Asserting the Preview of Amazon SageMaker Profiler: Observe and visualize detailed {hardware} efficiency information on your mannequin coaching workloads

At this time, we’re happy to announce the preview of Amazon SageMaker Profiler, a functionality of Amazon SageMaker that gives an in depth view into the AWS compute assets provisioned throughout coaching deep studying fashions on SageMaker. With SageMaker Profiler, you possibly can observe all actions on CPUs and GPUs, similar to CPU and GPU utilizations, kernel runs on GPUs, kernel launches on CPUs, sync operations, reminiscence operations throughout GPUs, latencies between kernel launches and corresponding runs, and information switch between CPUs and GPUs. On this submit, we stroll you thru the capabilities of SageMaker Profiler.
SageMaker Profiler supplies Python modules for annotating PyTorch or TensorFlow coaching scripts and activating SageMaker Profiler. It additionally provides a consumer interface (UI) that visualizes the profile, a statistical abstract of profiled occasions, and the timeline of a coaching job for monitoring and understanding the time relationship of the occasions between GPUs and CPUs.
The necessity for profiling coaching jobs
With the rise of deep studying (DL), machine studying (ML) has change into compute and information intensive, usually requiring multi-node, multi-GPU clusters. As state-of-the-art fashions develop in measurement within the order of trillions of parameters, their computational complexity and price additionally improve quickly. ML practitioners have to deal with widespread challenges of environment friendly useful resource utilization when coaching such giant fashions. That is notably evident in giant language fashions (LLMs), which usually have billions of parameters and due to this fact require giant multi-node GPU clusters to be able to practice them effectively.
When coaching these fashions on giant compute clusters, we will encounter compute useful resource optimization challenges similar to I/O bottlenecks, kernel launch latencies, reminiscence limits, and low useful resource utilizations. If the coaching job configuration is just not optimized, these challenges can lead to inefficient {hardware} utilization and longer coaching instances or incomplete coaching runs, which improve the general prices and timelines for the undertaking.
Conditions
The next are the stipulations to begin utilizing SageMaker Profiler:
- A SageMaker area in your AWS account – For directions on establishing a website, see Onboard to Amazon SageMaker Domain using quick setup. You additionally want so as to add area consumer profiles for particular person customers to entry the SageMaker Profiler UI utility. For extra data, see Add and remove SageMaker Domain user profiles.
- Permissions – The next checklist is the minimal set of permissions that needs to be assigned to the execution function for utilizing the SageMaker Profiler UI utility:
sagemaker:CreateAppsagemaker:DeleteAppsagemaker:DescribeTrainingJobsagemaker:SearchTrainingJobss3:GetObjects3:ListBucket
Put together and run a coaching job with SageMaker Profiler
To start out capturing kernel runs on GPUs whereas the coaching job is working, modify your coaching script utilizing the SageMaker Profiler Python modules. Import the library and add the start_profiling() and stop_profiling() strategies to outline the start and the tip of profiling. You too can use non-obligatory customized annotations so as to add markers within the coaching script to visualise {hardware} actions throughout explicit operations in every step.
There are two approaches that you may take to profile your coaching scripts with SageMaker Profiler. The primary method is predicated on profiling full capabilities; the second method is predicated on profiling particular code traces in capabilities.
To profile by capabilities, use the context supervisor smppy.annotate to annotate full capabilities. The next instance script reveals learn how to implement the context supervisor to wrap the coaching loop and full capabilities in every iteration:
You too can use smppy.annotation_begin() and smppy.annotation_end() to annotate particular traces of code in capabilities. For extra data, confer with documentation.
Configure the SageMaker coaching job launcher
After you’re achieved annotating and establishing the profiler initiation modules, save the coaching script and put together the SageMaker framework estimator for coaching utilizing the SageMaker Python SDK.
- Arrange a
profiler_configobject utilizing theProfilerConfigandProfilermodules as follows: - Create a SageMaker estimator with the
profiler_configobject created within the earlier step. The next code reveals an instance of making a PyTorch estimator:
If you wish to create a TensorFlow estimator, import sagemaker.tensorflow.TensorFlow as a substitute, and specify one of many TensorFlow variations supported by SageMaker Profiler. For extra details about supported frameworks and occasion varieties, see Supported frameworks.
- Begin the coaching job by working the match technique:
Launch the SageMaker Profiler UI
When the coaching job is full, you possibly can launch the SageMaker Profiler UI to visualise and discover the profile of the coaching job. You’ll be able to entry the SageMaker Profiler UI utility via the SageMaker Profiler touchdown web page on the SageMaker console or via the SageMaker area.
To launch the SageMaker Profiler UI utility on the SageMaker console, full the next steps:
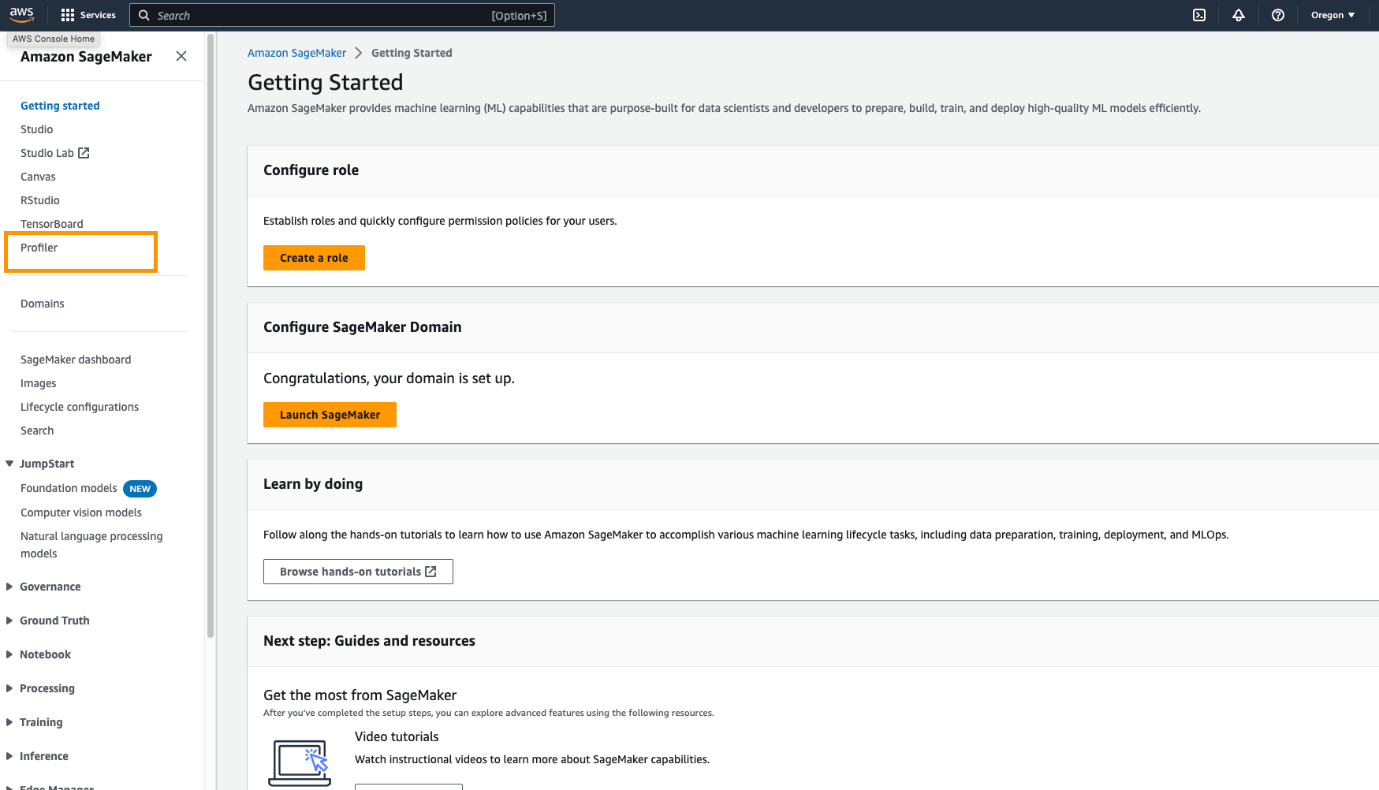
- On the SageMaker console, select Profiler within the navigation pane.
- Below Get began, choose the area by which you wish to launch the SageMaker Profiler UI utility.
In case your consumer profile solely belongs to 1 area, you’ll not see the choice for choosing a website.
- Choose the consumer profile for which you wish to launch the SageMaker Profiler UI utility.
If there isn’t any consumer profile within the area, select Create consumer profile. For extra details about creating a brand new consumer profile, see Add and Remove User Profiles.
- Select Open Profiler.
You too can launch the SageMaker Profiler UI from the domain details page.
Acquire insights from the SageMaker Profiler
While you open the SageMaker Profiler UI, the Choose and cargo a profile web page opens, as proven within the following screenshot.

You’ll be able to view an inventory of all of the coaching jobs which were submitted to SageMaker Profiler and seek for a selected coaching job by its identify, creation time, and run standing (In Progress, Accomplished, Failed, Stopped, or Stopping). To load a profile, choose the coaching job you wish to view and select Load. The job identify ought to seem within the Loaded profile part on the prime.
Select the job identify to generate the dashboard and timeline. Word that if you select the job, the UI routinely opens the dashboard. You’ll be able to load and visualize one profile at a time. To load one other profile, it’s essential to first unload the beforehand loaded profile. To unload a profile, select the trash bin icon within the Loaded profile part.
For this submit, we view the profile of an ALBEF coaching job on two ml.p4d.24xlarge situations.
After you end loading and deciding on the coaching job, the UI opens the Dashboard web page, as proven within the following screenshot.
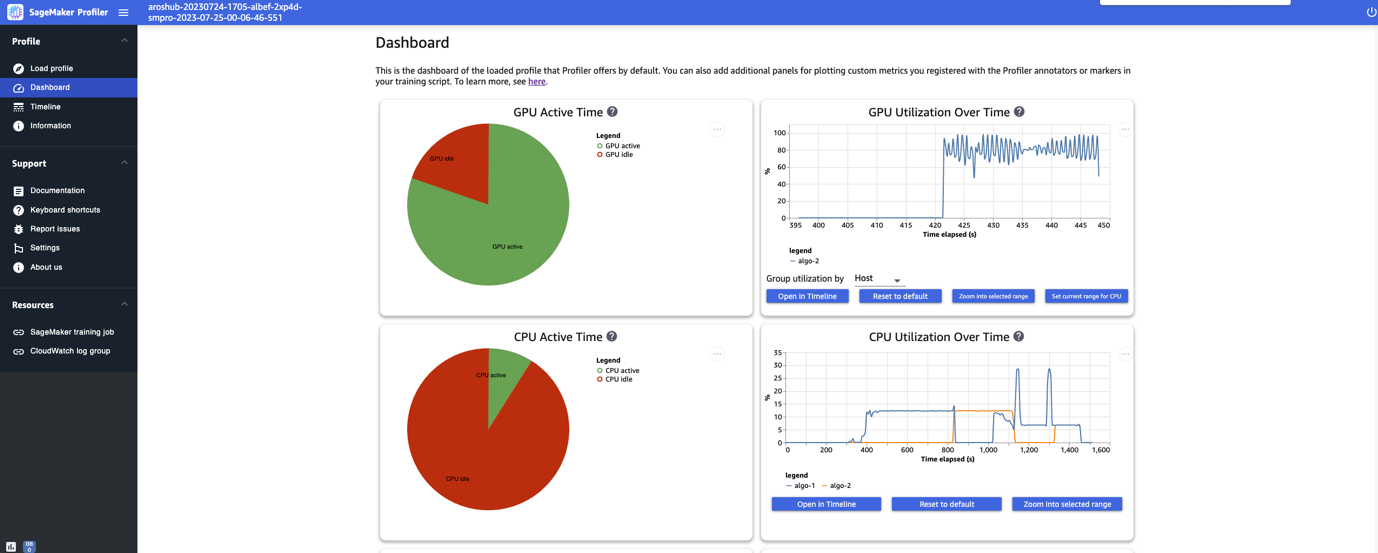
You’ll be able to see the plots for key metrics, specifically the GPU lively time, GPU utilization over time, CPU lively time, and CPU utilization over time. The GPU lively time pie chart reveals the share of GPU lively time vs. GPU idle time, which permits us to test if the GPUs are extra lively than idle all through your entire coaching job. The GPU utilization over time timeline graph reveals the typical GPU utilization price over time per node, aggregating all of the nodes in a single chart. You’ll be able to test if the GPUs have an unbalanced workload, under-utilization points, bottlenecks, or idle points throughout sure time intervals. For extra particulars on decoding these metrics, confer with documentation.
The dashboard supplies you with further plots, together with time spent by all GPU kernels, time spent by the highest 15 GPU kernels, launch counts of all GPU kernels, and launch counts of the highest 15 GPU kernels, as proven within the following screenshot.
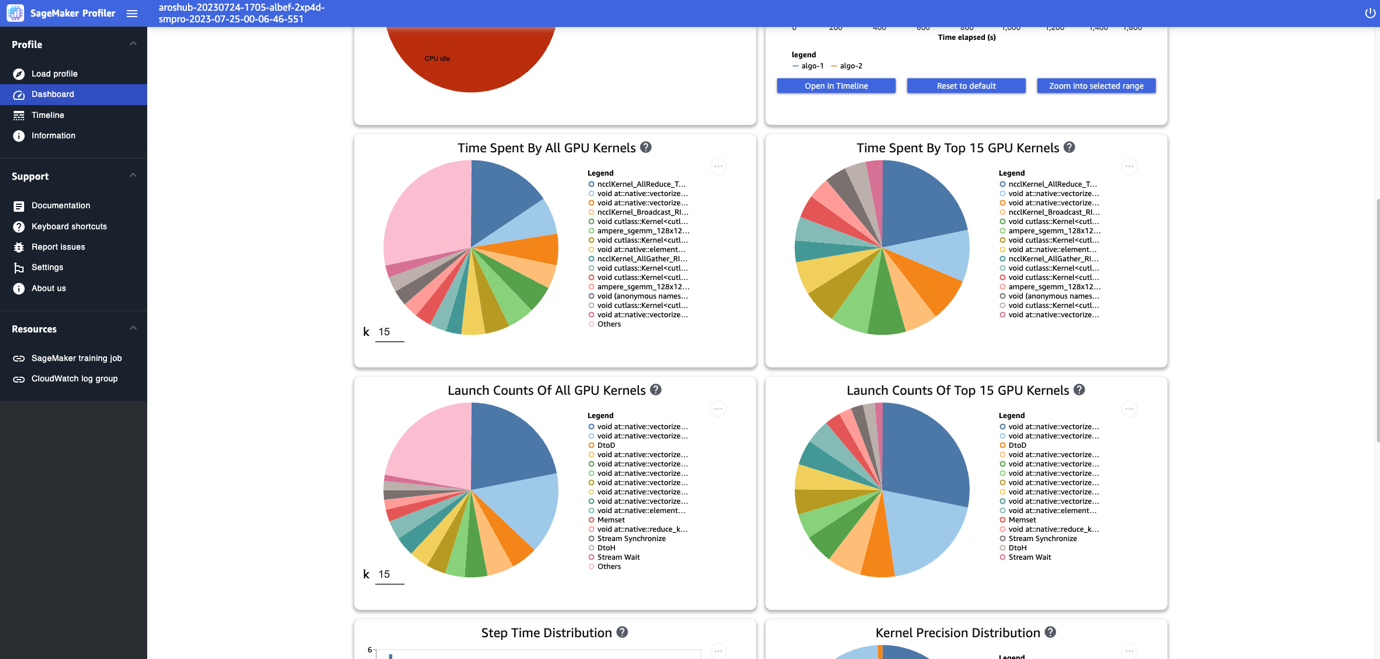
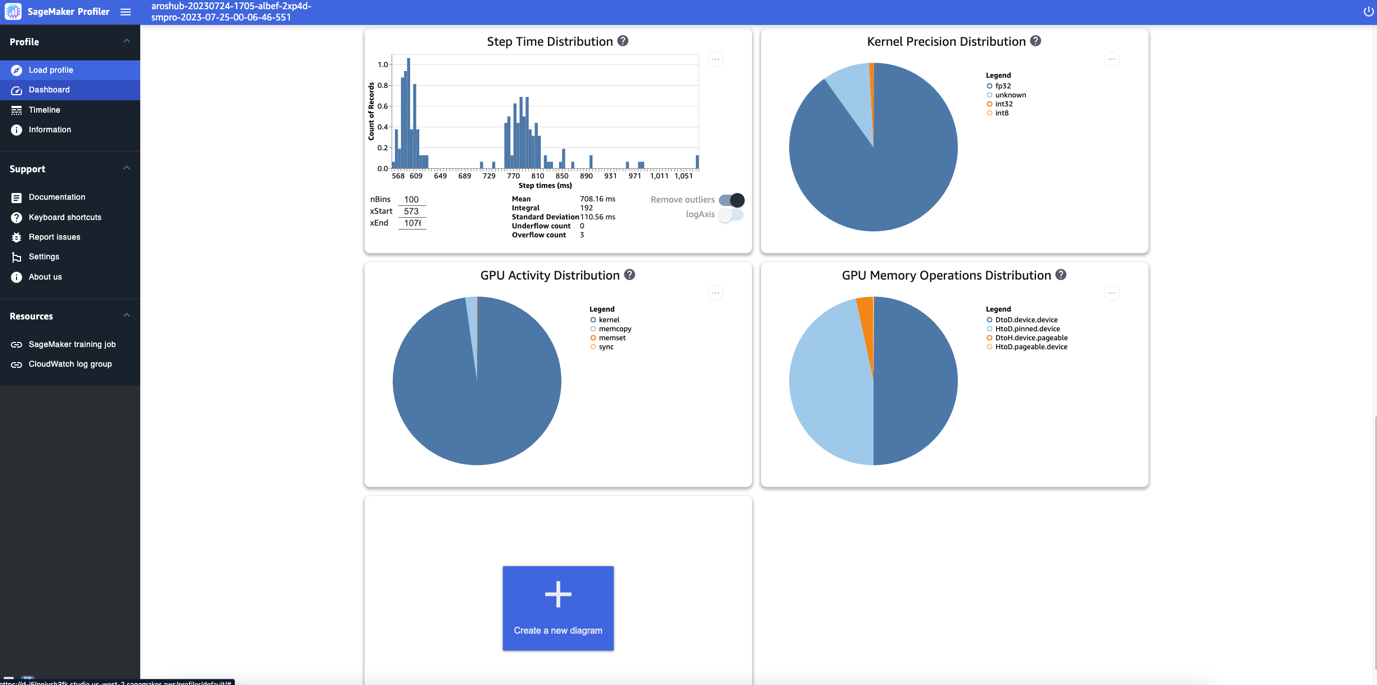
Lastly, the dashboard lets you visualize further metrics, such because the step time distribution, which is a histogram that reveals the distribution of step durations on GPUs, and the kernel precision distribution pie chart, which reveals the share of time spent on working kernels in several information varieties similar to FP32, FP16, INT32, and INT8.
You too can receive a pie chart on the GPU exercise distribution that reveals the share of time spent on GPU actions, similar to working kernels, reminiscence (memcpy and memset), and synchronization (sync). You’ll be able to visualize the share of time spent on GPU reminiscence operations from the GPU reminiscence operations distribution pie chart.
You too can create your individual histograms primarily based on a customized metric that you just annotated manually as described earlier on this submit. When including a customized annotation to a brand new histogram, choose or enter the identify of the annotation you added within the coaching script.
Timeline interface
The SageMaker Profiler UI additionally features a timeline interface, which supplies you with an in depth view into the compute assets on the degree of operations and kernels scheduled on the CPUs and run on the GPUs. The timeline is organized in a tree construction, providing you with data from the host degree to the gadget degree, as proven within the following screenshot.
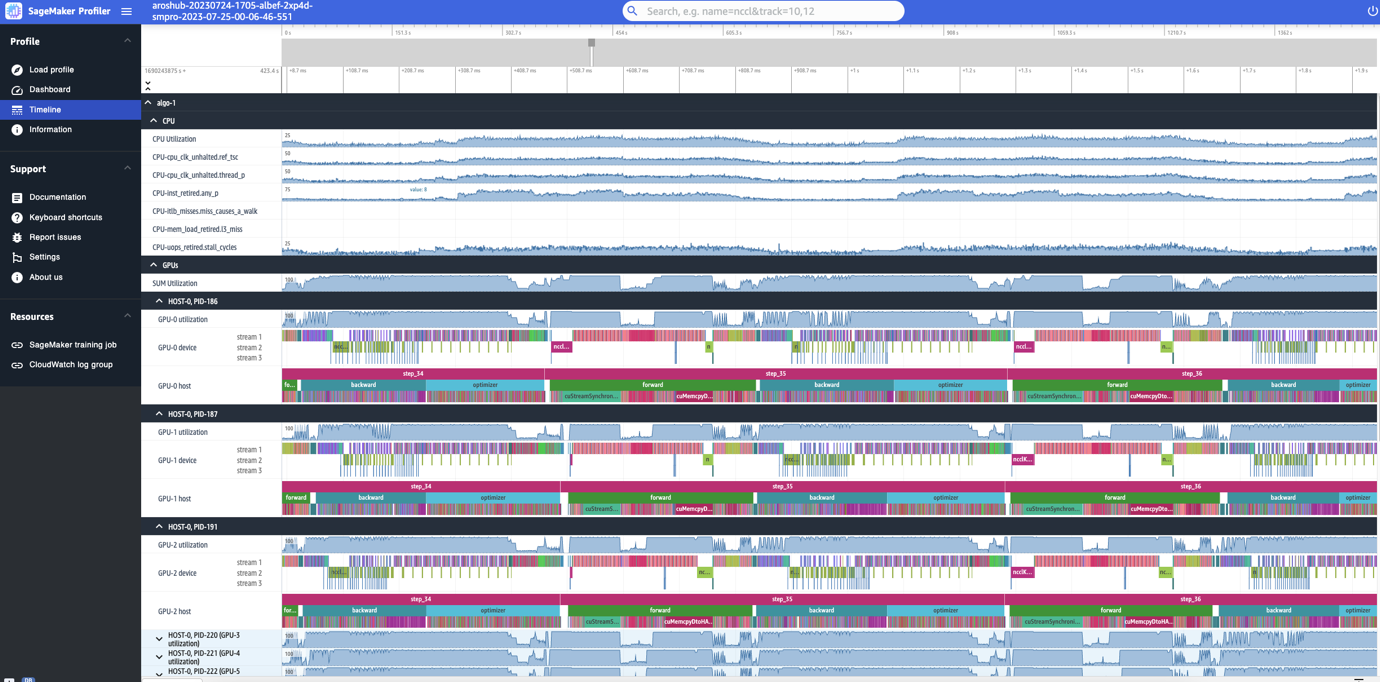
For every CPU, you possibly can observe the CPU efficiency counters, similar to clk_unhalted_ref.tsc and itlb_misses.miss_causes_a_walk. For every GPU on the 2x p4d.24xlarge occasion, you possibly can see a number timeline and a tool timeline. Kernel launches are on the host timeline and kernel runs are on the gadget timeline.
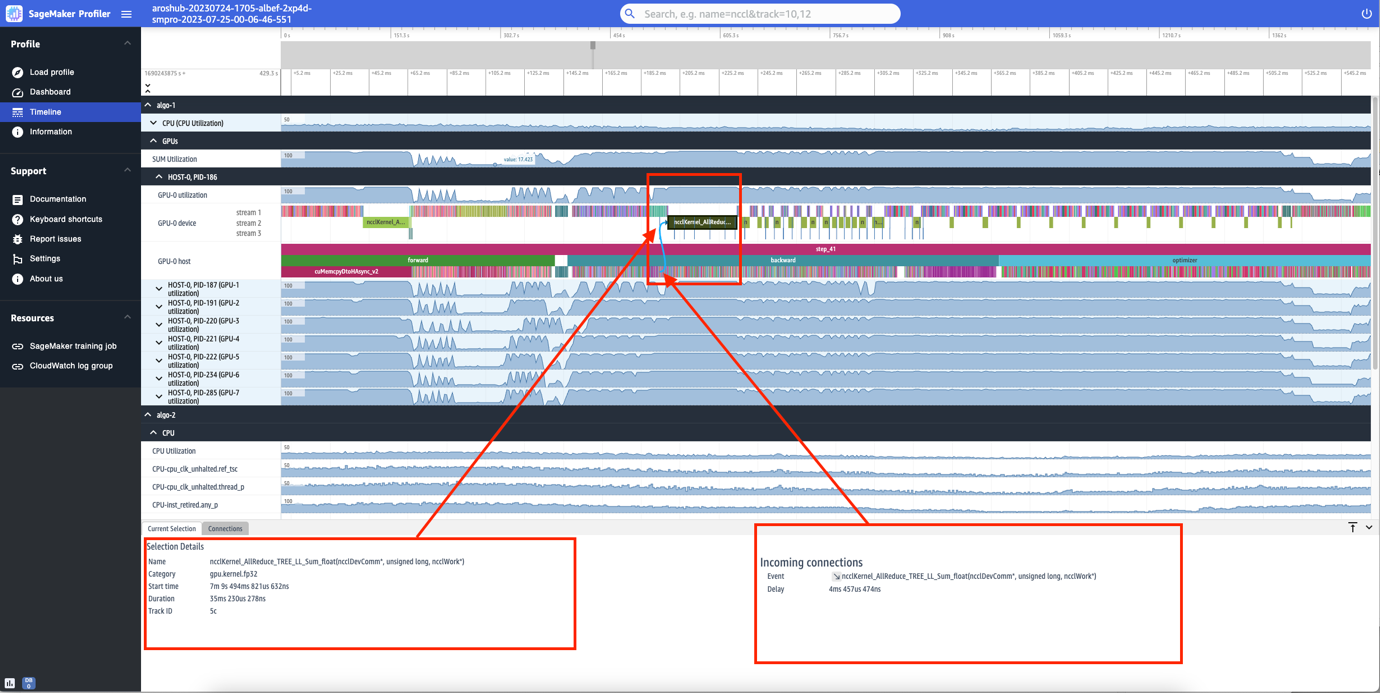
You too can zoom in to the person steps. Within the following screenshot, we now have zoomed in to step_41. The timeline strip chosen within the following screenshot is the AllReduce operation, a vital communication and synchronization step in distributed coaching, run on GPU-0. Within the screenshot, observe that the kernel launch within the GPU-0 host connects to the kernel run within the GPU-0 gadget stream 1, indicated with the arrow in cyan.
Availability and issues
SageMaker Profiler is accessible in PyTorch (model 2.0.0 and 1.13.1) and TensorFlow (model 2.12.0 and a couple of.11.1). The next desk supplies the hyperlinks to the supported AWS Deep Learning Containers for SageMaker.
| Framework | Model | AWS DLC Picture URI |
| PyTorch | 2.0.0 | 763104351884.dkr.ecr.<area>.amazonaws.com/pytorch-training:2.0.0-gpu-py310-cu118-ubuntu20.04-sagemaker |
| PyTorch | 1.13.1 | 763104351884.dkr.ecr.<area>.amazonaws.com/pytorch-training:1.13.1-gpu-py39-cu117-ubuntu20.04-sagemaker |
| TensorFlow | 2.12.0 | 763104351884.dkr.ecr.<area>.amazonaws.com/tensorflow-training:2.12.0-gpu-py310-cu118-ubuntu20.04-sagemaker |
| TensorFlow | 2.11.1 | 763104351884.dkr.ecr.<area>.amazonaws.com/tensorflow-training:2.11.1-gpu-py39-cu112-ubuntu20.04-sagemaker |
SageMaker Profiler is at present accessible within the following Areas: US East (Ohio, N. Virginia), US West (Oregon), and Europe (Frankfurt, Eire).
SageMaker Profiler is accessible within the coaching occasion varieties ml.p4d.24xlarge, ml.p3dn.24xlarge, and ml.g4dn.12xlarge.
For the total checklist of supported frameworks and variations, confer with documentation.
SageMaker Profiler incurs costs after the SageMaker Free Tier or the free trial interval of the function ends. For extra data, see Amazon SageMaker Pricing.
Efficiency of SageMaker Profiler
We in contrast the overhead of SageMaker Profiler in opposition to numerous open-source profilers. The baseline used for the comparability was obtained from working the coaching job with no profiler.
Our key discovering revealed that SageMaker Profiler typically resulted in a shorter billable coaching period as a result of it had much less overhead time on the end-to-end coaching runs. It additionally generated much less profiling information (as much as 10 instances much less) compared in opposition to open-source options. The smaller profiling artifacts generated by SageMaker Profiler require much less storage, thereby additionally saving on prices.
Conclusion
SageMaker Profiler lets you get detailed insights into the utilization of compute assets when coaching your deep studying fashions. This may allow you to resolve efficiency hotspots and bottlenecks to make sure environment friendly useful resource utilization that will finally drive down coaching prices and cut back the general coaching period.
To get began with SageMaker Profiler, confer with documentation.
In regards to the Authors
 Roy Allela is a Senior AI/ML Specialist Options Architect at AWS primarily based in Munich, Germany. Roy helps AWS prospects—from small startups to giant enterprises—practice and deploy giant language fashions effectively on AWS. Roy is keen about computational optimization issues and bettering the efficiency of AI workloads.
 Sushant Moon is a Information Scientist at AWS, India, specializing in guiding prospects via their AI/ML endeavors. With a various background spanning retail, finance, and insurance coverage domains, he delivers revolutionary and tailor-made options. Past his skilled life, Sushant finds rejuvenation in swimming and seeks inspiration from his travels to various locales.
 Diksha Sharma is an AI/ML Specialist Options Architect within the Worldwide Specialist Group. She works with public sector prospects to assist them architect environment friendly, safe, and scalable machine studying functions together with generative AI options on AWS. In her spare time, Diksha likes to learn, paint, and spend time along with her household.