Enhance accuracy of Amazon Rekognition Face Search with person vectors

In varied industries, comparable to monetary providers, telecommunications, and healthcare, prospects use a digital identification course of, which normally includes a number of steps to confirm end-users throughout on-line onboarding or step-up authentication. An instance of 1 step that can be utilized is face search, which will help decide whether or not a brand new end-user’s face matches these related to an current account.
Constructing an correct face search system includes a number of steps. The system should be capable to detect human faces in photographs, extract the faces into vector representations, retailer face vectors in a database, and examine new faces in opposition to current entries. Amazon Rekognition makes this easy by supplying you with pre-trained fashions which are invoked by way of easy API calls.
Amazon Rekognition allows you to obtain very excessive face search accuracy with a single face picture. In some instances, you need to use a number of photographs of the identical particular person’s face to create person vectors and enhance accuracy even additional. That is particularly useful when photographs have variations in lighting, poses, and appearances.
On this submit, we show use the Amazon Rekognition Face Search APIs with person vectors to extend the similarity rating for true matches and reduce the similarity rating for true non-matches.
We examine the outcomes of performing face matching with and with out person vectors.
Amazon Rekognition face matching
Amazon Rekognition face matching permits measuring the similarity of a face vector extracted from one picture to a face vector extracted from one other picture. A pair of face photographs is claimed to be a true match if each photographs comprise the face of the identical particular person, and a true non-match in any other case. Amazon Rekognition returns a rating for the similarity of the supply and goal faces. The minimal similarity rating is 0, implying little or no similarity, and the utmost is 100.
For evaluating a supply face with a group of goal faces (1:N matching), Amazon Rekognition permits you to create a Assortment object and populate it with faces from photographs utilizing API calls.
When including a face to a group, Amazon Rekognition doesn’t retailer the precise picture of the face however relatively the face vector, a mathematical illustration of the face. With the SearchFaces API, you’ll be able to examine a supply face with one or a number of collections of goal faces.
In June 2023, AWS launched user vectors, a new capability that significantly improves face search accuracy through the use of a number of face photographs of a person. Now, you’ll be able to create person vectors, which mixture a number of face vectors of the identical person. Person vectors supply increased face search accuracy with extra strong depictions, as a result of they comprise various levels of lighting, sharpness, pose, look, and extra. This improves the accuracy in comparison with looking in opposition to particular person face vectors.
Within the following sections, we define the method of utilizing Amazon Rekognition person vectors. We information you thru creating a group, storing face vectors in that assortment, aggregating these face vectors into person vectors, after which evaluating the outcomes of looking in opposition to these particular person face vectors and person vectors.
Resolution overview
For this resolution, we use an Amazon Rekognition assortment of customers, every with its related listed face vectors from numerous completely different photographs of faces for every person.
Let’s have a look at the workflow to construct a group with customers and faces:
- Create an Amazon Rekognition assortment.
- For every person, create a person within the assortment.
- For every picture of the person, add the face to the gathering (IndexFaces, which returns face ID corresponding to every face vector).
- Affiliate all listed face IDs with the person (that is essential for person vectors).
Then, we’ll examine the next workflows:
Looking out with a brand new given enter picture in opposition to particular person face vectors in our assortment:
- Get all faces from a picture (DetectFaces).
- For every face, examine in opposition to particular person faces in our assortment (SearchFacesByImage).
Looking out with a brand new given enter picture in opposition to person vectors in our assortment:
- Get all faces from a picture (DetectFaces).
- For every face, examine to the person vector (SearchUsersByImage).
Now let’s describe the answer in particulars.
Conditions
Add the next coverage to your AWS Identity and Access Management (IAM) person or position. The coverage grants you permission to the related Amazon Rekognition APIs and permits entry to an Amazon Simple Storage Service (Amazon S3) bucket to retailer the photographs:
Create an Amazon Rekognition assortment and add customers and faces
First, we create an S3 bucket to retailer customers’ photographs. We arrange the bucket by making a folder for every person that incorporates their private photographs. Our images folder seems to be like the next construction:
Our S3 bucket has a listing for every person that shops their photographs. There are at present two folders, and every incorporates a number of photographs. You may add extra folders to your customers, every containing a number of photographs to be listed.
Subsequent, we create our Amazon Rekognition assortment. We’ve provided helpers.py, which incorporates completely different strategies that we use:
- create_collection – Create a brand new assortment
- delete_collection – Delete a group
- create_user – Create a brand new person in a group
- add_faces_to_collection – Add faces to assortment
- associate_faces – Affiliate face_ids to a person in a group
- get_subdirs – Get all subdirectories beneath the S3 prefix
- get_files – Get all information beneath the S3 prefix
The next is an instance technique for creating an Amazon Rekognition assortment:
Create the gathering with the next code:
Subsequent, let’s add the face vectors into our assortment and mixture them into person vectors.
For every person within the S3 listing, we create a person vector within the assortment. Then we index the face photographs for every person into the gathering as particular person face vectors, which generates face IDs. Lastly, we affiliate the face IDs to the suitable person vector.
This creates two sorts of vectors in our assortment:
- Particular person face vectors
- Person vectors, that are constructed primarily based on the face vector IDs provided utilizing the tactic
associate_faces
See the next code:
We use the next strategies:
- get_subdirs – Returns a listing of all of the customers’ directories. In our instance, the worth is [Swami,Werner].
- get_files – Returns all the photographs information beneath the S3 prefix for the person.
- face_ids – It is a checklist containing all of the face IDs belonging to a person. We use this checklist when calling the AssociateFaces API.
As defined earlier, you’ll be able to add extra customers by including folders for them (the folder dictates the person ID) and add your photographs in that folder (no ordering is required for the information).
Now that the environment is ready up and we’ve got each particular person face vectors and person vectors, let’s examine our search high quality in opposition to every of them. To try this, we use a brand new photograph with a number of folks and try to match their faces in opposition to our assortment, first in opposition to the person face vectors after which in opposition to the person vectors.
Face search of picture in opposition to a group of particular person face vectors
To go looking in opposition to our particular person face vectors, we use the Amazon Rekognition SearchFacesByImage API. This operate makes use of a supply face picture to look in opposition to particular person face vectors in our assortment and returns faces that match our outlined similarity rating threshold.
An essential consideration is that the SearchFacesByImage API will solely function on the most important face detected within the picture. If a number of faces are current, that you must crop every particular person face and cross it individually to the tactic for identification.
For extracting faces particulars from a picture (comparable to their location on the picture), we use the Amazon Rekognition DetectFaces API.
The next detect_faces_in_image technique detects faces in a picture. For every face, it performs the next actions:
- Print its bounding field location
- Crop the face from the picture and verify if such face exists within the assortment and print the person or ‘Unknown’
- Print the similarity rating
The instance Python code makes use of the Pillow library for doing the picture manipulations (comparable to printing, drawing, and cropping).
We use a similarity rating threshold of 99%, which is a typical setting for identification verification use instances.
Run the next code:
file_key is the S3 object key we need to match in opposition to our assortment. We’ve provided an instance picture (photograph.jpeg) beneath the photographs folder.
The next picture exhibits our outcomes.

Utilizing a threshold of 99%, just one particular person was recognized. Dr. Werner Vogels was flagged as Unknown. If we run the identical code utilizing a decrease threshold of 90 (set threshold=90), we get the next outcomes.

Now we see Dr. Werner Vogel’s face has a similarity rating of 96.86%. Subsequent, let’s verify if we will get the similarity rating above our outlined threshold through the use of person vectors.
Face search of picture in opposition to a group of person vectors
To go looking in opposition to our person vectors, we use the Amazon Rekognition SearchUsersByImage API. This operate makes use of a supply face picture to look in opposition to person vectors in our assortment and returns customers that match our outlined similarity rating threshold.
The identical consideration is related right here – the SearchUsersByImage API will solely function on the most important face detected within the picture. If there are a number of faces current, that you must crop every particular person face and cross it individually to the tactic for identification.
For extracting faces particulars from a picture (comparable to their location on the picture), we use the Amazon Rekognition DetectFaces API.
The next detect_users_in_image technique detects faces in a picture. For every face, it performs the next actions:
- Print its bounding field location
- Crop the face from the picture and verify if such person face exists in our assortment and print the person or ‘Unknown’
- Print the similarity rating
See the next code:
The operate returns a modified picture with the outcomes that may be saved to Amazon S3 or printed. The operate additionally outputs statistics in regards to the estimated ages of the faces to the terminal.
Run the next code:
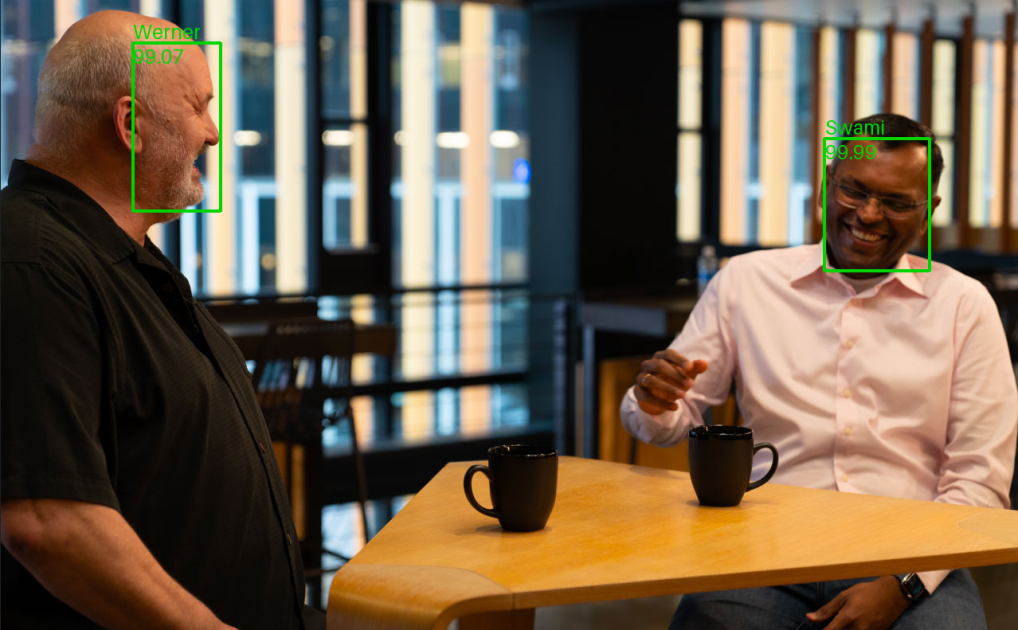
The next picture exhibits our outcomes.

The customers that exist in our assortment have been recognized appropriately with excessive similarity (over 99%).
We have been in a position to enhance the similarity rating through the use of three face vectors per person vector. As we enhance the variety of face vectors used, we count on the similarity rating for true matches to additionally enhance. You should use as much as 100 face vectors per person vector.
An end-to-end instance code could be discovered within the GitHub repository. It features a detailed Jupyter notebook that you would be able to run on Amazon SageMaker Studio (or different alternate options).
Clear up
To delete the gathering, use the next code:
Conclusion
On this submit, we introduced use Amazon Rekognition person vectors to implement face search in opposition to a group of customers’ faces. We demonstrated enhance face search accuracy through the use of a number of face photographs per person and in contrast it in opposition to particular person face vectors. Moreover, we described how you need to use the completely different Amazon Rekognition APIs to detect faces. The offered instance code serves as a stable basis for developing a purposeful face search system.
For extra details about Amazon Rekognition person vectors, check with Searching faces in a collection. If you happen to’re new to Amazon Rekognition, you need to use our Free Tier, which lasts 12 months and consists of processing 5,000 photographs monthly and storing 1,000 person vector objects monthly.
In regards to the Authors
 Arik Porat is a Senior Startups Options Architect at Amazon Net Providers. He works with startups to assist them construct and design their options within the cloud, and is obsessed with machine studying and container-based options. In his spare time, Arik likes to play chess and video video games.
 Eliran Efron is a Startups Options Architect at Amazon Net Providers. Eliran is an information and compute fanatic, helping startups designing their system architectures. In his spare time, Eliran likes to construct and race vehicles in Touring races and construct IoT gadgets.