Promote pipelines in a multi-environment setup utilizing Amazon SageMaker Mannequin Registry, HashiCorp Terraform, GitHub, and Jenkins CI/CD
Constructing out a machine studying operations (MLOps) platform within the quickly evolving panorama of synthetic intelligence (AI) and machine studying (ML) for organizations is crucial for seamlessly bridging the hole between knowledge science experimentation and deployment whereas assembly the necessities round mannequin efficiency, safety, and compliance.
In an effort to fulfill regulatory and compliance necessities, the important thing necessities when designing such a platform are:
- Deal with knowledge drift
- Monitor mannequin efficiency
- Facilitate automated mannequin retraining
- Present a course of for mannequin approval
- Preserve fashions in a safe setting
On this publish, we present find out how to create an MLOps framework to handle these wants whereas utilizing a mixture of AWS companies and third-party toolsets. The answer entails a multi-environment setup with automated mannequin retraining, batch inference, and monitoring with Amazon SageMaker Model Monitor, mannequin versioning with SageMaker Model Registry, and a CI/CD pipeline to facilitate promotion of ML code and pipelines throughout environments through the use of Amazon SageMaker, Amazon EventBridge, Amazon Simple Notification Service (Amazon S3), HashiCorp Terraform, GitHub, and Jenkins CI/CD. We construct a mannequin to foretell the severity (benign or malignant) of a mammographic mass lesion educated with the XGBoost algorithm utilizing the publicly obtainable UCI Mammography Mass dataset and deploy it utilizing the MLOps framework. The complete directions with code can be found within the GitHub repository.
Resolution overview
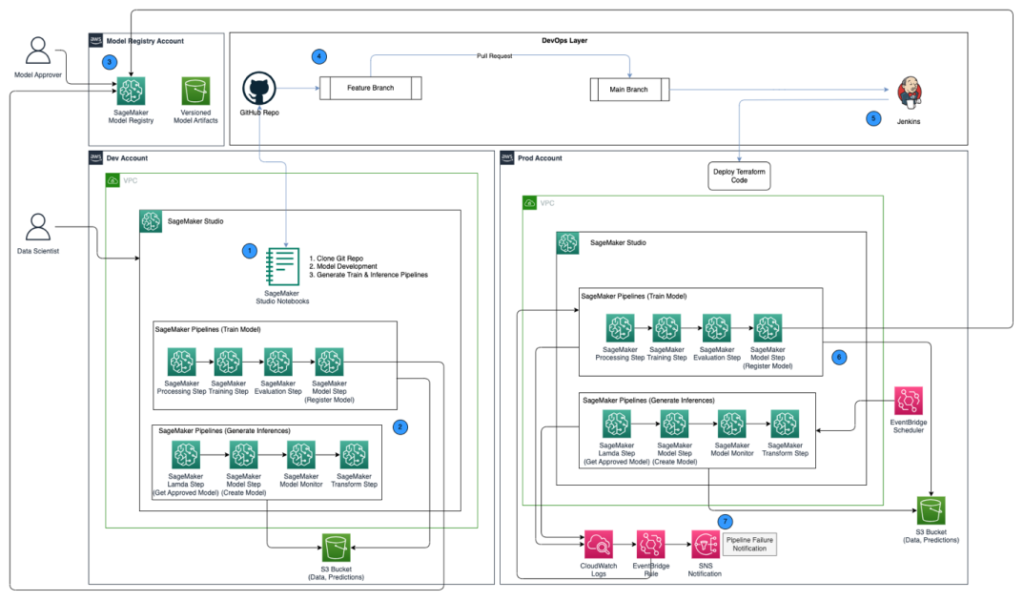
The next structure diagram reveals an outline of the MLOps framework with the next key elements:
- Multi account technique – Two totally different environments (dev and prod) are arrange in two totally different AWS accounts following the AWS Effectively-Architected greatest practices, and a 3rd account is ready up within the central mannequin registry:
- Dev setting – The place an Amazon SageMaker Studio domain is ready as much as enable mannequin growth, mannequin coaching, and testing of ML pipelines (prepare and inference), earlier than a mannequin is able to be promoted to increased environments.
- Prod setting – The place the ML pipelines from dev are promoted to as a primary step, and scheduled and monitored over time.
- Central mannequin registry – Amazon SageMaker Model Registry is ready up in a separate AWS account to trace mannequin variations generated throughout the dev and prod environments.
- CI/CD and supply management – The deployment of ML pipelines throughout environments is dealt with by way of CI/CD arrange with Jenkins, together with model management dealt with by way of GitHub. Code adjustments merged to the corresponding setting git department triggers a CI/CD workflow to make applicable adjustments to the given goal setting.
- Batch predictions with mannequin monitoring – The inference pipeline constructed with Amazon SageMaker Pipelines runs on a scheduled foundation to generate predictions together with mannequin monitoring utilizing SageMaker Mannequin Monitor to detect knowledge drift.
- Automated retraining mechanism – The coaching pipeline constructed with SageMaker Pipelines is triggered each time a knowledge drift is detected within the inference pipeline. After it’s educated, the mannequin is registered into the central mannequin registry to be accepted by a mannequin approver. When it’s accepted, the up to date mannequin model is used to generate predictions by way of the inference pipeline.
- Infrastructure as code – The infrastructure as code (IaC), created utilizing HashiCorp Terraform, helps the scheduling of the inference pipeline with EventBridge, triggering of the prepare pipeline primarily based on an EventBridge rule and sending notifications utilizing Amazon Simple Notification Service (Amazon SNS) topics.

The MLOps workflow contains the next steps:
- Entry the SageMaker Studio area within the growth account, clone the GitHub repository, undergo the method of mannequin growth utilizing the pattern mannequin supplied, and generate the prepare and inference pipelines.
- Run the prepare pipeline within the growth account, which generates the mannequin artifacts for the educated mannequin model and registers the mannequin into SageMaker Mannequin Registry within the central mannequin registry account.
- Approve the mannequin in SageMaker Mannequin Registry within the central mannequin registry account.
- Push the code (prepare and inference pipelines, and the Terraform IaC code to create the EventBridge schedule, EventBridge rule, and SNS matter) right into a characteristic department of the GitHub repository. Create a pull request to merge the code into the primary department of the GitHub repository.
- Set off the Jenkins CI/CD pipeline, which is ready up with the GitHub repository. The CI/CD pipeline deploys the code into the prod account to create the prepare and inference pipelines together with Terraform code to provision the EventBridge schedule, EventBridge rule, and SNS matter.
- The inference pipeline is scheduled to run each day, whereas the prepare pipeline is ready as much as run each time knowledge drift is detected from the inference pipeline.
- Notifications are despatched by way of the SNS matter each time there’s a failure with both the prepare or inference pipeline.
Stipulations
For this resolution, you need to have the next conditions:
- Three AWS accounts (dev, prod, and central mannequin registry accounts)
- A SageMaker Studio area arrange in every of the three AWS accounts (see Onboard to Amazon SageMaker Studio or watch the video Onboard Quickly to Amazon SageMaker Studio for setup directions)
- Jenkins (we use Jenkins 2.401.1) with administrative privileges put in on AWS
- Terraform model 1.5.5 or later put in on Jenkins server
For this publish, we work within the us-east-1 Area to deploy the answer.
Provision KMS keys in dev and prod accounts
Our first step is to create AWS Key Management Service (AWS KMS) keys within the dev and prod accounts.
Create a KMS key within the dev account and provides entry to the prod account
Full the next steps to create a KMS key within the dev account:
- On the AWS KMS console, select Buyer managed keys within the navigation pane.
- Select Create key.
- For Key kind, choose Symmetric.
- For Key utilization, choose Encrypt and decrypt.
- Select Subsequent.

- Enter the manufacturing account quantity to offer the manufacturing account entry to the KMS key provisioned within the dev account. It is a required step as a result of the primary time the mannequin is educated within the dev account, the mannequin artifacts are encrypted with the KMS key earlier than being written to the S3 bucket within the central mannequin registry account. The manufacturing account wants entry to the KMS key with a view to decrypt the mannequin artifacts and run the inference pipeline.
- Select Subsequent and end creating your key.

After the bottom line is provisioned, it needs to be seen on the AWS KMS console.

Create a KMS key within the prod account
Undergo the identical steps within the earlier part to create a buyer managed KMS key within the prod account. You’ll be able to skip the step to share the KMS key to a different account.
Arrange a mannequin artifacts S3 bucket within the central mannequin registry account
Create an S3 bucket of your alternative with the string sagemaker within the naming conference as a part of the bucket’s title within the central mannequin registry account, and replace the bucket coverage on the S3 bucket to offer permissions from each the dev and prod accounts to learn and write mannequin artifacts into the S3 bucket.
The next code is the bucket coverage to be up to date on the S3 bucket:
Arrange IAM roles in your AWS accounts
The following step is to arrange AWS Identity and Access Management (IAM) roles in your AWS accounts with permissions for AWS Lambda, SageMaker, and Jenkins.
Lambda execution function
Arrange Lambda execution roles within the dev and prod accounts, which will likely be utilized by the Lambda perform run as a part of the SageMaker Pipelines Lambda step. This step will run from the inference pipeline to fetch the most recent accepted mannequin, utilizing which inferences are generated. Create IAM roles within the dev and prod accounts with the naming conference arn:aws:iam::<account-id>:function/lambda-sagemaker-role and connect the next IAM insurance policies:
- Coverage 1 – Create an inline coverage named
cross-account-model-registry-access, which provides entry to the mannequin package deal arrange within the mannequin registry within the central account: - Coverage 2 – Connect AmazonSageMakerFullAccess, which is an AWS managed policy that grants full entry to SageMaker. It additionally supplies choose entry to associated companies, akin to AWS Application Auto Scaling, Amazon S3, Amazon Elastic Container Registry (Amazon ECR), and Amazon CloudWatch Logs.
- Coverage 3 – Connect AWSLambda_FullAccess, which is an AWS managed coverage that grants full entry to Lambda, Lambda console options, and different associated AWS companies.
- Coverage 4 – Use the next IAM belief coverage for the IAM function:
SageMaker execution function
The SageMaker Studio domains arrange within the dev and prod accounts ought to every have an execution function related, which could be discovered on the Area settings tab on the area particulars web page, as proven within the following screenshot. This function is used to run coaching jobs, processing jobs, and extra throughout the SageMaker Studio area.

Add the next insurance policies to the SageMaker execution function in each accounts:
- Coverage 1 – Create an inline coverage named
cross-account-model-artifacts-s3-bucket-access, which provides entry to the S3 bucket within the central mannequin registry account, which shops the mannequin artifacts: - Coverage 2 – Create an inline coverage named
cross-account-model-registry-access, which provides entry to the mannequin package deal within the mannequin registry within the central mannequin registry account: - Coverage 3 – Create an inline coverage named
kms-key-access-policy, which provides entry to the KMS key created within the earlier step. Present the account ID by which the coverage is being created and the KMS key ID created in that account. - Coverage 4 – Connect AmazonSageMakerFullAccess, which is an AWS managed policy that grants full entry to SageMaker and choose entry to associated companies.
- Coverage 5 – Connect AWSLambda_FullAccess, which is an AWS managed coverage that grants full entry to Lambda, Lambda console options, and different associated AWS companies.
- Coverage 6 – Connect CloudWatchEventsFullAccess, which is an AWS managed coverage that grants full entry to CloudWatch Occasions.
- Coverage 7 – Add the next IAM belief coverage for the SageMaker execution IAM function:
- Coverage 8 (particular to the SageMaker execution function within the prod account) – Create an inline coverage named
cross-account-kms-key-access-policy, which provides entry to the KMS key created within the dev account. That is required for the inference pipeline to learn mannequin artifacts saved within the central mannequin registry account the place the mannequin artifacts are encrypted utilizing the KMS key from the dev account when the primary model of the mannequin is created from the dev account.
Cross-account Jenkins function
Arrange an IAM function referred to as cross-account-jenkins-role within the prod account, which Jenkins will assume to deploy ML pipelines and corresponding infrastructure into the prod account.
Add the next managed IAM insurance policies to the function:
CloudWatchFullAccessAmazonS3FullAccessAmazonSNSFullAccessAmazonSageMakerFullAccessAmazonEventBridgeFullAccessAWSLambda_FullAccess
Replace the belief relationship on the function to offer permissions to the AWS account internet hosting the Jenkins server:
Replace permissions on the IAM function related to the Jenkins server
Assuming that Jenkins has been arrange on AWS, replace the IAM function related to Jenkins so as to add the next insurance policies, which is able to give Jenkins entry to deploy the sources into the prod account:
- Coverage 1 – Create the next inline coverage named
assume-production-role-policy: - Coverage 2 – Connect the
CloudWatchFullAccessmanaged IAM coverage.
Arrange the mannequin package deal group within the central mannequin registry account
From the SageMaker Studio area within the central mannequin registry account, create a mannequin package deal group referred to as mammo-severity-model-package utilizing the next code snippet (which you’ll run utilizing a Jupyter pocket book):
Arrange entry to the mannequin package deal for IAM roles within the dev and prod accounts
Provision entry to the SageMaker execution roles created within the dev and prod accounts so you possibly can register mannequin variations throughout the mannequin package deal mammo-severity-model-package within the central mannequin registry from each accounts. From the SageMaker Studio area within the central mannequin registry account, run the next code in a Jupyter pocket book:
Arrange Jenkins
On this part, we configure Jenkins to create the ML pipelines and the corresponding Terraform infrastructure within the prod account by way of the Jenkins CI/CD pipeline.
- On the CloudWatch console, create a log group named
jenkins-logthroughout the prod account to which Jenkins will push logs from the CI/CD pipeline. The log group needs to be created in the identical Area as the place the Jenkins server is ready up.
- Install the following plugins in your Jenkins server:
- Arrange AWS credentials in Jenkins utilizing the cross-account IAM function (
cross-account-jenkins-role) provisioned within the prod account.
- For System Configuration, select AWS.

- Present the credentials and CloudWatch log group you created earlier.

- Arrange GitHub credentials inside Jenkins.

- Create a brand new challenge in Jenkins.
- Enter a challenge title and select Pipeline.

- On the Common tab, choose GitHub challenge and enter the forked GitHub repository URL.
- Choose This challenge is parameterized.
- On the Add Parameter menu, select String Parameter.

- For Identify, enter
prodAccount. - For Default Worth, enter the prod account ID.

- Below Superior Challenge Choices, for Definition, choose Pipeline script from SCM.
- For SCM, select Git.

- For Repository URL, enter the forked GitHub repository URL.
- For Credentials, enter the GitHub credentials saved in Jenkins.
- Enter
principalwithin the Branches to construct part, primarily based on which the CI/CD pipeline will likely be triggered.
- For Script Path, enter
Jenkinsfile. - Select Save.

The Jenkins pipeline needs to be created and visual in your dashboard.

Provision S3 buckets, accumulate and put together knowledge
Full the next steps to arrange your S3 buckets and knowledge:
- Create an S3 bucket of your alternative with the string
sagemakerwithin the naming conference as a part of the bucket’s title in each dev and prod accounts to retailer datasets and mannequin artifacts. - Arrange an S3 bucket to take care of the Terraform state within the prod account.
- Obtain and save the publicly obtainable UCI Mammography Mass dataset to the S3 bucket you created earlier within the dev account.
- Fork and clone the GitHub repository throughout the SageMaker Studio area within the dev account. The repo has the next folder construction:
- /environments – Configuration script for prod setting
- /mlops-infra – Code for deploying AWS companies utilizing Terraform code
- /pipelines – Code for SageMaker pipeline elements
- Jenkinsfile – Script to deploy by way of Jenkins CI/CD pipeline
- setup.py – Wanted to put in the required Python modules and create the run-pipeline command
- mammography-severity-modeling.ipynb – Lets you create and run the ML workflow
- Create a folder referred to as knowledge throughout the cloned GitHub repository folder and save a duplicate of the publicly obtainable UCI Mammography Mass dataset.
- Comply with the Jupyter pocket book
mammography-severity-modeling.ipynb. - Run the next code within the pocket book to preprocess the dataset and add it to the S3 bucket within the dev account:
The code will generate the next datasets:
-
- knowledge/ mammo-train-dataset-part1.csv – Will probably be used to coach the primary model of mannequin.
- knowledge/ mammo-train-dataset-part2.csv – Will probably be used to coach the second model of mannequin together with the mammo-train-dataset-part1.csv dataset.
- knowledge/mammo-batch-dataset.csv – Will probably be used to generate inferences.
- knowledge/mammo-batch-dataset-outliers.csv – Will introduce outliers into the dataset to fail the inference pipeline. This may allow us to check the sample to set off automated retraining of the mannequin.
- Add the dataset
mammo-train-dataset-part1.csvbeneath the prefixmammography-severity-model/train-dataset, and add the datasetsmammo-batch-dataset.csvandmammo-batch-dataset-outliers.csvto the prefixmammography-severity-model/batch-datasetof the S3 bucket created within the dev account: - Add the datasets
mammo-train-dataset-part1.csvandmammo-train-dataset-part2.csvbeneath the prefixmammography-severity-model/train-datasetinto the S3 bucket created within the prod account by way of the Amazon S3 console.
- Add the datasets
mammo-batch-dataset.csvandmammo-batch-dataset-outliers.csvto the prefixmammography-severity-model/batch-datasetof the S3 bucket within the prod account.
Run the prepare pipeline
Below <project-name>/pipelines/prepare, you possibly can see the next Python scripts:
- scripts/raw_preprocess.py – Integrates with SageMaker Processing for characteristic engineering
- scripts/evaluate_model.py – Permits mannequin metrics calculation, on this case
auc_score - train_pipeline.py – Comprises the code for the mannequin coaching pipeline
Full the next steps:
- Add the scripts into Amazon S3:
- Get the prepare pipeline occasion:
- Submit the prepare pipeline and run it:
The next determine reveals a profitable run of the coaching pipeline. The ultimate step within the pipeline registers the mannequin within the central mannequin registry account.

Approve the mannequin within the central mannequin registry
Log in to the central mannequin registry account and entry the SageMaker mannequin registry throughout the SageMaker Studio area. Change the mannequin model standing to Authorised.

As soon as accepted, the standing needs to be modified on the mannequin model.

Run the inference pipeline (Optionally available)
This step just isn’t required however you possibly can nonetheless run the inference pipeline to generate predictions within the dev account.
Below <project-name>/pipelines/inference, you possibly can see the next Python scripts:
- scripts/lambda_helper.py – Pulls the most recent accepted mannequin model from the central mannequin registry account utilizing a SageMaker Pipelines Lambda step
- inference_pipeline.py – Comprises the code for the mannequin inference pipeline
Full the next steps:
- Add the script to the S3 bucket:
- Get the inference pipeline occasion utilizing the traditional batch dataset:
- Submit the inference pipeline and run it:
The next determine reveals a profitable run of the inference pipeline. The ultimate step within the pipeline generates the predictions and shops them within the S3 bucket. We use MonitorBatchTransformStep to observe the inputs into the batch rework job. If there are any outliers, the inference pipeline goes right into a failed state.

Run the Jenkins pipeline
The setting/ folder throughout the GitHub repository accommodates the configuration script for the prod account. Full the next steps to set off the Jenkins pipeline:
- Replace the config script
prod.tfvars.jsonprimarily based on the sources created within the earlier steps: - As soon as up to date, push the code into the forked GitHub repository and merge the code into principal department.
- Go to the Jenkins UI, select Construct with Parameters, and set off the CI/CD pipeline created within the earlier steps.

When the construct is full and profitable, you possibly can log in to the prod account and see the prepare and inference pipelines throughout the SageMaker Studio area.


Moreover, you will note three EventBridge guidelines on the EventBridge console within the prod account:
- Schedule the inference pipeline
- Ship a failure notification on the prepare pipeline
- When the inference pipeline fails to set off the prepare pipeline, ship a notification

Lastly, you will note an SNS notification matter on the Amazon SNS console that sends notifications by way of e-mail. You’ll get an e-mail asking you to verify the acceptance of those notification emails.

Check the inference pipeline utilizing a batch dataset with out outliers
To check if the inference pipeline is working as anticipated within the prod account, we are able to log in to the prod account and set off the inference pipeline utilizing the batch dataset with out outliers.
Run the pipeline by way of the SageMaker Pipelines console within the SageMaker Studio area of the prod account, the place the transform_input would be the S3 URI of the dataset with out outliers (s3://<s3-bucket-in-prod-account>/mammography-severity-model/knowledge/mammo-batch-dataset.csv).

The inference pipeline succeeds and writes the predictions again to the S3 bucket.

Check the inference pipeline utilizing a batch dataset with outliers
You’ll be able to run the inference pipeline utilizing the batch dataset with outliers to test if the automated retraining mechanism works as anticipated.
Run the pipeline by way of the SageMaker Pipelines console within the SageMaker Studio area of the prod account, the place the transform_input would be the S3 URI of the dataset with outliers (s3://<s3-bucket-in-prod-account>/mammography-severity-model/knowledge/mammo-batch-dataset-outliers.csv).

The inference pipeline fails as anticipated, which triggers the EventBridge rule, which in flip triggers the prepare pipeline.

After a number of moments, you need to see a brand new run of the prepare pipeline on the SageMaker Pipelines console, which picks up the 2 totally different prepare datasets (mammo-train-dataset-part1.csv and mammo-train-dataset-part2.csv) uploaded to the S3 bucket to retrain the mannequin.

Additionally, you will see a notification despatched to the e-mail subscribed to the SNS matter.

To make use of the up to date mannequin model, log in to the central mannequin registry account and approve the mannequin model, which will likely be picked up in the course of the subsequent run of the inference pipeline triggered by way of the scheduled EventBridge rule.
Though the prepare and inference pipelines use a static dataset URL, you possibly can have the dataset URL handed to the prepare and inference pipelines as dynamic variables with a view to use up to date datasets to retrain the mannequin and generate predictions in a real-world situation.
Clear up
To keep away from incurring future expenses, full the next steps:
- Take away the SageMaker Studio area throughout all of the AWS accounts.
- Delete all of the sources created outdoors SageMaker, together with the S3 buckets, IAM roles, EventBridge guidelines, and SNS matter arrange by way of Terraform within the prod account.
- Delete the SageMaker pipelines created throughout accounts utilizing the AWS Command Line Interface (AWS CLI).
Conclusion
Organizations typically must align with enterprise-wide toolsets to allow collaboration throughout totally different useful areas and groups. This collaboration ensures that your MLOps platform can adapt to evolving enterprise wants and accelerates the adoption of ML throughout groups. This publish defined find out how to create an MLOps framework in a multi-environment setup to allow automated mannequin retraining, batch inference, and monitoring with Amazon SageMaker Mannequin Monitor, mannequin versioning with SageMaker Mannequin Registry, and promotion of ML code and pipelines throughout environments with a CI/CD pipeline. We showcased this resolution utilizing a mixture of AWS companies and third-party toolsets. For directions on implementing this resolution, see the GitHub repository. You too can prolong this resolution by bringing in your individual knowledge sources and modeling frameworks.
Concerning the Authors
 Gayatri Ghanakota is a Sr. Machine Studying Engineer with AWS Skilled Providers. She is obsessed with creating, deploying, and explaining AI/ ML options throughout numerous domains. Previous to this function, she led a number of initiatives as a knowledge scientist and ML engineer with high world companies within the monetary and retail house. She holds a grasp’s diploma in Pc Science specialised in Knowledge Science from the College of Colorado, Boulder.
 Sunita Koppar is a Sr. Knowledge Lake Architect with AWS Skilled Providers. She is obsessed with fixing buyer ache factors processing huge knowledge and offering long-term scalable options. Previous to this function, she developed merchandise in web, telecom, and automotive domains, and has been an AWS buyer. She holds a grasp’s diploma in Knowledge Science from the College of California, Riverside.
 Saswata Sprint is a DevOps Marketing consultant with AWS Skilled Providers. She has labored with prospects throughout healthcare and life sciences, aviation, and manufacturing. She is obsessed with all issues automation and has complete expertise in designing and constructing enterprise-scale buyer options in AWS. Outdoors of labor, she pursues her ardour for images and catching sunrises.