Construct and deploy ML inference functions from scratch utilizing Amazon SageMaker
As machine studying (ML) goes mainstream and beneficial properties wider adoption, ML-powered inference functions have gotten more and more frequent to resolve a variety of complicated enterprise issues. The answer to those complicated enterprise issues usually requires utilizing a number of ML fashions and steps. This put up exhibits you easy methods to construct and host an ML software with customized containers on Amazon SageMaker.
Amazon SageMaker affords built-in algorithms and pre-built SageMaker docker photographs for mannequin deployment. However, if these don’t suit your wants, you possibly can convey your individual containers (BYOC) for internet hosting on Amazon SageMaker.
There are a number of use circumstances the place customers would possibly must BYOC for internet hosting on Amazon SageMaker.
- Customized ML frameworks or libraries: If you happen to plan on utilizing a ML framework or libraries that aren’t supported by Amazon SageMaker built-in algorithms or pre-built containers, you then’ll must create a customized container.
- Specialised fashions: For sure domains or industries, it’s possible you’ll require particular mannequin architectures or tailor-made preprocessing steps that aren’t obtainable in built-in Amazon SageMaker choices.
- Proprietary algorithms: If you happen to’ve developed your individual proprietary algorithms inhouse, you then’ll want a customized container to deploy them on Amazon SageMaker.
- Complicated inference pipelines: In case your ML inference workflow entails customized enterprise logic — a sequence of complicated steps that have to be executed in a selected order — then BYOC will help you handle and orchestrate these steps extra effectively.
Answer overview
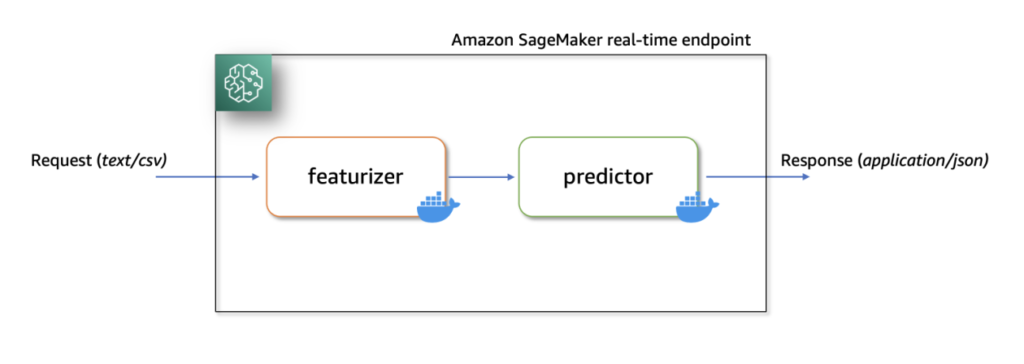
On this resolution, we present easy methods to host a ML serial inference software on Amazon SageMaker with real-time endpoints utilizing two customized inference containers with newest scikit-learn and xgboost packages.
The primary container makes use of a scikit-learn mannequin to rework uncooked knowledge into featurized columns. It applies StandardScaler for numerical columns and OneHotEncoder to categorical ones.
The second container hosts a pretrained XGboost mannequin (i.e., predictor). The predictor mannequin accepts the featurized enter and outputs predictions.
Lastly, we deploy the featurizer and predictor in a serial-inference pipeline to an Amazon SageMaker real-time endpoint.
Listed here are few totally different concerns as to why it’s possible you’ll need to have separate containers inside your inference software.
- Decoupling – Numerous steps of the pipeline have a clearly outlined function and have to be run on separate containers as a result of underlying dependencies concerned. This additionally helps preserve the pipeline properly structured.
- Frameworks – Numerous steps of the pipeline use particular fit-for-purpose frameworks (comparable to scikit or Spark ML) and due to this fact have to be run on separate containers.
- Useful resource isolation – Numerous steps of the pipeline have various useful resource consumption necessities and due to this fact have to be run on separate containers for extra flexibility and management.
- Upkeep and upgrades – From an operational standpoint, this promotes practical isolation and you’ll proceed to improve or modify particular person steps way more simply, with out affecting different fashions.
Moreover, native construct of the person containers helps within the iterative strategy of improvement and testing with favourite instruments and Built-in Growth Environments (IDEs). As soon as the containers are prepared, you should use deploy them to the AWS cloud for inference utilizing Amazon SageMaker endpoints.
Full implementation, together with code snippets, is on the market on this Github repository here.

Conditions
As we check these customized containers regionally first, we’ll want docker desktop put in in your native laptop. You ought to be conversant in constructing docker containers.
You’ll additionally want an AWS account with entry to Amazon SageMaker, Amazon ECR and Amazon S3 to check this software end-to-end.
Guarantee you’ve got the newest model of Boto3 and the Amazon SageMaker Python packages put in:
Answer Walkthrough
Construct customized featurizer container
To construct the primary container, the featurizer container, we prepare a scikit-learn mannequin to course of uncooked options within the abalone dataset. The preprocessing script makes use of SimpleImputer for dealing with lacking values, StandardScaler for normalizing numerical columns, and OneHotEncoder for reworking categorical columns. After becoming the transformer, we save the mannequin in joblib format. We then compress and add this saved mannequin artifact to an Amazon Easy Storage Service (Amazon S3) bucket.
Right here’s a pattern code snippet that demonstrates this. Confer with featurizer.ipynb for full implementation:
Subsequent, to create a customized inference container for the featurizer mannequin, we construct a Docker picture with nginx, gunicorn, flask packages, together with different required dependencies for the featurizer mannequin.
Nginx, gunicorn and the Flask app will function the mannequin serving stack on Amazon SageMaker real-time endpoints.
When bringing customized containers for internet hosting on Amazon SageMaker, we have to make sure that the inference script performs the next duties after being launched contained in the container:
- Mannequin loading: Inference script (
preprocessing.py) ought to discuss with/decide/ml/mannequinlisting to load the mannequin within the container. Mannequin artifacts in Amazon S3 shall be downloaded and mounted onto the container on the path/decide/ml/mannequin. - Surroundings variables: To go customized atmosphere variables to the container, you could specify them in the course of the Model creation step or throughout Endpoint creation from a coaching job.
- API necessities: The Inference script should implement each
/pingand/invocationsroutes as a Flask software. The/pingAPI is used for well being checks, whereas the/invocationsAPI handles inference requests. - Logging: Output logs within the inference script have to be written to plain output (stdout) and customary error (stderr) streams. These logs are then streamed to Amazon CloudWatch by Amazon SageMaker.
Right here’s a snippet from preprocessing.py that present the implementation of /ping and /invocations.
Confer with preprocessing.py below the featurizer folder for full implementation.
Construct Docker picture with featurizer and mannequin serving stack
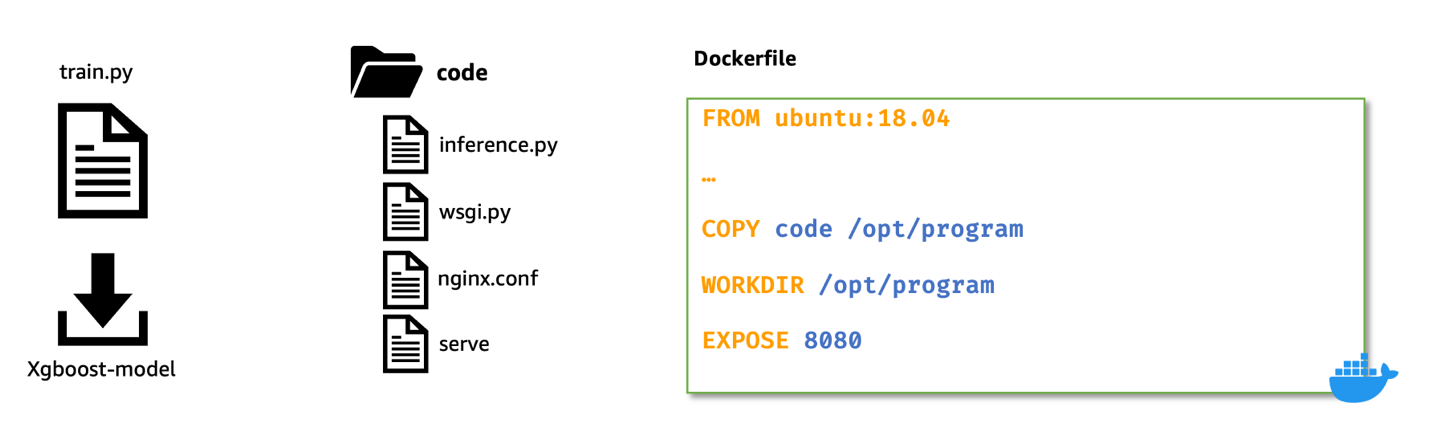
Let’s now construct a Dockerfile utilizing a customized base picture and set up required dependencies.
For this, we use python:3.9-slim-buster as the bottom picture. You may change this another base picture related to your use case.
We then copy the nginx configuration, gunicorn’s internet server gateway file, and the inference script to the container. We additionally create a python script known as serve that launches nginx and gunicorn processes within the background and units the inference script (i.e., preprocessing.py Flask software) because the entry level for the container.
Right here’s a snippet of the Dockerfile for internet hosting the featurizer mannequin. For full implementation discuss with Dockerfile below featurizer folder.
Take a look at customized inference picture with featurizer regionally
Now, construct and check the customized inference container with featurizer regionally, utilizing Amazon SageMaker local mode. Native mode is ideal for testing your processing, coaching, and inference scripts with out launching any jobs on Amazon SageMaker. After confirming the outcomes of your native assessments, you possibly can simply adapt the coaching and inference scripts for deployment on Amazon SageMaker with minimal modifications.
To check the featurizer customized picture regionally, first construct the picture utilizing the beforehand outlined Dockerfile. Then, launch a container by mounting the listing containing the featurizer mannequin (preprocess.joblib) to the /decide/ml/mannequin listing contained in the container. Moreover, map port 8080 from container to the host.
As soon as launched, you possibly can ship inference requests to http://localhost:8080/invocations.
To construct and launch the container, open a terminal and run the next instructions.
Word that it’s best to substitute the <IMAGE_NAME>, as proven within the following code, with the picture identify of your container.
The next command additionally assumes that the educated scikit-learn mannequin (preprocess.joblib) is current below a listing known as fashions.
After the container is up and operating, we will check each the /ping and /invocations routes utilizing curl instructions.
Run the beneath instructions from a terminal
When uncooked (untransformed) knowledge is distributed to http://localhost:8080/invocations, the endpoint responds with remodeled knowledge.
You need to see response one thing just like the next:
We now terminate the operating container, after which tag and push the native customized picture to a personal Amazon Elastic Container Registry (Amazon ECR) repository.
See the next instructions to login to Amazon ECR, which tags the native picture with full Amazon ECR picture path after which push the picture to Amazon ECR. Make sure you substitute area and account variables to match your atmosphere.
Confer with create a repository and push an image to Amazon ECR AWS Command Line Interface (AWS CLI) instructions for extra data.
Optionally available step
Optionally, you may carry out a reside check by deploying the featurizer mannequin to a real-time endpoint with the customized docker picture in Amazon ECR. Confer with featurizer.ipynb pocket book for full implementation of buiding, testing, and pushing the customized picture to Amazon ECR.
Amazon SageMaker initializes the inference endpoint and copies the mannequin artifacts to the /decide/ml/mannequin listing contained in the container. See How SageMaker Loads your Model artifacts.
Construct customized XGBoost predictor container
For constructing the XGBoost inference container we comply with comparable steps as we did whereas constructing the picture for featurizer container:
- Obtain pre-trained
XGBoostmannequin from Amazon S3. - Create the
inference.pyscript that hundreds the pretrainedXGBoostmannequin, converts the remodeled enter knowledge obtained from featurizer, and converts toXGBoost.DMatrixformat, runspredicton the booster, and returns predictions in json format. - Scripts and configuration information that kind the mannequin serving stack (i.e.,
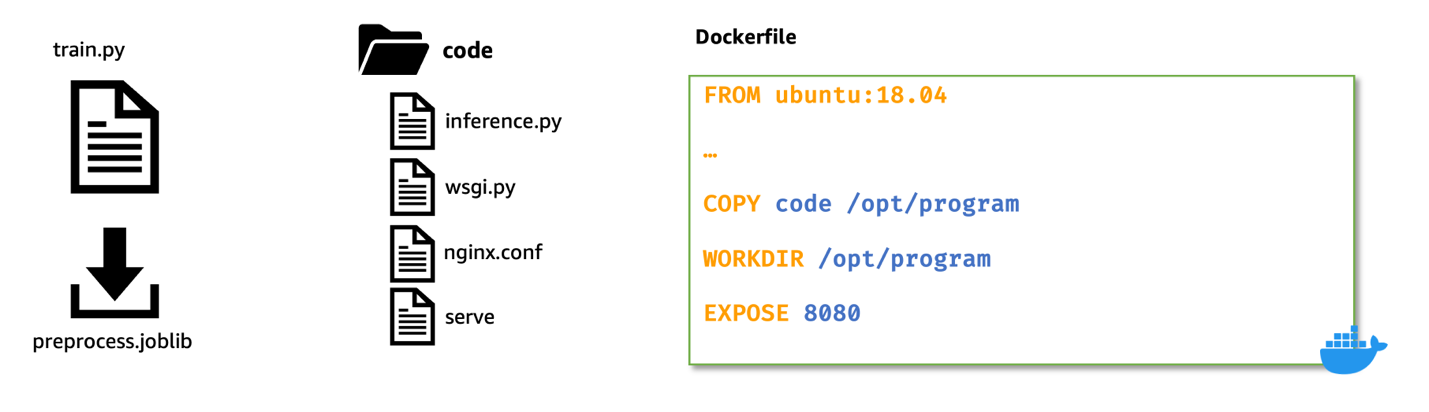
nginx.conf,wsgi.py, andservestay the identical and wishes no modification. - We use
Ubuntu:18.04as the bottom picture for the Dockerfile. This isn’t a prerequisite. We use the ubuntu base picture to reveal that containers may be constructed with any base picture. - The steps for constructing the client docker picture, testing the picture regionally, and pushing the examined picture to Amazon ECR stay the identical as earlier than.
For brevity, because the steps are comparable proven beforehand; nonetheless, we solely present the modified coding within the following.
First, the inference.py script. Right here’s a snippet that present the implementation of /ping and /invocations. Confer with inference.py below the predictor folder for full implementation of this file.
Right here’s a snippet of the Dockerfile for internet hosting the predictor mannequin. For full implementation discuss with Dockerfile below predictor folder.
We then proceed to construct, check, and push this practice predictor picture to a personal repository in Amazon ECR. Confer with predictor.ipynb pocket book for full implementation of constructing, testing and pushing the customized picture to Amazon ECR.
Deploy serial inference pipeline
After we have now examined each the featurizer and predictor photographs and have pushed them to Amazon ECR, we now add our mannequin artifacts to an Amazon S3 bucket.
Then, we create two mannequin objects: one for the featurizer (i.e., preprocess.joblib) and different for the predictor (i.e., xgboost-model) by specifying the customized picture uri we constructed earlier.
Right here’s a snippet that exhibits that. Confer with serial-inference-pipeline.ipynb for full implementation.
Now, to deploy these containers in a serial style, we first create a PipelineModel object and go the featurizer mannequin and the predictor mannequin to a python record object in the identical order.
Then, we name the .deploy() technique on the PipelineModel specifying the occasion kind and occasion depend.
At this stage, Amazon SageMaker deploys the serial inference pipeline to a real-time endpoint. We watch for the endpoint to be InService.
We will now check the endpoint by sending some inference requests to this reside endpoint.
Confer with serial-inference-pipeline.ipynb for full implementation.
Clear up
After you might be achieved testing, please comply with the directions within the cleanup part of the pocket book to delete the assets provisioned on this put up to keep away from pointless prices. Confer with Amazon SageMaker Pricing for particulars on the price of the inference cases.
Conclusion
On this put up, I confirmed how we will construct and deploy a serial ML inference software utilizing customized inference containers to real-time endpoints on Amazon SageMaker.
This resolution demonstrates how clients can convey their very own customized containers for internet hosting on Amazon SageMaker in a cost-efficient method. With BYOC choice, clients can rapidly construct and adapt their ML functions to be deployed on to Amazon SageMaker.
We encourage you to do that resolution with a dataset related to your enterprise Key Efficiency Indicators (KPIs). You may discuss with your entire resolution on this GitHub repository.
References
Concerning the Writer
 Praveen Chamarthi is a Senior AI/ML Specialist with Amazon Internet Companies. He’s obsessed with AI/ML and all issues AWS. He helps clients throughout the Americas to scale, innovate, and function ML workloads effectively on AWS. In his spare time, Praveen likes to learn and enjoys sci-fi motion pictures.