Prepare and deploy ML fashions in a multicloud atmosphere utilizing Amazon SageMaker

As prospects speed up their migrations to the cloud and remodel their enterprise, some discover themselves in conditions the place they need to handle IT operations in a multicloud atmosphere. For instance, you might need acquired an organization that was already working on a special cloud supplier, or you could have a workload that generates worth from distinctive capabilities offered by AWS. One other instance is impartial software program distributors (ISVs) that make their services obtainable in numerous cloud platforms to learn their finish prospects. Or a corporation could also be working in a Area the place a major cloud supplier is just not obtainable, and in an effort to meet the information sovereignty or knowledge residency necessities, they’ll use a secondary cloud supplier.
In these situations, as you begin to embrace generative AI, giant language fashions (LLMs) and machine studying (ML) applied sciences as a core a part of what you are promoting, you might be on the lookout for choices to make the most of AWS AI and ML capabilities outdoors of AWS in a multicloud atmosphere. For instance, you might wish to make use of Amazon SageMaker to construct and practice ML mannequin, or use Amazon SageMaker Jumpstart to deploy pre-built basis or third get together ML fashions, which you’ll be able to deploy on the click on of some buttons. Or you might wish to make the most of Amazon Bedrock to construct and scale generative AI functions, or you’ll be able to leverage AWS’ pre-trained AI services, which don’t require you to be taught machine studying expertise. AWS offers help for situations the place organizations wish to bring their own model to Amazon SageMaker or into Amazon SageMaker Canvas for predictions.
On this publish, we reveal one of many many choices that it’s important to make the most of AWS’s broadest and deepest set of AI/ML capabilities in a multicloud atmosphere. We present how one can construct and practice an ML mannequin in AWS and deploy the mannequin in one other platform. We practice the mannequin utilizing Amazon SageMaker, retailer the mannequin artifacts in Amazon Simple Storage Service (Amazon S3), and deploy and run the mannequin in Azure. This strategy is helpful should you use AWS companies for ML for its most complete set of options, but it is advisable to run your mannequin in one other cloud supplier in one of many conditions we’ve mentioned.
Key ideas
Amazon SageMaker Studio is a web-based, built-in improvement atmosphere (IDE) for machine studying. SageMaker Studio permits knowledge scientists, ML engineers, and knowledge engineers to arrange knowledge, construct, practice, and deploy ML fashions on one net interface. With SageMaker Studio, you’ll be able to entry purpose-built instruments for each stage of the ML improvement lifecycle, from knowledge preparation to constructing, coaching, and deploying your ML fashions, bettering knowledge science staff productiveness by as much as ten occasions. SageMaker Studio notebooks are fast begin, collaborative notebooks that combine with purpose-built ML instruments in SageMaker and different AWS companies.
SageMaker is a complete ML service enabling enterprise analysts, knowledge scientists, and MLOps engineers to construct, practice, and deploy ML fashions for any use case, no matter ML experience.
AWS offers Deep Learning Containers (DLCs) for well-liked ML frameworks reminiscent of PyTorch, TensorFlow, and Apache MXNet, which you should use with SageMaker for coaching and inference. DLCs can be found as Docker photos in Amazon Elastic Container Registry (Amazon ECR). The Docker photos are preinstalled and examined with the newest variations of well-liked deep studying frameworks in addition to different dependencies wanted for coaching and inference. For a whole listing of the pre-built Docker photos managed by SageMaker, see Docker Registry Paths and Example Code. Amazon ECR helps safety scanning, and is built-in with Amazon Inspector vulnerability administration service to fulfill your group’s picture compliance safety necessities, and to automate vulnerability evaluation scanning. Organizations may also use AWS Trainium and AWS Inferentia for higher price-performance for working ML coaching jobs or inference.
Resolution overview
On this part, we describe the best way to construct and practice a mannequin utilizing SageMaker and deploy the mannequin to Azure Capabilities. We use a SageMaker Studio pocket book to construct, practice, and deploy the mannequin. We practice the mannequin in SageMaker utilizing a pre-built Docker picture for PyTorch. Though we’re deploying the educated mannequin to Azure on this case, you can use the identical strategy to deploy the mannequin on different platforms reminiscent of on premises or different cloud platforms.
Once we create a coaching job, SageMaker launches the ML compute cases and makes use of our coaching code and the coaching dataset to coach the mannequin. It saves the ensuing mannequin artifacts and different output in an S3 bucket that we specify as enter to the coaching job. When mannequin coaching is full, we use the Open Neural Network Exchange (ONNX) runtime library to export the PyTorch mannequin as an ONNX mannequin.
Lastly, we deploy the ONNX mannequin together with a customized inference code written in Python to Azure Capabilities utilizing the Azure CLI. ONNX helps a lot of the commonly used ML frameworks and tools. One factor to notice is that changing an ML mannequin to ONNX is helpful if you wish to wish to use a special goal deployment framework, reminiscent of PyTorch to TensorFlow. Should you’re utilizing the identical framework on each the supply and goal, you don’t have to convert the mannequin to ONNX format.
The next diagram illustrates the structure for this strategy.
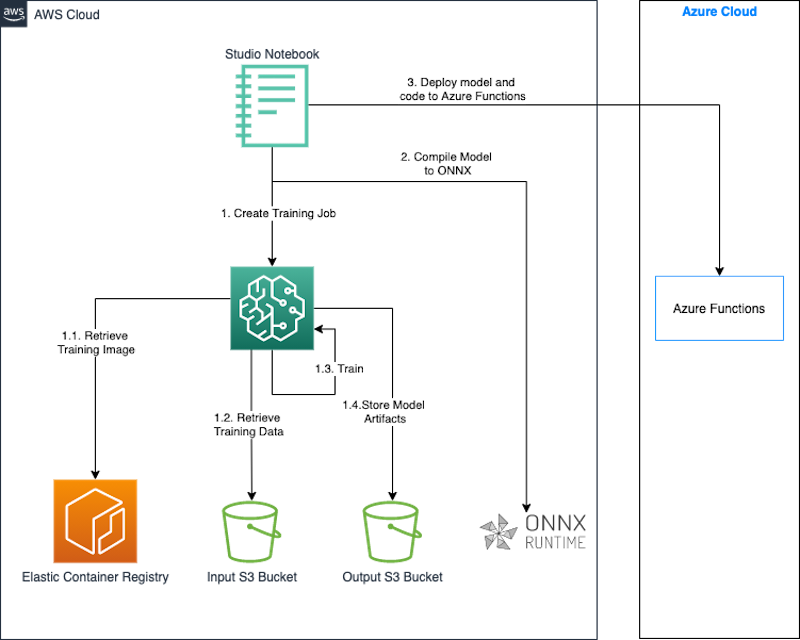
We use a SageMaker Studio pocket book together with the SageMaker Python SDK to construct and practice our mannequin. The SageMaker Python SDK is an open-source library for coaching and deploying ML fashions on SageMaker. For extra particulars, discuss with Create or Open an Amazon SageMaker Studio Notebook.
The code snippets within the following sections have been examined within the SageMaker Studio pocket book atmosphere utilizing the Information Science 3.0 picture and Python 3.0 kernel.
On this answer, we reveal the next steps:
- Prepare a PyTorch mannequin.
- Export the PyTorch mannequin as an ONNX mannequin.
- Bundle the mannequin and inference code.
- Deploy the mannequin to Azure Capabilities.
Conditions
You must have the next conditions:
- An AWS account.
- A SageMaker area and SageMaker Studio consumer. For directions to create these, discuss with Onboard to Amazon SageMaker Domain Using Quick setup.
- The Azure CLI.
- Entry to Azure and credentials for a service principal that has permissions to create and handle Azure Capabilities.
Prepare a mannequin with PyTorch
On this part, we element the steps to coach a PyTorch mannequin.
Set up dependencies
Set up the libraries to hold out the steps required for mannequin coaching and mannequin deployment:
pip set up torchvision onnx onnxruntimeFull preliminary setup
We start by importing the AWS SDK for Python (Boto3) and the SageMaker Python SDK. As a part of the setup, we outline the next:
- A session object that gives comfort strategies throughout the context of SageMaker and our personal account.
- A SageMaker position ARN used to delegate permissions to the coaching and internet hosting service. We’d like this in order that these companies can entry the S3 buckets the place our knowledge and mannequin are saved. For directions on creating a task that meets what you are promoting wants, discuss with SageMaker Roles. For this publish, we use the identical execution position as our Studio pocket book occasion. We get this position by calling
sagemaker.get_execution_role(). - The default Area the place our coaching job will run.
- The default bucket and the prefix we use to retailer the mannequin output.
See the next code:
import sagemaker
import boto3
import os

execution_role = sagemaker.get_execution_role()
area = boto3.Session().region_name
session = sagemaker.Session()
bucket = session.default_bucket()
prefix = "sagemaker/mnist-pytorch"
Create the coaching dataset
We use the dataset obtainable within the public bucket sagemaker-example-files-prod-{area}. The dataset comprises the next recordsdata:
- train-images-idx3-ubyte.gz – Incorporates coaching set photos
- train-labels-idx1-ubyte.gz – Incorporates coaching set labels
- t10k-images-idx3-ubyte.gz – Incorporates check set photos
- t10k-labels-idx1-ubyte.gz – Incorporates check set labels
We use thetorchvision.datasets module to obtain the information from the general public bucket domestically earlier than importing it to our coaching knowledge bucket. We cross this bucket location as an enter to the SageMaker coaching job. Our coaching script makes use of this location to obtain and put together the coaching knowledge, after which practice the mannequin. See the next code:
MNIST.mirrors = [
    f"https://sagemaker-example-files-prod-{region}.s3.amazonaws.com/datasets/image/MNIST/"
]

MNIST(
    "knowledge",
    obtain=True,
    remodel=transforms.Compose(
        [transforms.ToTensor(), transforms.Normalize((0.1307,), (0.3081,))]
    ),
)
Create the coaching script
With SageMaker, you’ll be able to convey your individual mannequin utilizing script mode. With script mode, you should use the pre-built SageMaker containers and supply your individual coaching script, which has the mannequin definition, together with any customized libraries and dependencies. The SageMaker Python SDK passes our script as an entry_point to the container, which hundreds and runs the practice perform from the offered script to coach our mannequin.
When the coaching is full, SageMaker saves the mannequin output within the S3 bucket that we offered as a parameter to the coaching job.
Our coaching code is tailored from the next PyTorch example script. The next excerpt from the code reveals the mannequin definition and the practice perform:
# outline community

class Internet(nn.Module):
    def __init__(self):
        tremendous(Internet, self).__init__()
        self.conv1 = nn.Conv2d(1, 32, 3, 1)
        self.conv2 = nn.Conv2d(32, 64, 3, 1)
        self.dropout1 = nn.Dropout(0.25)
        self.dropout2 = nn.Dropout(0.5)
        self.fc1 = nn.Linear(9216, 128)
        self.fc2 = nn.Linear(128, 10)

    def ahead(self, x):
        x = self.conv1(x)
        x = F.relu(x)
        x = self.conv2(x)
        x = F.relu(x)
        x = F.max_pool2d(x, 2)
        x = self.dropout1(x)
        x = torch.flatten(x, 1)
        x = self.fc1(x)
        x = F.relu(x)
        x = self.dropout2(x)
        x = self.fc2(x)
        output = F.log_softmax(x, dim=1)
        return output
# practice
def practice(args, mannequin, machine, train_loader, optimizer, epoch):
mannequin.practice()
for batch_idx, (knowledge, goal) in enumerate(train_loader):
knowledge, goal = knowledge.to(machine), goal.to(machine)
optimizer.zero_grad()
output = mannequin(knowledge)
loss = F.nll_loss(output, goal)
loss.backward()
optimizer.step()
if batch_idx % args.log_interval == 0:
print('Prepare Epoch: {} [{}/{} ({:.0f}%)]tLoss: {:.6f}'.format(
epoch, batch_idx * len(knowledge), len(train_loader.dataset),
100. * batch_idx / len(train_loader), loss.merchandise()))
if args.dry_run:
breakPrepare the mannequin
Now that we’ve arrange our surroundings and created our enter dataset and customized coaching script, we will begin the mannequin coaching utilizing SageMaker. We use the PyTorch estimator within the SageMaker Python SDK to begin a coaching job on SageMaker. We cross within the required parameters to the estimator and name the match methodology. Once we name match on the PyTorch estimator, SageMaker begins a coaching job utilizing our script as coaching code:
from sagemaker.pytorch import PyTorch

output_location = f"s3://{bucket}/{prefix}/output"
print(f"coaching artifacts might be uploaded to: {output_location}")

hyperparameters={
    "batch-size": 100,
    "epochs": 1,
    "lr": 0.1,
    "gamma": 0.9,
    "log-interval": 100
}

instance_type = "ml.c4.xlarge"
estimator = PyTorch(
    entry_point="practice.py",
    source_dir="code",  # listing of your coaching script
    position=execution_role,
    framework_version="1.13",
    py_version="py39",
    instance_type=instance_type,
    instance_count=1,
    volume_size=250,
    output_path=output_location,
    hyperparameters=hyperparameters
)

estimator.match(inputs = {
    'coaching': f"{inputs}",
    'testing':  f"{inputs}"
})
Export the educated mannequin as a ONNX mannequin
After the coaching is full and our mannequin is saved to the predefined location in Amazon S3, we export the mannequin to an ONNX mannequin utilizing the ONNX runtime.
We embrace the code to export our mannequin to ONNX in our coaching script to run after the coaching is full.
PyTorch exports the mannequin to ONNX by working the mannequin utilizing our enter and recording a hint of operators used to compute the output. We use a random enter of the precise kind with the PyTorch torch.onnx.export perform to export the mannequin to ONNX. We additionally specify the primary dimension in our enter as dynamic in order that our mannequin accepts a variable batch_size of inputs throughout inference.
def export_to_onnx(mannequin, model_dir, machine):
    logger.data("Exporting the mannequin to onnx.")
    dummy_input = torch.randn(1, 1, 28, 28).to(machine)
    input_names = [ "input_0" ]
    output_names = [ "output_0" ]
    path = os.path.be part of(model_dir, 'mnist-pytorch.onnx')
    torch.onnx.export(mannequin, dummy_input, path, verbose=True, input_names=input_names, output_names=output_names,
                     dynamic_axes={'input_0' : {0 : 'batch_size'},    # variable size axes
                                'output_0' : {0 : 'batch_size'}})
ONNX is an open customary format for deep studying fashions that permits interoperability between deep studying frameworks reminiscent of PyTorch, Microsoft Cognitive Toolkit (CNTK), and extra. This implies you should use any of those frameworks to coach the mannequin and subsequently export the pre-trained fashions in ONNX format. By exporting the mannequin to ONNX, you get the good thing about a broader choice of deployment gadgets and platforms.
Obtain and extract the mannequin artifacts
The ONNX mannequin that our coaching script has saved has been copied by SageMaker to Amazon S3 within the output location that we specified after we began the coaching job. The mannequin artifacts are saved as a compressed archive file referred to as mannequin.tar.gz. We obtain this archive file to an area listing in our Studio pocket book occasion and extract the mannequin artifacts, specifically the ONNX mannequin.
import tarfile

local_model_file="mannequin.tar.gz"
model_bucket,model_key = estimator.model_data.cut up('/',2)[-1].cut up('/',1)
s3 = boto3.consumer("s3")
s3.download_file(model_bucket,model_key,local_model_file)

model_tar = tarfile.open(local_model_file)
model_file_name = model_tar.subsequent().identify
model_tar.extractall('.')
model_tar.shut()
Validate the ONNX mannequin
The ONNX mannequin is exported to a file named mnist-pytorch.onnx by our coaching script. After we’ve downloaded and extracted this file, we will optionally validate the ONNX mannequin utilizing the onnx.checker module. The check_model perform on this module checks the consistency of a mannequin. An exception is raised if the check fails.
import onnx

onnx_model = onnx.load("mnist-pytorch.onnx")
onnx.checker.check_model(onnx_model)
Bundle the mannequin and inference code
For this publish, we use .zip deployment for Azure Capabilities. On this methodology, we package deal our mannequin, accompanying code, and Azure Capabilities settings in a .zip file and publish it to Azure Capabilities. The next code reveals the listing construction of our deployment package deal:
mnist-onnx├── function_app.py├── mannequin│ └── mnist-pytorch.onnx└── necessities.txt
Checklist dependencies
We listing the dependencies for our inference code within the necessities.txt file on the root of our package deal. This file is used to construct the Azure Capabilities atmosphere after we publish the package deal.
azure-functionsnumpyonnxruntime
Write inference code
We use Python to jot down the next inference code, utilizing the ONNX Runtime library to load our mannequin and run inference. This instructs the Azure Capabilities app to make the endpoint obtainable on the /classify relative path.
import logging
import azure.capabilities as func
import numpy as np
import os
import onnxruntime as ort
import json


app = func.FunctionApp()

def preprocess(input_data_json):
    # convert the JSON knowledge into the tensor enter
    return np.array(input_data_json['data']).astype('float32')

def run_model(model_path, req_body):
    session = ort.InferenceSession(model_path)
    input_data = preprocess(req_body)
    logging.data(f"Enter Information form is {input_data.form}.")
    input_name = session.get_inputs()[0].identify  # get the id of the primary enter of the mannequin
    strive:
        end result = session.run([], {input_name: input_data})
    besides (RuntimeError) as e:
        print("Form={0} and error={1}".format(input_data.form, e))
    return end result[0]

def get_model_path():
    d=os.path.dirname(os.path.abspath(__file__))
    return os.path.be part of(d , './mannequin/mnist-pytorch.onnx')

@app.function_name(identify="mnist_classify")
@app.route(route="classify", auth_level=func.AuthLevel.ANONYMOUS)
def major(req: func.HttpRequest) -> func.HttpResponse:
    logging.data('Python HTTP set off perform processed a request.')
    # Get the img worth from the publish.
    strive:
        req_body = req.get_json()
    besides ValueError:
        cross

    if req_body:
        # run mannequin
        end result = run_model(get_model_path(), req_body)
        # map output to integer and return end result string.
        digits = np.argmax(end result, axis=1)
        logging.data(kind(digits))
        return func.HttpResponse(json.dumps({"digits": np.array(digits).tolist()}))
    else:
        return func.HttpResponse(
             "This HTTP triggered perform efficiently.",
             status_code=200
        )
Deploy the mannequin to Azure Capabilities
Now that we’ve the code packaged into the required .zip format, we’re able to publish it to Azure Capabilities. We try this utilizing the Azure CLI, a command line utility to create and handle Azure assets. Set up the Azure CLI with the next code:
!pip set up -q azure-cliThen full the next steps:
- Log in to Azure:
!az login - Arrange the useful resource creation parameters:
import random random_suffix = str(random.randint(10000,99999)) resource_group_name = f"multicloud-{random_suffix}-rg" storage_account_name = f"multicloud{random_suffix}" location = "ukwest" sku_storage = "Standard_LRS" functions_version = "4" python_version = "3.9" function_app = f"multicloud-mnist-{random_suffix}" - Use the next instructions to create the Azure Capabilities app together with the prerequisite assets:
!az group create --name {resource_group_name} --location {location} !az storage account create --name {storage_account_name} --resource-group {resource_group_name} --location {location} --sku {sku_storage} !az functionapp create --name {function_app} --resource-group {resource_group_name} --storage-account {storage_account_name} --consumption-plan-location "{location}" --os-type Linux --runtime python --runtime-version {python_version} --functions-version {functions_version} - Arrange the Azure Capabilities in order that after we deploy the Capabilities package deal, the
necessities.txtfile is used to construct our software dependencies:!az functionapp config appsettings set --name {function_app} --resource-group {resource_group_name} --settings @./functionapp/settings.json - Configure the Capabilities app to run the Python v2 mannequin and carry out a construct on the code it receives after .zip deployment:
{ "AzureWebJobsFeatureFlags": "EnableWorkerIndexing", "SCM_DO_BUILD_DURING_DEPLOYMENT": true } - After we’ve the useful resource group, storage container, and Capabilities app with the precise configuration, publish the code to the Capabilities app:
!az functionapp deployment supply config-zip -g {resource_group_name} -n {function_app} --src {function_archive} --build-remote true
Take a look at the mannequin
We have now deployed the ML mannequin to Azure Capabilities as an HTTP set off, which suggests we will use the Capabilities app URL to ship an HTTP request to the perform to invoke the perform and run the mannequin.
To arrange the enter, obtain the check photos recordsdata from the SageMaker instance recordsdata bucket and put together a set of samples to the format required by the mannequin:
from torch.utils.knowledge import DataLoader
from torchvision import datasets, transforms
import matplotlib.pyplot as plt

remodel=transforms.Compose(
        [transforms.ToTensor(), transforms.Normalize((0.1307,), (0.3081,))]
)

test_dataset = datasets.MNIST(root="../knowledge",  obtain=True, practice=False, remodel=remodel)
test_loader = DataLoader(test_dataset, batch_size=16, shuffle=True)

test_features, test_labels = subsequent(iter(test_loader))
Use the requests library to ship a publish request to the inference endpoint with the pattern inputs. The inference endpoint takes the format as proven within the following code:
import requests, json

def to_numpy(tensor):
    return tensor.detach().cpu().numpy() if tensor.requires_grad else tensor.cpu().numpy()

url = f"https://{function_app}.azurewebsites.web/api/classify"
response = requests.publish(url,
                json.dumps({"knowledge":to_numpy(test_features).tolist()})
            )
predictions = json.hundreds(response.textual content)['digits']
Clear up
Whenever you’re carried out testing the mannequin, delete the useful resource group together with the contained assets, together with the storage container and Capabilities app:
!az group delete --name {resource_group_name} --yesMoreover, it is suggested to close down idle assets inside SageMaker Studio to cut back prices. For extra info, discuss with Save costs by automatically shutting down idle resources within Amazon SageMaker Studio.
Conclusion
On this publish, we confirmed how one can construct and practice an ML mannequin with SageMaker and deploy it to a different cloud supplier. Within the answer, we used a SageMaker Studio pocket book, however for manufacturing workloads, we really useful utilizing MLOps to create repeatable coaching workflows to speed up mannequin improvement and deployment.
This publish didn’t present all of the doable methods to deploy and run a mannequin in a multicloud atmosphere. For instance, you may as well package deal your mannequin right into a container picture together with inference code and dependency libraries to run the mannequin as a containerized software in any platform. For extra details about this strategy, discuss with Deploy container applications in a multicloud environment using Amazon CodeCatalyst. The intent of the publish is to indicate how organizations can use AWS AI/ML capabilities in a multicloud atmosphere.
Concerning the authors
 Raja Vaidyanathan is a Options Architect at AWS supporting world monetary companies prospects. Raja works with prospects to architect options to complicated issues with long-term constructive impression on their enterprise. He’s a powerful engineering skilled expert in IT technique, enterprise knowledge administration, and software structure, with specific pursuits in analytics and machine studying.
 Amandeep Bajwa is a Senior Options Architect at AWS supporting monetary companies enterprises. He helps organizations obtain their enterprise outcomes by figuring out the suitable cloud transformation technique primarily based on trade developments and organizational priorities. A few of the areas Amandeep consults on are cloud migration, cloud technique (together with hybrid and multicloud), digital transformation, knowledge and analytics, and know-how on the whole.
 Prema Iyer is Senior Technical Account Supervisor for AWS Enterprise Assist. She works with exterior prospects on quite a lot of tasks, serving to them enhance the worth of their options when utilizing AWS.