Orchestrate Ray-based machine studying workflows utilizing Amazon SageMaker
Machine studying (ML) is turning into more and more complicated as clients attempt to remedy an increasing number of difficult issues. This complexity typically results in the necessity for distributed ML, the place a number of machines are used to coach a single mannequin. Though this allows parallelization of duties throughout a number of nodes, resulting in accelerated coaching instances, enhanced scalability, and improved efficiency, there are vital challenges in successfully utilizing distributed {hardware}. Information scientists have to deal with challenges like knowledge partitioning, load balancing, fault tolerance, and scalability. ML engineers should deal with parallelization, scheduling, faults, and retries manually, requiring complicated infrastructure code.
On this submit, we focus on the advantages of utilizing Ray and Amazon SageMaker for distributed ML, and supply a step-by-step information on find out how to use these frameworks to construct and deploy a scalable ML workflow.
Ray, an open-source distributed computing framework, gives a versatile framework for distributed coaching and serving of ML fashions. It abstracts away low-level distributed system particulars by easy, scalable libraries for frequent ML duties corresponding to knowledge preprocessing, distributed coaching, hyperparameter tuning, reinforcement studying, and mannequin serving.
SageMaker is a totally managed service for constructing, coaching, and deploying ML fashions. Ray seamlessly integrates with SageMaker options to construct and deploy complicated ML workloads which might be each environment friendly and dependable. The mix of Ray and SageMaker gives end-to-end capabilities for scalable ML workflows, and has the next highlighted options:
- Distributed actors and parallelism constructs in Ray simplify creating distributed functions.
- Ray AI Runtime (AIR) reduces friction of going from improvement to manufacturing. With Ray and AIR, the identical Python code can scale seamlessly from a laptop computer to a big cluster.
- The managed infrastructure of SageMaker and options like processing jobs, coaching jobs, and hyperparameter tuning jobs can use Ray libraries beneath for distributed computing.
- Amazon SageMaker Experiments permits quickly iterating and preserving observe of trials.
- Amazon SageMaker Feature Store gives a scalable repository for storing, retrieving, and sharing ML options for mannequin coaching.
- Skilled fashions may be saved, versioned, and tracked in Amazon SageMaker Model Registry for governance and administration.
- Amazon SageMaker Pipelines permits orchestrating the end-to-end ML lifecycle from knowledge preparation and coaching to mannequin deployment as automated workflows.
Resolution overview
This submit focuses on the advantages of utilizing Ray and SageMaker collectively. We arrange an end-to-end Ray-based ML workflow, orchestrated utilizing SageMaker Pipelines. The workflow consists of parallel ingestion of information into the characteristic retailer utilizing Ray actors, knowledge preprocessing with Ray Information, coaching fashions and hyperparameter tuning at scale utilizing Ray Practice and hyperparameter optimization (HPO) tuning jobs, and eventually mannequin analysis and registering the mannequin right into a mannequin registry.
For our knowledge, we use a synthetic housing dataset that consists of eight options (YEAR_BUILT, SQUARE_FEET, NUM_BEDROOM, NUM_BATHROOMS, LOT_ACRES, GARAGE_SPACES, FRONT_PORCH, and DECK) and our mannequin will predict the PRICE of the home.
Every stage within the ML workflow is damaged into discrete steps, with its personal script that takes enter and output parameters. Within the subsequent part, we spotlight key code snippets from every step. The complete code may be discovered on the aws-samples-for-ray GitHub repository.
Conditions
To make use of the SageMaker Python SDK and run the code related to this submit, you want the next conditions:
Ingest knowledge into SageMaker Characteristic Retailer
Step one within the ML workflow is to learn the supply knowledge file from Amazon Simple Storage Service (Amazon S3) in CSV format and ingest it into SageMaker Characteristic Retailer. SageMaker Characteristic Retailer is a purpose-built repository that makes it straightforward for groups to create, share, and handle ML options. It simplifies characteristic discovery, reuse, and sharing, resulting in quicker improvement, elevated collaboration inside buyer groups, and lowered prices.
Ingesting options into the characteristic retailer accommodates the next steps:
- Outline a characteristic group and create the characteristic group within the characteristic retailer.
- Put together the supply knowledge for the characteristic retailer by including an occasion time and file ID for every row of information.
- Ingest the ready knowledge into the characteristic group through the use of the Boto3 SDK.
On this part, we solely spotlight Step 3, as a result of that is the half that includes parallel processing of the ingestion activity utilizing Ray. You’ll be able to evaluation the complete code for this course of within the GitHub repo.
The ingest_features technique is outlined inside a category referred to as Featurestore. Observe that the Featurestore class is adorned with @ray.distant. This means that an occasion of this class is a Ray actor, a stateful and concurrent computational unit inside Ray. It’s a programming mannequin that lets you create distributed objects that keep an inner state and may be accessed concurrently by a number of duties working on totally different nodes in a Ray cluster. Actors present a solution to handle and encapsulate the mutable state, making them helpful for constructing complicated, stateful functions in a distributed setting. You’ll be able to specify useful resource necessities in actors too. On this case, every occasion of the FeatureStore class would require 0.5 CPUs. See the next code:
@ray.distant(num_cpus=0.5)
class Featurestore:
    def ingest_features(self,feature_group_name, df, area):
        """
        Ingest options to Characteristic Retailer Group
        Args:
            feature_group_name (str): Characteristic Group Identify
            data_path (str): Path to the prepare/validation/take a look at knowledge in CSV format.
        """

        ...
You’ll be able to work together with the actor by calling the distant operator. Within the following code, the specified variety of actors is handed in as an enter argument to the script. The info is then partitioned based mostly on the variety of actors and handed to the distant parallel processes to be ingested into the characteristic retailer. You’ll be able to name get on the item ref to dam the execution of the present activity till the distant computation is full and the result’s accessible. When the result’s accessible, ray.get will return the consequence, and the execution of the present activity will proceed.
import modin.pandas as pd
import ray

df = pd.read_csv(s3_path)
knowledge = prepare_df_for_feature_store(df)
# Cut up into partitions
partitions = [ray.put(part) for part in np.array_split(data, num_actors)]
# Begin actors and assign partitions in a loop
actors = [Featurestore.remote() for _ in range(args.num_actors)]
outcomes = []

for actor, partition in zip(actors, input_partitions):
    outcomes.append(actor.ingest_features.distant(
                        args.feature_group_name,
                        partition, args.area
                      )
                )

ray.get(outcomes)
Put together knowledge for coaching, validation, and testing
On this step, we use Ray Dataset to effectively break up, rework, and scale our dataset in preparation for machine studying. Ray Dataset gives a typical solution to load distributed knowledge into Ray, supporting numerous storage programs and file codecs. It has APIs for frequent ML knowledge preprocessing operations like parallel transformations, shuffling, grouping, and aggregations. Ray Dataset additionally handles operations needing stateful setup and GPU acceleration. It integrates easily with different knowledge processing libraries like Spark, Pandas, NumPy, and extra, in addition to ML frameworks like TensorFlow and PyTorch. This enables constructing end-to-end knowledge pipelines and ML workflows on prime of Ray. The objective is to make distributed knowledge processing and ML simpler for practitioners and researchers.
Let’s take a look at sections of the scripts that carry out this knowledge preprocessing. We begin by loading the information from the characteristic retailer:
def load_dataset(feature_group_name, area):
    """
    Hundreds the information as a ray dataset from the offline featurestore S3 location
    Args:
        feature_group_name (str): title of the characteristic group
    Returns:
        ds (ray.knowledge.dataset): Ray dataset the accommodates the requested dat from the characteristic retailer
    """
    session = sagemaker.Session(boto3.Session(region_name=area))
    fs_group = FeatureGroup(
        title=feature_group_name,
        sagemaker_session=session
    )

    fs_data_loc = fs_group.describe().get("OfflineStoreConfig").get("S3StorageConfig").get("ResolvedOutputS3Uri")

    # Drop columns added by the characteristic retailer
    # Since these aren't associated to the ML downside at hand
    cols_to_drop = ["record_id", "event_time","write_time",
                    "api_invocation_time", "is_deleted",
                    "year", "month", "day", "hour"]

    ds = ray.knowledge.read_parquet(fs_data_loc)
    ds = ds.drop_columns(cols_to_drop)
    print(f"{fs_data_loc} rely is {ds.rely()}")
    return ds
We then break up and scale knowledge utilizing the higher-level abstractions accessible from the ray.knowledge library:
def split_dataset(dataset, train_size, val_size, test_size, random_state=None):
    """
    Cut up dataset into prepare, validation and take a look at samples
    Args:
        dataset (ray.knowledge.Dataset): enter knowledge
        train_size (float): ratio of information to make use of as coaching dataset
        val_size (float): ratio of information to make use of as validation dataset
        test_size (float): ratio of information to make use of as take a look at dataset
        random_state (int): Cross an int for reproducible output throughout a number of perform calls.
    Returns:
        train_set (ray.knowledge.Dataset): prepare dataset
        val_set (ray.knowledge.Dataset): validation dataset
        test_set (ray.knowledge.Dataset): take a look at dataset
    """
    # Shuffle this dataset with a hard and fast random seed.
    shuffled_ds = dataset.random_shuffle(seed=random_state)
    # Cut up the information into prepare, validation and take a look at datasets
    train_set, val_set, test_set = shuffled_ds.split_proportionately([train_size, val_size])
    return train_set, val_set, test_set

def scale_dataset(train_set, val_set, test_set, target_col):
    """
    Match StandardScaler to train_set and apply it to val_set and test_set
    Args:
        train_set (ray.knowledge.Dataset): prepare dataset
        val_set (ray.knowledge.Dataset): validation dataset
        test_set (ray.knowledge.Dataset): take a look at dataset
        target_col (str): goal col
    Returns:
        train_transformed (ray.knowledge.Dataset): prepare knowledge scaled
        val_transformed (ray.knowledge.Dataset): val knowledge scaled
        test_transformed (ray.knowledge.Dataset): take a look at knowledge scaled
    """
    tranform_cols = dataset.columns()
    # Take away the goal columns from being scaled
    tranform_cols.take away(target_col)
    # arrange a typical scaler
    standard_scaler = StandardScaler(tranform_cols)
    # match scaler to coaching dataset
    print("Becoming scaling to coaching knowledge and reworking dataset...")
    train_set_transformed = standard_scaler.fit_transform(train_set)
    # apply scaler to validation and take a look at datasets
    print("Reworking validation and take a look at datasets...")
    val_set_transformed = standard_scaler.rework(val_set)
    test_set_transformed = standard_scaler.rework(test_set)
    return train_set_transformed, val_set_transformed, test_set_transformed
The processed prepare, validation, and take a look at datasets are saved in Amazon S3 and shall be handed because the enter parameters to subsequent steps.
Carry out mannequin coaching and hyperparameter optimization
With our knowledge preprocessed and prepared for modeling, it’s time to coach some ML fashions and fine-tune their hyperparameters to maximise predictive efficiency. We use XGBoost-Ray, a distributed backend for XGBoost constructed on Ray that permits coaching XGBoost fashions on giant datasets through the use of a number of nodes and GPUs. It gives easy drop-in replacements for XGBoost’s prepare and predict APIs whereas dealing with the complexities of distributed knowledge administration and coaching underneath the hood.
To allow distribution of the coaching over a number of nodes, we make the most of a helper class named RayHelper. As proven within the following code, we use the useful resource configuration of the coaching job and select the primary host as the pinnacle node:
class RayHelper():
    def __init__(self, ray_port:str="9339", redis_pass:str="redis_password"):
        ....
        self.resource_config = self.get_resource_config()
        self.head_host = self.resource_config["hosts"][0]
        self.n_hosts = len(self.resource_config["hosts"])
We are able to use the host info to determine find out how to initialize Ray on every of the coaching job cases:
def start_ray(self):
   head_ip = self._get_ip_from_host()
   # If the present host is the host choosen as the pinnacle node
   # run `ray begin` with specifying the --head flag making that is the pinnacle node
    if self.resource_config["current_host"] == self.head_host:
        output = subprocess.run(['ray', 'start', '--head', '-vvv', '--port',
        self.ray_port, '--redis-password', self.redis_pass,
        '--include-dashboard', 'false'], stdout=subprocess.PIPE)
        print(output.stdout.decode("utf-8"))
        ray.init(tackle="auto", include_dashboard=False)
        self._wait_for_workers()
        print("All employees current and accounted for")
        print(ray.cluster_resources())

    else:
       # If the present host shouldn't be the pinnacle node,
       # run `ray begin` with specifying ip tackle because the head_host as the pinnacle node
        time.sleep(10)
        output = subprocess.run(['ray', 'start',
        f"--address={head_ip}:{self.ray_port}",
        '--redis-password', self.redis_pass, "--block"], stdout=subprocess.PIPE)
        print(output.stdout.decode("utf-8"))
        sys.exit(0)
When a coaching job is began, a Ray cluster may be initialized by calling the start_ray() technique on an occasion of RayHelper:
if __name__ == '__main__':
    ray_helper = RayHelper()
    ray_helper.start_ray()
    args = read_parameters()
    sess = sagemaker.Session(boto3.Session(region_name=args.area))
We then use the XGBoost coach from XGBoost-Ray for coaching:
def train_xgboost(ds_train, ds_val, params, num_workers, target_col = "worth") -> Consequence:
    """
    Creates a XGBoost coach, prepare it, and return the consequence.
    Args:
        ds_train (ray.knowledge.dataset): Coaching dataset
        ds_val (ray.knowledge.dataset): Validation dataset
        params (dict): Hyperparameters
        num_workers (int): variety of employees to distribute the coaching throughout
        target_col (str): goal column
    Returns:
        consequence (ray.air.consequence.Consequence): Results of the coaching job
    """

    train_set = RayDMatrix(ds_train, 'PRICE')
    val_set = RayDMatrix(ds_val, 'PRICE')

    evals_result = {}

    coach = prepare(
        params=params,
        dtrain=train_set,
        evals_result=evals_result,
        evals=[(val_set, "validation")],
        verbose_eval=False,
        num_boost_round=100,
        ray_params=RayParams(num_actors=num_workers, cpus_per_actor=1),
    )

    output_path=os.path.be part of(args.model_dir, 'mannequin.xgb')

    coach.save_model(output_path)

    valMAE = evals_result["validation"]["mae"][-1]
    valRMSE = evals_result["validation"]["rmse"][-1]

    print('[3] #011validation-mae:{}'.format(valMAE))
    print('[4] #011validation-rmse:{}'.format(valRMSE))

    local_testing = False
    strive:
        load_run(sagemaker_session=sess)
    besides:
        local_testing = True
    if not local_testing: # Monitor experiment if utilizing SageMaker Coaching
        with load_run(sagemaker_session=sess) as run:
            run.log_metric('validation-mae', valMAE)
            run.log_metric('validation-rmse', valRMSE)
Observe that whereas instantiating the coach, we go RayParams, which takes the quantity actors and variety of CPUs per actors. XGBoost-Ray makes use of this info to distribute the coaching throughout all of the nodes connected to the Ray cluster.
We now create a XGBoost estimator object based mostly on the SageMaker Python SDK and use that for the HPO job.
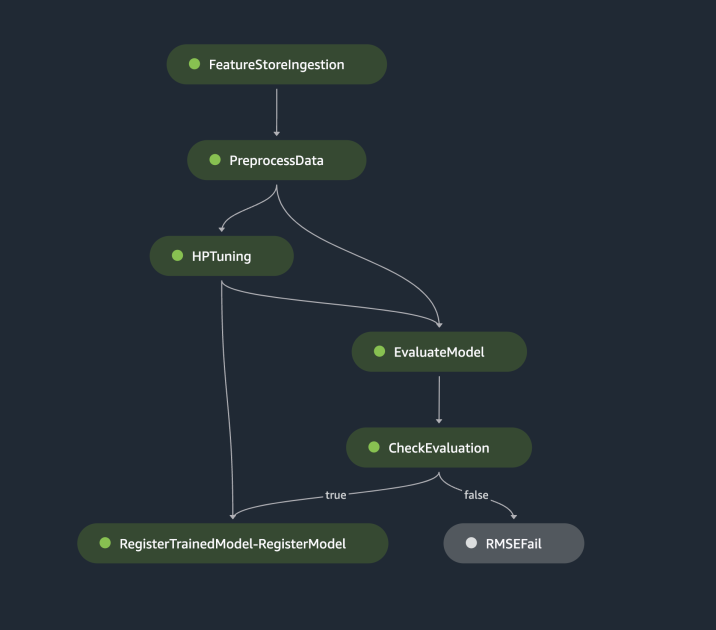
Orchestrate the previous steps utilizing SageMaker Pipelines
To construct an end-to-end scalable and reusable ML workflow, we have to use a CI/CD device to orchestrate the previous steps right into a pipeline. SageMaker Pipelines has direct integration with SageMaker, the SageMaker Python SDK, and SageMaker Studio. This integration lets you create ML workflows with an easy-to-use Python SDK, after which visualize and handle your workflow utilizing SageMaker Studio. You can even observe the historical past of your knowledge inside the pipeline execution and designate steps for caching.
SageMaker Pipelines creates a Directed Acyclic Graph (DAG) that features steps wanted to construct an ML workflow. Every pipeline is a sequence of interconnected steps orchestrated by knowledge dependencies between steps, and may be parameterized, permitting you to supply enter variables as parameters for every run of the pipeline. SageMaker Pipelines has 4 kinds of pipeline parameters: ParameterString, ParameterInteger, ParameterFloat, and ParameterBoolean. On this part, we parameterize a number of the enter variables and arrange the step caching configuration:
processing_instance_count = ParameterInteger(
    title="ProcessingInstanceCount",
    default_value=1
)
feature_group_name = ParameterString(
    title="FeatureGroupName",
    default_value="fs-ray-synthetic-housing-data"
)
bucket_prefix = ParameterString(
    title="Bucket_Prefix",
    default_value="aws-ray-mlops-workshop/feature-store"
)
rmse_threshold = ParameterFloat(title="RMSEThreshold", default_value=15000.0)
    train_size = ParameterString(
    title="TrainSize",
    default_value="0.6"
)
val_size = ParameterString(
    title="ValidationSize",
    default_value="0.2"
)
test_size = ParameterString(
    title="TestSize",
    default_value="0.2"
)

cache_config = CacheConfig(enable_caching=True, expire_after="PT12H")
We outline two processing steps: one for SageMaker Characteristic Retailer ingestion, the opposite for knowledge preparation. This could look similar to the earlier steps described earlier. The one new line of code is the ProcessingStep after the steps’ definition, which permits us to take the processing job configuration and embrace it as a pipeline step. We additional specify the dependency of the information preparation step on the SageMaker Characteristic Retailer ingestion step. See the next code:
feature_store_ingestion_step = ProcessingStep(
    title="FeatureStoreIngestion",
    step_args=fs_processor_args,
    cache_config=cache_config
)

preprocess_dataset_step = ProcessingStep(
    title="PreprocessData",
    step_args=processor_args,
    cache_config=cache_config
)
preprocess_dataset_step.add_depends_on([feature_store_ingestion_step])
Equally, to construct a mannequin coaching and tuning step, we have to add a definition of TuningStep after the mannequin coaching step’s code to permit us to run SageMaker hyperparameter tuning as a step within the pipeline:
tuning_step = TuningStep(
    title="HPTuning",
    tuner=tuner,
    inputs={
        "prepare": TrainingInput(
            s3_data=preprocess_dataset_step.properties.ProcessingOutputConfig.Outputs[
            "train"
            ].S3Output.S3Uri,
            content_type="textual content/csv"
        ),
        "validation": TrainingInput(
            s3_data=preprocess_dataset_step.properties.ProcessingOutputConfig.Outputs[
            "validation"
            ].S3Output.S3Uri,
            content_type="textual content/csv"
        )
    },
    cache_config=cache_config,
)
tuning_step.add_depends_on([preprocess_dataset_step])
After the tuning step, we select to register the most effective mannequin into SageMaker Mannequin Registry. To regulate the mannequin high quality, we implement a minimal high quality gate that compares the most effective mannequin’s goal metric (RMSE) towards a threshold outlined because the pipeline’s enter parameter rmse_threshold. To do that analysis, we create one other processing step to run an evaluation script. The mannequin analysis consequence shall be saved as a property file. Property information are significantly helpful when analyzing the outcomes of a processing step to determine how different steps ought to be run. See the next code:
# Specify the place we'll retailer the mannequin analysis outcomes in order that different steps can entry these outcomes
evaluation_report = PropertyFile(
    title="EvaluationReport",
    output_name="analysis",
    path="analysis.json",
)

# A ProcessingStep is used to guage the efficiency of a particular mannequin from the HPO step.
# On this case, the highest performing mannequin is evaluated.
evaluation_step = ProcessingStep(
    title="EvaluateModel",
    processor=evaluation_processor,
    inputs=[
        ProcessingInput(
            source=tuning_step.get_top_model_s3_uri(
                top_k=0, s3_bucket=bucket, prefix=s3_prefix
            ),
            destination='/opt/ml/processing/model',
        ),
        ProcessingInput(
            source=preprocess_dataset_step.properties.ProcessingOutputConfig.Outputs['test'].S3Output.S3Uri,
            vacation spot='/decide/ml/processing/take a look at',
        ),
    ],
    outputs=[
        ProcessingOutput(
            output_name="evaluation", source="/opt/ml/processing/evaluation"
        ),
    ],
    code="./pipeline_scripts/consider/script.py",
    property_files=[evaluation_report],
)
We outline a ModelStep to register the most effective mannequin into SageMaker Mannequin Registry in our pipeline. In case the most effective mannequin doesn’t go our predetermined high quality examine, we moreover specify a FailStep to output an error message:
register_step = ModelStep(
    title="RegisterTrainedModel",
    step_args=model_registry_args
)

metrics_fail_step = FailStep(
    title="RMSEFail",
    error_message=Be a part of(on=" ", values=["Execution failed due to RMSE >", rmse_threshold]),
)
Subsequent, we use a ConditionStep to guage whether or not the mannequin registration step or failure step ought to be taken subsequent within the pipeline. In our case, the most effective mannequin shall be registered if its RMSE rating is decrease than the brink.
# Situation step for evaluating mannequin high quality and branching execution
cond_lte = ConditionLessThanOrEqualTo(
    left=JsonGet(
        step_name=evaluation_step.title,
        property_file=evaluation_report,
        json_path="regression_metrics.rmse.worth",
    ),
    proper=rmse_threshold,
)
condition_step = ConditionStep(
    title="CheckEvaluation",
    circumstances=[cond_lte],
    if_steps=[register_step],
    else_steps=[metrics_fail_step],
)
Lastly, we orchestrate all of the outlined steps right into a pipeline:
pipeline_name="synthetic-housing-training-sm-pipeline-ray"
step_list = [
             feature_store_ingestion_step,
             preprocess_dataset_step,
             tuning_step,
             evaluation_step,
             condition_step
            ]

training_pipeline = Pipeline(
    title=pipeline_name,
    parameters=[
        processing_instance_count,
        feature_group_name,
        train_size,
        val_size,
        test_size,
        bucket_prefix,
        rmse_threshold
    ],
    steps=step_list
)

# Observe: If an current pipeline has the identical title it will likely be overwritten.
training_pipeline.upsert(role_arn=role_arn)
The previous pipeline may be visualized and executed straight in SageMaker Studio, or be executed by calling execution = training_pipeline.begin(). The next determine illustrates the pipeline stream.

Moreover, we are able to evaluation the lineage of artifacts generated by the pipeline execution.
from sagemaker.lineage.visualizer import LineageTableVisualizer

viz = LineageTableVisualizer(sagemaker.session.Session())
for execution_step in reversed(execution.list_steps()):
    print(execution_step)
    show(viz.present(pipeline_execution_step=execution_step))
    time.sleep(5)
Deploy the mannequin
After the most effective mannequin is registered in SageMaker Mannequin Registry through a pipeline run, we deploy the mannequin to a real-time endpoint through the use of the absolutely managed mannequin deployment capabilities of SageMaker. SageMaker has different mannequin deployment choices to satisfy the wants of various use circumstances. For particulars, check with Deploy models for inference when choosing the proper choice to your use case. First, let’s get the mannequin registered in SageMaker Mannequin Registry:
xgb_regressor_model = ModelPackage(
    role_arn,
    model_package_arn=model_package_arn,
    title=model_name
)
The mannequin’s present standing is PendingApproval. We have to set its standing to Permitted previous to deployment:
sagemaker_client.update_model_package(
    ModelPackageArn=xgb_regressor_model.model_package_arn,
    ModelApprovalStatus="Permitted"
)

xgb_regressor_model.deploy(
    initial_instance_count=1,
    instance_type="ml.m5.xlarge",
    endpoint_name=endpoint_name
)
Clear up
After you’re performed experimenting, bear in mind to scrub up the assets to keep away from pointless costs. To scrub up, delete the real-time endpoint, mannequin group, pipeline, and have group by calling the APIs DeleteEndpoint, DeleteModelPackageGroup, DeletePipeline, and DeleteFeatureGroup, respectively, and shut down all SageMaker Studio pocket book cases.
Conclusion
This submit demonstrated a step-by-step walkthrough on find out how to use SageMaker Pipelines to orchestrate Ray-based ML workflows. We additionally demonstrated the potential of SageMaker Pipelines to combine with third-party ML instruments. There are numerous AWS providers that assist Ray workloads in a scalable and safe style to make sure efficiency excellence and operational effectivity. Now, it’s your flip to discover these highly effective capabilities and begin optimizing your machine studying workflows with Amazon SageMaker Pipelines and Ray. Take motion at this time and unlock the complete potential of your ML tasks!
Concerning the Writer
 Raju Rangan is a Senior Options Architect at Amazon Internet Providers (AWS). He works with authorities sponsored entities, serving to them construct AI/ML options utilizing AWS. When not tinkering with cloud options, you’ll catch him hanging out with household or smashing birdies in a full of life recreation of badminton with pals.
 Sherry Ding is a senior AI/ML specialist options architect at Amazon Internet Providers (AWS). She has intensive expertise in machine studying with a PhD diploma in laptop science. She primarily works with public sector clients on numerous AI/ML-related enterprise challenges, serving to them speed up their machine studying journey on the AWS Cloud. When not serving to clients, she enjoys out of doors actions.