In February 2022, Amazon Net Providers added support for NVIDIA GPU metrics in Amazon CloudWatch, making it potential to push metrics from the Amazon CloudWatch Agent to Amazon CloudWatch and monitor your code for optimum GPU utilization. Since then, this characteristic has been built-in into a lot of our managed Amazon Machine Photographs (AMIs), such because the Deep Learning AMI and the AWS ParallelCluster AMI. To acquire instance-level metrics of GPU utilization, you should utilize Packer or the Amazon ImageBuilder to bootstrap your personal customized AMI and use it in varied managed service choices like AWS Batch, Amazon Elastic Container Service (Amazon ECS), or Amazon Elastic Kubernetes Service (Amazon EKS). Nonetheless, for a lot of container-based service choices and workloads, it’s preferrred to seize utilization metrics on the container, pod, or namespace stage.
This put up particulars the right way to arrange container-based GPU metrics and supplies an instance of amassing these metrics from EKS pods.
Answer overview
To exhibit container-based GPU metrics, we create an EKS cluster with g5.2xlarge situations; nevertheless, this can work with any supported NVIDIA accelerated occasion household.
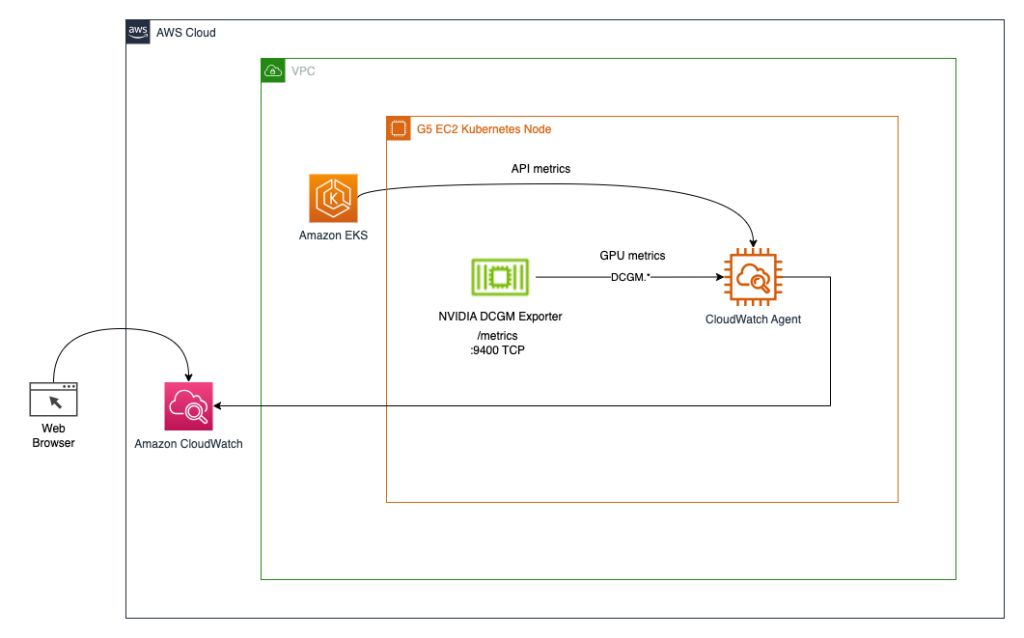
We deploy the NVIDIA GPU operator to allow use of GPU sources and the NVIDIA DCGM Exporter to allow GPU metrics assortment. Then we discover two architectures. The primary one connects the metrics from NVIDIA DCGM Exporter to CloudWatch through a CloudWatch agent, as proven within the following diagram.
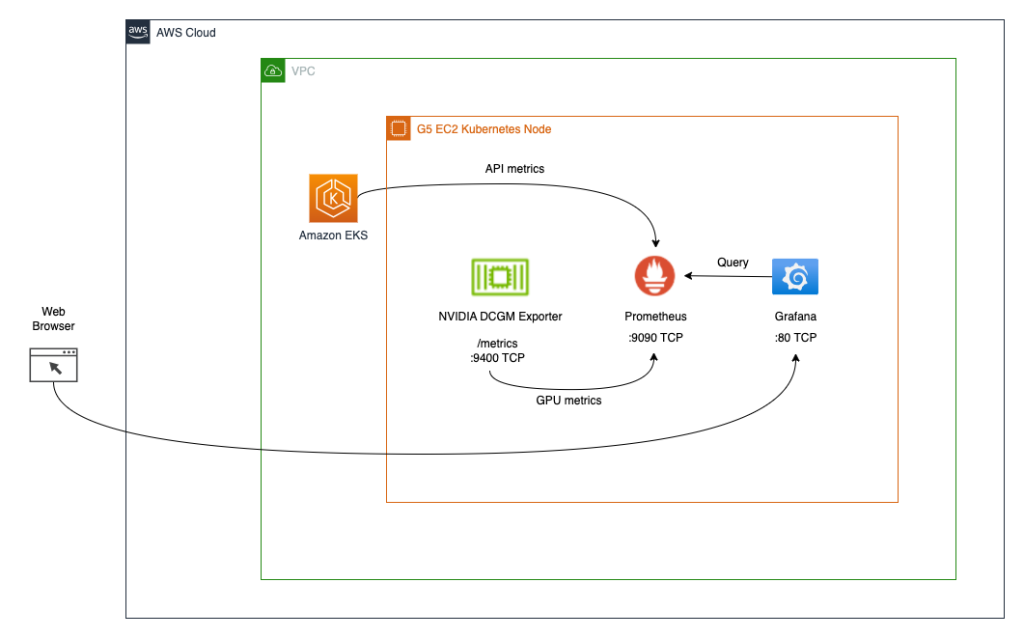
The second structure (see the next diagram) connects the metrics from DCGM Exporter to Prometheus, then we use a Grafana dashboard to visualise these metrics.
Conditions
To simplify reproducing your entire stack from this put up, we use a container that has all of the required tooling (aws cli, eksctl, helm, and so on.) already put in. In an effort to clone the container project from GitHub, you’ll need git. To construct and run the container, you’ll need Docker. To deploy the structure, you’ll need AWS credentials. To allow entry to Kubernetes companies utilizing port-forwarding, additionally, you will want kubectl.
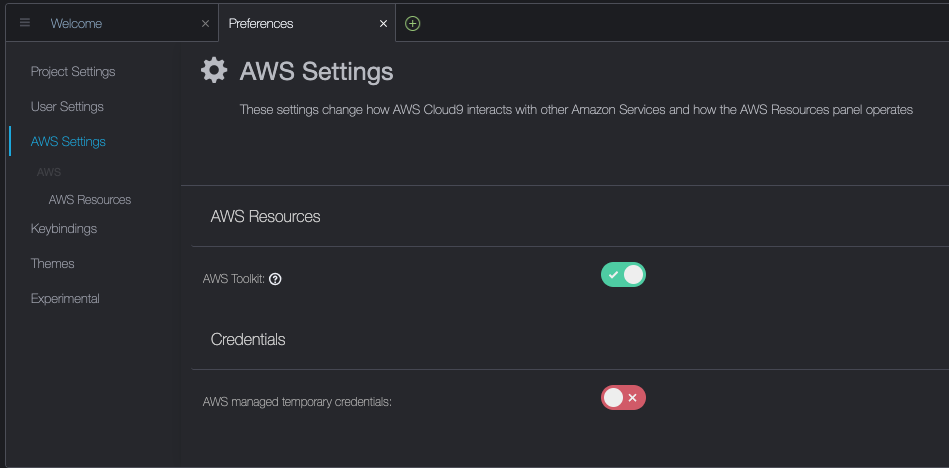
These stipulations will be put in in your native machine, EC2 instance with NICE DCV, or AWS Cloud9. On this put up, we’ll use a c5.2xlarge Cloud9 occasion with a 40GB native storage quantity. When utilizing Cloud9, please disable AWS managed short-term credentials by visiting Cloud9->Preferences->AWS Settings as proven on the screenshot beneath.
Construct and run the aws-do-eks container
Open a terminal shell in your most popular setting and run the next instructions:
git clone https://github.com/aws-samples/aws-do-eks
cd aws-do-eks
./construct.sh
./run.sh
./exec.sh
The result’s as follows:
You now have a shell in a container setting that has all of the instruments wanted to finish the duties beneath. We’ll seek advice from it as “aws-do-eks shell”. You may be working the instructions within the following sections on this shell, except particularly instructed in any other case.
Create an EKS cluster with a node group
This group features a GPU occasion household of your alternative; on this instance, we use the g5.2xlarge occasion kind.
The aws-do-eks project comes with a group of cluster configurations. You may set your required cluster configuration with a single configuration change.
- Within the container shell, run
./env-config.sh after which set CONF=conf/eksctl/yaml/eks-gpu-g5.yaml
- To confirm the cluster configuration, run
./eks-config.sh
It is best to see the next cluster manifest:
apiVersion: eksctl.io/v1alpha5
variety: ClusterConfig
metadata:
  title: do-eks-yaml-g5
  model: "1.25"
  area: us-east-1
availabilityZones:
  - us-east-1a
  - us-east-1b
  - us-east-1c
  - us-east-1d
managedNodeGroups:
  - title: sys
    instanceType: m5.xlarge
    desiredCapacity: 1
    iam:
      withAddonPolicies:
        autoScaler: true
        cloudWatch: true
  - title: g5
    instanceType: g5.2xlarge
    instancePrefix: g5-2xl
    privateNetworking: true
    efaEnabled: false
    minSize: 0
    desiredCapacity: 1
    maxSize: 10
    volumeSize: 80
    iam:
      withAddonPolicies:
        cloudWatch: true
iam:
  withOIDC: true
- To create the cluster, run the next command within the container
The output is as follows:
root@e5ecb162812f:/eks# ./eks-create.sh
/eks/impl/eksctl/yaml /eks

./eks-create.sh

Mon Could 22 20:50:59 UTC 2023
Creating cluster utilizing /eks/conf/eksctl/yaml/eks-gpu-g5.yaml ...

eksctl create cluster -f /eks/conf/eksctl/yaml/eks-gpu-g5.yaml

2023-05-22 20:50:59 [ℹ]  eksctl model 0.133.0
2023-05-22 20:50:59 [ℹ]  utilizing area us-east-1
2023-05-22 20:50:59 [ℹ]  subnets for us-east-1a - public:192.168.0.0/19 non-public:192.168.128.0/19
2023-05-22 20:50:59 [ℹ]  subnets for us-east-1b - public:192.168.32.0/19 non-public:192.168.160.0/19
2023-05-22 20:50:59 [ℹ]  subnets for us-east-1c - public:192.168.64.0/19 non-public:192.168.192.0/19
2023-05-22 20:50:59 [ℹ]  subnets for us-east-1d - public:192.168.96.0/19 non-public:192.168.224.0/19
2023-05-22 20:50:59 [ℹ]  nodegroup "sys" will use "" [AmazonLinux2/1.25]
2023-05-22 20:50:59 [ℹ]  nodegroup "g5" will use "" [AmazonLinux2/1.25]
2023-05-22 20:50:59 [ℹ]  utilizing Kubernetes model 1.25
2023-05-22 20:50:59 [ℹ]  creating EKS cluster "do-eks-yaml-g5" in "us-east-1" area with managed nodes
2023-05-22 20:50:59 [ℹ]  2 nodegroups (g5, sys) had been included (primarily based on the embrace/exclude guidelines)
2023-05-22 20:50:59 [ℹ]  will create a CloudFormation stack for cluster itself and 0 nodegroup stack(s)
2023-05-22 20:50:59 [ℹ]  will create a CloudFormation stack for cluster itself and a couple of managed nodegroup stack(s)
2023-05-22 20:50:59 [ℹ]  in case you encounter any points, examine CloudFormation console or strive 'eksctl utils describe-stacks --region=us-east-1 --cluster=do-eks-yaml-g5'
2023-05-22 20:50:59 [ℹ]  Kubernetes API endpoint entry will use default of {publicAccess=true, privateAccess=false} for cluster "do-eks-yaml-g5" in "us-east-1"
2023-05-22 20:50:59 [ℹ]  CloudWatch logging won't be enabled for cluster "do-eks-yaml-g5" in "us-east-1"
2023-05-22 20:50:59 [ℹ]  you possibly can allow it with 'eksctl utils update-cluster-logging --enable-types={SPECIFY-YOUR-LOG-TYPES-HERE (e.g. all)} --region=us-east-1 --cluster=do-eks-yaml-g5'
2023-05-22 20:50:59 [ℹ]
2 sequential duties: { create cluster management airplane "do-eks-yaml-g5",
    2 sequential sub-tasks: {
        4 sequential sub-tasks: {
            anticipate management airplane to turn into prepared,
            affiliate IAM OIDC supplier,
            2 sequential sub-tasks: {
                create IAM position for serviceaccount "kube-system/aws-node",
                create serviceaccount "kube-system/aws-node",
            },
            restart daemonset "kube-system/aws-node",
        },
        2 parallel sub-tasks: {
            create managed nodegroup "sys",
            create managed nodegroup "g5",
        },
    }
}
2023-05-22 20:50:59 [ℹ]  constructing cluster stack "eksctl-do-eks-yaml-g5-cluster"
2023-05-22 20:51:00 [ℹ]  deploying stack "eksctl-do-eks-yaml-g5-cluster"
2023-05-22 20:51:30 [ℹ]  ready for CloudFormation stack "eksctl-do-eks-yaml-g5-cluster"
2023-05-22 20:52:00 [ℹ]  ready for CloudFormation stack "eksctl-do-eks-yaml-g5-cluster"
2023-05-22 20:53:01 [ℹ]  ready for CloudFormation stack "eksctl-do-eks-yaml-g5-cluster"
2023-05-22 20:54:01 [ℹ]  ready for CloudFormation stack "eksctl-do-eks-yaml-g5-cluster"
2023-05-22 20:55:01 [ℹ]  ready for CloudFormation stack "eksctl-do-eks-yaml-g5-cluster"
2023-05-22 20:56:02 [ℹ]  ready for CloudFormation stack "eksctl-do-eks-yaml-g5-cluster"
2023-05-22 20:57:02 [ℹ]  ready for CloudFormation stack "eksctl-do-eks-yaml-g5-cluster"
2023-05-22 20:58:02 [ℹ]  ready for CloudFormation stack "eksctl-do-eks-yaml-g5-cluster"
2023-05-22 20:59:02 [ℹ]  ready for CloudFormation stack "eksctl-do-eks-yaml-g5-cluster"
2023-05-22 21:00:03 [ℹ]  ready for CloudFormation stack "eksctl-do-eks-yaml-g5-cluster"
2023-05-22 21:01:03 [ℹ]  ready for CloudFormation stack "eksctl-do-eks-yaml-g5-cluster"
2023-05-22 21:02:03 [ℹ]  ready for CloudFormation stack "eksctl-do-eks-yaml-g5-cluster"
2023-05-22 21:03:04 [ℹ]  ready for CloudFormation stack "eksctl-do-eks-yaml-g5-cluster"
2023-05-22 21:05:07 [ℹ]  constructing iamserviceaccount stack "eksctl-do-eks-yaml-g5-addon-iamserviceaccount-kube-system-aws-node"
2023-05-22 21:05:10 [ℹ]  deploying stack "eksctl-do-eks-yaml-g5-addon-iamserviceaccount-kube-system-aws-node"
2023-05-22 21:05:10 [ℹ]  ready for CloudFormation stack "eksctl-do-eks-yaml-g5-addon-iamserviceaccount-kube-system-aws-node"
2023-05-22 21:05:40 [ℹ]  ready for CloudFormation stack "eksctl-do-eks-yaml-g5-addon-iamserviceaccount-kube-system-aws-node"
2023-05-22 21:05:40 [ℹ]  serviceaccount "kube-system/aws-node" already exists
2023-05-22 21:05:41 [ℹ]  up to date serviceaccount "kube-system/aws-node"
2023-05-22 21:05:41 [ℹ]  daemonset "kube-system/aws-node" restarted
2023-05-22 21:05:41 [ℹ]  constructing managed nodegroup stack "eksctl-do-eks-yaml-g5-nodegroup-sys"
2023-05-22 21:05:41 [ℹ]  constructing managed nodegroup stack "eksctl-do-eks-yaml-g5-nodegroup-g5"
2023-05-22 21:05:42 [ℹ]  deploying stack "eksctl-do-eks-yaml-g5-nodegroup-sys"
2023-05-22 21:05:42 [ℹ]  ready for CloudFormation stack "eksctl-do-eks-yaml-g5-nodegroup-sys"
2023-05-22 21:05:42 [ℹ]  deploying stack "eksctl-do-eks-yaml-g5-nodegroup-g5"
2023-05-22 21:05:42 [ℹ]  ready for CloudFormation stack "eksctl-do-eks-yaml-g5-nodegroup-g5"
2023-05-22 21:06:12 [ℹ]  ready for CloudFormation stack "eksctl-do-eks-yaml-g5-nodegroup-sys"
2023-05-22 21:06:12 [ℹ]  ready for CloudFormation stack "eksctl-do-eks-yaml-g5-nodegroup-g5"
2023-05-22 21:06:55 [ℹ]  ready for CloudFormation stack "eksctl-do-eks-yaml-g5-nodegroup-sys"
2023-05-22 21:07:11 [ℹ]  ready for CloudFormation stack "eksctl-do-eks-yaml-g5-nodegroup-g5"
2023-05-22 21:08:29 [ℹ]  ready for CloudFormation stack "eksctl-do-eks-yaml-g5-nodegroup-g5"
2023-05-22 21:08:45 [ℹ]  ready for CloudFormation stack "eksctl-do-eks-yaml-g5-nodegroup-sys"
2023-05-22 21:09:52 [ℹ]  ready for CloudFormation stack "eksctl-do-eks-yaml-g5-nodegroup-g5"
2023-05-22 21:09:53 [ℹ]  ready for the management airplane to turn into prepared
2023-05-22 21:09:53 [✔]  saved kubeconfig as "/root/.kube/config"
2023-05-22 21:09:53 [ℹ]  1 job: { set up Nvidia system plugin }
W0522 21:09:54.155837    1668 warnings.go:70] spec.template.metadata.annotations[scheduler.alpha.kubernetes.io/critical-pod]: non-functional in v1.16+; use the "priorityClassName" discipline as an alternative
2023-05-22 21:09:54 [ℹ]  created "kube-system:DaemonSet.apps/nvidia-device-plugin-daemonset"
2023-05-22 21:09:54 [ℹ]  as you might be utilizing the EKS-Optimized Accelerated AMI with a GPU-enabled occasion kind, the Nvidia Kubernetes system plugin was mechanically put in.
        to skip putting in it, use --install-nvidia-plugin=false.
2023-05-22 21:09:54 [✔]  all EKS cluster sources for "do-eks-yaml-g5" have been created
2023-05-22 21:09:54 [ℹ]  nodegroup "sys" has 1 node(s)
2023-05-22 21:09:54 [ℹ]  node "ip-192-168-18-137.ec2.inner" is prepared
2023-05-22 21:09:54 [ℹ]  ready for a minimum of 1 node(s) to turn into prepared in "sys"
2023-05-22 21:09:54 [ℹ]  nodegroup "sys" has 1 node(s)
2023-05-22 21:09:54 [ℹ]  node "ip-192-168-18-137.ec2.inner" is prepared
2023-05-22 21:09:55 [ℹ]  kubectl command ought to work with "/root/.kube/config", strive 'kubectl get nodes'
2023-05-22 21:09:55 [✔]  EKS cluster "do-eks-yaml-g5" in "us-east-1" area is prepared

Mon Could 22 21:09:55 UTC 2023
Accomplished creating cluster utilizing /eks/conf/eksctl/yaml/eks-gpu-g5.yaml

/eks
- To confirm that your cluster is created efficiently, run the next command
kubectl get nodes -L node.kubernetes.io/instance-type
The output is just like the next:
NAME                              STATUS   ROLES    AGE   VERSION               INSTANCE_TYPE
ip-192-168-18-137.ec2.inner    Prepared    <none>   47m   v1.25.9-eks-0a21954   m5.xlarge
ip-192-168-214-241.ec2.inner   Prepared    <none>   46m   v1.25.9-eks-0a21954   g5.2xlarge
On this instance, we’ve got one m5.xlarge and one g5.2xlarge occasion in our cluster; subsequently, we see two nodes listed within the previous output.
Through the cluster creation course of, the NVIDIA system plugin will get put in. You have to to take away it after cluster creation as a result of we’ll use the NVIDIA GPU Operator as an alternative.
- Delete the plugin with the next command
kubectl -n kube-system delete daemonset nvidia-device-plugin-daemonset
We get the next output:
daemonset.apps "nvidia-device-plugin-daemonset" deleted
Set up the NVIDIA Helm repo
Set up the NVIDIA Helm repo with the next command:
helm repo add nvidia https://helm.ngc.nvidia.com/nvidia && helm repo replace
Deploy the DCGM exporter with the NVIDIA GPU Operator
To deploy the DCGM exporter, full the next steps:
- Put together the DCGM exporter GPU metrics configuration
curl https://uncooked.githubusercontent.com/NVIDIA/dcgm-exporter/predominant/and so on/dcp-metrics-included.csv > dcgm-metrics.csv
You’ve gotten the choice to edit the dcgm-metrics.csv file. You may add or take away any metrics as wanted.
- Create the gpu-operator namespace and DCGM exporter ConfigMap
kubectl create namespace gpu-operator && /
kubectl create configmap metrics-config -n gpu-operator --from-file=dcgm-metrics.csv
The output is as follows:
namespace/gpu-operator created
configmap/metrics-config created
- Apply the GPU operator to the EKS cluster
helm set up --wait --generate-name -n gpu-operator --create-namespace nvidia/gpu-operator
--set dcgmExporter.config.title=metrics-config
--set dcgmExporter.env[0].title=DCGM_EXPORTER_COLLECTORS
--set dcgmExporter.env[0].worth=/and so on/dcgm-exporter/dcgm-metrics.csv
--set toolkit.enabled=false
The output is as follows:
NAME: gpu-operator-1684795140
LAST DEPLOYED: Day Month Date HH:mm:ss YYYY
NAMESPACE: gpu-operator
STATUS: deployed
REVISION: 1
TEST SUITE: None
- Affirm that the DCGM exporter pod is working
kubectl -n gpu-operator get pods | grep dcgm
The output is as follows:
nvidia-dcgm-exporter-lkmfr 1/1 Operating 0 1m
When you examine the logs, it is best to see the “Beginning webserver” message:
kubectl -n gpu-operator logs -f $(kubectl -n gpu-operator get pods | grep dcgm | minimize -d ' ' -f 1)
The output is as follows:
Defaulted container "nvidia-dcgm-exporter" out of: nvidia-dcgm-exporter, toolkit-validation (init)
time="2023-05-22T22:40:08Z" stage=information msg="Beginning dcgm-exporter"
time="2023-05-22T22:40:08Z" stage=information msg="DCGM efficiently initialized!"
time="2023-05-22T22:40:08Z" stage=information msg="Amassing DCP Metrics"
time="2023-05-22T22:40:08Z" stage=information msg="No configmap knowledge specified, falling again to metric file /and so on/dcgm-exporter/dcgm-metrics.csv"
time="2023-05-22T22:40:08Z" stage=information msg="Initializing system entities of kind: GPU"
time="2023-05-22T22:40:09Z" stage=information msg="Initializing system entities of kind: NvSwitch"
time="2023-05-22T22:40:09Z" stage=information msg="Not amassing change metrics: no switches to watch"
time="2023-05-22T22:40:09Z" stage=information msg="Initializing system entities of kind: NvLink"
time="2023-05-22T22:40:09Z" stage=information msg="Not amassing hyperlink metrics: no switches to watch"
time="2023-05-22T22:40:09Z" stage=information msg="Kubernetes metrics assortment enabled!"
time="2023-05-22T22:40:09Z" stage=information msg="Pipeline beginning"
time="2023-05-22T22:40:09Z" stage=information msg="Beginning webserver"
NVIDIA DCGM Exporter exposes a Prometheus metrics endpoint, which will be ingested by the CloudWatch agent. To see the endpoint, use the next command:
kubectl -n gpu-operator get companies | grep dcgm
We get the next output:
nvidia-dcgm-exporter ClusterIP 10.100.183.207 <none> 9400/TCP 10m
- To generate some GPU utilization, we deploy a pod that runs the gpu-burn binary
kubectl apply -f https://uncooked.githubusercontent.com/aws-samples/aws-do-eks/predominant/Container-Root/eks/deployment/gpu-metrics/gpu-burn-deployment.yaml
The output is as follows:
deployment.apps/gpu-burn created
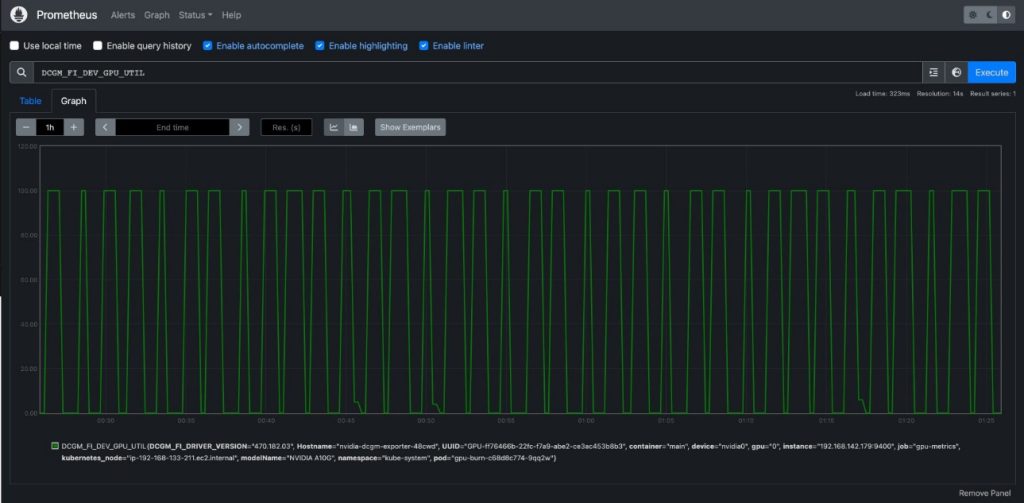
This deployment makes use of a single GPU to supply a steady sample of 100% utilization for 20 seconds adopted by 0% utilization for 20 seconds.
- To verify the endpoint works, you possibly can run a short lived container that makes use of curl to learn the content material of
http://nvidia-dcgm-exporter:9400/metrics
kubectl -n gpu-operator run -it --rm curl --restart="By no means" --image=curlimages/curl --command -- curl http://nvidia-dcgm-exporter:9400/metrics
We get the next output:
# HELP DCGM_FI_DEV_SM_CLOCK SM clock frequency (in MHz).
# TYPE DCGM_FI_DEV_SM_CLOCK gauge
DCGM_FI_DEV_SM_CLOCK{gpu="0",UUID="GPU-ff76466b-22fc-f7a9-abe2-ce3ac453b8b3",system="nvidia0",modelName="NVIDIA A10G",Hostname="nvidia-dcgm-exporter-48cwd",DCGM_FI_DRIVER_VERSION="470.182.03",container="predominant",namespace="kube-system",pod="gpu-burn-c68d8c774-ltg9s"} 1455
# HELP DCGM_FI_DEV_MEM_CLOCK Reminiscence clock frequency (in MHz).
# TYPE DCGM_FI_DEV_MEM_CLOCK gauge
DCGM_FI_DEV_MEM_CLOCK{gpu="0",UUID="GPU-ff76466b-22fc-f7a9-abe2-ce3ac453b8b3",system="nvidia0",modelName="NVIDIA A10G",Hostname="nvidia-dcgm-exporter-48cwd",DCGM_FI_DRIVER_VERSION="470.182.03",container="predominant",namespace="kube-system",pod="gpu-burn-c68d8c774-ltg9s"} 6250
# HELP DCGM_FI_DEV_GPU_TEMP GPU temperature (in C).
# TYPE DCGM_FI_DEV_GPU_TEMP gauge
DCGM_FI_DEV_GPU_TEMP{gpu="0",UUID="GPU-ff76466b-22fc-f7a9-abe2-ce3ac453b8b3",system="nvidia0",modelName="NVIDIA A10G",Hostname="nvidia-dcgm-exporter-48cwd",DCGM_FI_DRIVER_VERSION="470.182.03",container="predominant",namespace="kube-system",pod="gpu-burn-c68d8c774-ltg9s"} 65
# HELP DCGM_FI_DEV_POWER_USAGE Energy draw (in W).
# TYPE DCGM_FI_DEV_POWER_USAGE gauge
DCGM_FI_DEV_POWER_USAGE{gpu="0",UUID="GPU-ff76466b-22fc-f7a9-abe2-ce3ac453b8b3",system="nvidia0",modelName="NVIDIA A10G",Hostname="nvidia-dcgm-exporter-48cwd",DCGM_FI_DRIVER_VERSION="470.182.03",container="predominant",namespace="kube-system",pod="gpu-burn-c68d8c774-ltg9s"} 299.437000
# HELP DCGM_FI_DEV_TOTAL_ENERGY_CONSUMPTION Complete power consumption since boot (in mJ).
# TYPE DCGM_FI_DEV_TOTAL_ENERGY_CONSUMPTION counter
DCGM_FI_DEV_TOTAL_ENERGY_CONSUMPTION{gpu="0",UUID="GPU-ff76466b-22fc-f7a9-abe2-ce3ac453b8b3",system="nvidia0",modelName="NVIDIA A10G",Hostname="nvidia-dcgm-exporter-48cwd",DCGM_FI_DRIVER_VERSION="470.182.03",container="predominant",namespace="kube-system",pod="gpu-burn-c68d8c774-ltg9s"} 15782796862
# HELP DCGM_FI_DEV_PCIE_REPLAY_COUNTER Complete variety of PCIe retries.
# TYPE DCGM_FI_DEV_PCIE_REPLAY_COUNTER counter
DCGM_FI_DEV_PCIE_REPLAY_COUNTER{gpu="0",UUID="GPU-ff76466b-22fc-f7a9-abe2-ce3ac453b8b3",system="nvidia0",modelName="NVIDIA A10G",Hostname="nvidia-dcgm-exporter-48cwd",DCGM_FI_DRIVER_VERSION="470.182.03",container="predominant",namespace="kube-system",pod="gpu-burn-c68d8c774-ltg9s"} 0
# HELP DCGM_FI_DEV_GPU_UTIL GPU utilization (in %).
# TYPE DCGM_FI_DEV_GPU_UTIL gauge
DCGM_FI_DEV_GPU_UTIL{gpu="0",UUID="GPU-ff76466b-22fc-f7a9-abe2-ce3ac453b8b3",system="nvidia0",modelName="NVIDIA A10G",Hostname="nvidia-dcgm-exporter-48cwd",DCGM_FI_DRIVER_VERSION="470.182.03",container="predominant",namespace="kube-system",pod="gpu-burn-c68d8c774-ltg9s"} 100
# HELP DCGM_FI_DEV_MEM_COPY_UTIL Reminiscence utilization (in %).
# TYPE DCGM_FI_DEV_MEM_COPY_UTIL gauge
DCGM_FI_DEV_MEM_COPY_UTIL{gpu="0",UUID="GPU-ff76466b-22fc-f7a9-abe2-ce3ac453b8b3",system="nvidia0",modelName="NVIDIA A10G",Hostname="nvidia-dcgm-exporter-48cwd",DCGM_FI_DRIVER_VERSION="470.182.03",container="predominant",namespace="kube-system",pod="gpu-burn-c68d8c774-ltg9s"} 38
# HELP DCGM_FI_DEV_ENC_UTIL Encoder utilization (in %).
# TYPE DCGM_FI_DEV_ENC_UTIL gauge
DCGM_FI_DEV_ENC_UTIL{gpu="0",UUID="GPU-ff76466b-22fc-f7a9-abe2-ce3ac453b8b3",system="nvidia0",modelName="NVIDIA A10G",Hostname="nvidia-dcgm-exporter-48cwd",DCGM_FI_DRIVER_VERSION="470.182.03",container="predominant",namespace="kube-system",pod="gpu-burn-c68d8c774-ltg9s"} 0
# HELP DCGM_FI_DEV_DEC_UTIL Decoder utilization (in %).
# TYPE DCGM_FI_DEV_DEC_UTIL gauge
DCGM_FI_DEV_DEC_UTIL{gpu="0",UUID="GPU-ff76466b-22fc-f7a9-abe2-ce3ac453b8b3",system="nvidia0",modelName="NVIDIA A10G",Hostname="nvidia-dcgm-exporter-48cwd",DCGM_FI_DRIVER_VERSION="470.182.03",container="predominant",namespace="kube-system",pod="gpu-burn-c68d8c774-ltg9s"} 0
# HELP DCGM_FI_DEV_XID_ERRORS Worth of the final XID error encountered.
# TYPE DCGM_FI_DEV_XID_ERRORS gauge
DCGM_FI_DEV_XID_ERRORS{gpu="0",UUID="GPU-ff76466b-22fc-f7a9-abe2-ce3ac453b8b3",system="nvidia0",modelName="NVIDIA A10G",Hostname="nvidia-dcgm-exporter-48cwd",DCGM_FI_DRIVER_VERSION="470.182.03",container="predominant",namespace="kube-system",pod="gpu-burn-c68d8c774-ltg9s"} 0
# HELP DCGM_FI_DEV_FB_FREE Framebuffer reminiscence free (in MiB).
# TYPE DCGM_FI_DEV_FB_FREE gauge
DCGM_FI_DEV_FB_FREE{gpu="0",UUID="GPU-ff76466b-22fc-f7a9-abe2-ce3ac453b8b3",system="nvidia0",modelName="NVIDIA A10G",Hostname="nvidia-dcgm-exporter-48cwd",DCGM_FI_DRIVER_VERSION="470.182.03",container="predominant",namespace="kube-system",pod="gpu-burn-c68d8c774-ltg9s"} 2230
# HELP DCGM_FI_DEV_FB_USED Framebuffer reminiscence used (in MiB).
# TYPE DCGM_FI_DEV_FB_USED gauge
DCGM_FI_DEV_FB_USED{gpu="0",UUID="GPU-ff76466b-22fc-f7a9-abe2-ce3ac453b8b3",system="nvidia0",modelName="NVIDIA A10G",Hostname="nvidia-dcgm-exporter-48cwd",DCGM_FI_DRIVER_VERSION="470.182.03",container="predominant",namespace="kube-system",pod="gpu-burn-c68d8c774-ltg9s"} 20501
# HELP DCGM_FI_DEV_NVLINK_BANDWIDTH_TOTAL Complete variety of NVLink bandwidth counters for all lanes.
# TYPE DCGM_FI_DEV_NVLINK_BANDWIDTH_TOTAL counter
DCGM_FI_DEV_NVLINK_BANDWIDTH_TOTAL{gpu="0",UUID="GPU-ff76466b-22fc-f7a9-abe2-ce3ac453b8b3",system="nvidia0",modelName="NVIDIA A10G",Hostname="nvidia-dcgm-exporter-48cwd",DCGM_FI_DRIVER_VERSION="470.182.03",container="predominant",namespace="kube-system",pod="gpu-burn-c68d8c774-ltg9s"} 0
# HELP DCGM_FI_DEV_VGPU_LICENSE_STATUS vGPU License standing
# TYPE DCGM_FI_DEV_VGPU_LICENSE_STATUS gauge
DCGM_FI_DEV_VGPU_LICENSE_STATUS{gpu="0",UUID="GPU-ff76466b-22fc-f7a9-abe2-ce3ac453b8b3",system="nvidia0",modelName="NVIDIA A10G",Hostname="nvidia-dcgm-exporter-48cwd",DCGM_FI_DRIVER_VERSION="470.182.03",container="predominant",namespace="kube-system",pod="gpu-burn-c68d8c774-ltg9s"} 0
# HELP DCGM_FI_DEV_UNCORRECTABLE_REMAPPED_ROWS Variety of remapped rows for uncorrectable errors
# TYPE DCGM_FI_DEV_UNCORRECTABLE_REMAPPED_ROWS counter
DCGM_FI_DEV_UNCORRECTABLE_REMAPPED_ROWS{gpu="0",UUID="GPU-ff76466b-22fc-f7a9-abe2-ce3ac453b8b3",system="nvidia0",modelName="NVIDIA A10G",Hostname="nvidia-dcgm-exporter-48cwd",DCGM_FI_DRIVER_VERSION="470.182.03",container="predominant",namespace="kube-system",pod="gpu-burn-c68d8c774-ltg9s"} 0
# HELP DCGM_FI_DEV_CORRECTABLE_REMAPPED_ROWS Variety of remapped rows for correctable errors
# TYPE DCGM_FI_DEV_CORRECTABLE_REMAPPED_ROWS counter
DCGM_FI_DEV_CORRECTABLE_REMAPPED_ROWS{gpu="0",UUID="GPU-ff76466b-22fc-f7a9-abe2-ce3ac453b8b3",system="nvidia0",modelName="NVIDIA A10G",Hostname="nvidia-dcgm-exporter-48cwd",DCGM_FI_DRIVER_VERSION="470.182.03",container="predominant",namespace="kube-system",pod="gpu-burn-c68d8c774-ltg9s"} 0
# HELP DCGM_FI_DEV_ROW_REMAP_FAILURE Whether or not remapping of rows has failed
# TYPE DCGM_FI_DEV_ROW_REMAP_FAILURE gauge
DCGM_FI_DEV_ROW_REMAP_FAILURE{gpu="0",UUID="GPU-ff76466b-22fc-f7a9-abe2-ce3ac453b8b3",system="nvidia0",modelName="NVIDIA A10G",Hostname="nvidia-dcgm-exporter-48cwd",DCGM_FI_DRIVER_VERSION="470.182.03",container="predominant",namespace="kube-system",pod="gpu-burn-c68d8c774-ltg9s"} 0
# HELP DCGM_FI_PROF_GR_ENGINE_ACTIVE Ratio of time the graphics engine is energetic (in %).
# TYPE DCGM_FI_PROF_GR_ENGINE_ACTIVE gauge
DCGM_FI_PROF_GR_ENGINE_ACTIVE{gpu="0",UUID="GPU-ff76466b-22fc-f7a9-abe2-ce3ac453b8b3",system="nvidia0",modelName="NVIDIA A10G",Hostname="nvidia-dcgm-exporter-48cwd",DCGM_FI_DRIVER_VERSION="470.182.03",container="predominant",namespace="kube-system",pod="gpu-burn-c68d8c774-ltg9s"} 0.808369
# HELP DCGM_FI_PROF_PIPE_TENSOR_ACTIVE Ratio of cycles the tensor (HMMA) pipe is energetic (in %).
# TYPE DCGM_FI_PROF_PIPE_TENSOR_ACTIVE gauge
DCGM_FI_PROF_PIPE_TENSOR_ACTIVE{gpu="0",UUID="GPU-ff76466b-22fc-f7a9-abe2-ce3ac453b8b3",system="nvidia0",modelName="NVIDIA A10G",Hostname="nvidia-dcgm-exporter-48cwd",DCGM_FI_DRIVER_VERSION="470.182.03",container="predominant",namespace="kube-system",pod="gpu-burn-c68d8c774-ltg9s"} 0.000000
# HELP DCGM_FI_PROF_DRAM_ACTIVE Ratio of cycles the system reminiscence interface is energetic sending or receiving knowledge (in %).
# TYPE DCGM_FI_PROF_DRAM_ACTIVE gauge
DCGM_FI_PROF_DRAM_ACTIVE{gpu="0",UUID="GPU-ff76466b-22fc-f7a9-abe2-ce3ac453b8b3",system="nvidia0",modelName="NVIDIA A10G",Hostname="nvidia-dcgm-exporter-48cwd",DCGM_FI_DRIVER_VERSION="470.182.03",container="predominant",namespace="kube-system",pod="gpu-burn-c68d8c774-ltg9s"} 0.315787
# HELP DCGM_FI_PROF_PCIE_TX_BYTES The speed of information transmitted over the PCIe bus - together with each protocol headers and knowledge payloads - in bytes per second.
# TYPE DCGM_FI_PROF_PCIE_TX_BYTES gauge
DCGM_FI_PROF_PCIE_TX_BYTES{gpu="0",UUID="GPU-ff76466b-22fc-f7a9-abe2-ce3ac453b8b3",system="nvidia0",modelName="NVIDIA A10G",Hostname="nvidia-dcgm-exporter-48cwd",DCGM_FI_DRIVER_VERSION="470.182.03",container="predominant",namespace="kube-system",pod="gpu-burn-c68d8c774-ltg9s"} 3985328
# HELP DCGM_FI_PROF_PCIE_RX_BYTES The speed of information obtained over the PCIe bus - together with each protocol headers and knowledge payloads - in bytes per second.
# TYPE DCGM_FI_PROF_PCIE_RX_BYTES gauge
DCGM_FI_PROF_PCIE_RX_BYTES{gpu="0",UUID="GPU-ff76466b-22fc-f7a9-abe2-ce3ac453b8b3",system="nvidia0",modelName="NVIDIA A10G",Hostname="nvidia-dcgm-exporter-48cwd",DCGM_FI_DRIVER_VERSION="470.182.03",container="predominant",namespace="kube-system",pod="gpu-burn-c68d8c774-ltg9s"} 21715174
pod "curl" deleted
Configure and deploy the CloudWatch agent
To configure and deploy the CloudWatch agent, full the next steps:
- Obtain the YAML file and edit it
curl -O https://uncooked.githubusercontent.com/aws-samples/amazon-cloudwatch-container-insights/k8s/1.3.15/k8s-deployment-manifest-templates/deployment-mode/service/cwagent-prometheus/prometheus-eks.yaml
The file comprises a cwagent configmap and a prometheus configmap. For this put up, we edit each.
- Edit the
prometheus-eks.yaml file
Open the prometheus-eks.yaml file in your favourite editor and change the cwagentconfig.json part with the next content material:
apiVersion: v1
knowledge:
  # cwagent json config
  cwagentconfig.json: |
    {
      "logs": {
        "metrics_collected": {
          "prometheus": {
            "prometheus_config_path": "/and so on/prometheusconfig/prometheus.yaml",
            "emf_processor": {
              "metric_declaration": [
                {
                  "source_labels": ["Service"],
                  "label_matcher": ".*dcgm.*",
                  "dimensions": [["Service","Namespace","ClusterName","job","pod"]],
                  "metric_selectors": [
                    "^DCGM_FI_DEV_GPU_UTIL$",
                    "^DCGM_FI_DEV_DEC_UTIL$",
                    "^DCGM_FI_DEV_ENC_UTIL$",
                    "^DCGM_FI_DEV_MEM_CLOCK$",
                    "^DCGM_FI_DEV_MEM_COPY_UTIL$",
                    "^DCGM_FI_DEV_POWER_USAGE$",
                    "^DCGM_FI_DEV_ROW_REMAP_FAILURE$",
                    "^DCGM_FI_DEV_SM_CLOCK$",
                    "^DCGM_FI_DEV_XID_ERRORS$",
                    "^DCGM_FI_PROF_DRAM_ACTIVE$",
                    "^DCGM_FI_PROF_GR_ENGINE_ACTIVE$",
                    "^DCGM_FI_PROF_PCIE_RX_BYTES$",
                    "^DCGM_FI_PROF_PCIE_TX_BYTES$",
                    "^DCGM_FI_PROF_PIPE_TENSOR_ACTIVE$"
                  ]
                }
              ]
            }
          }
        },
        "force_flush_interval": 5
      }
    }
- Within the
prometheus config part, append the next job definition for the DCGM exporter
- job_name: 'kubernetes-pod-dcgm-exporter'
      sample_limit: 10000
      metrics_path: /api/v1/metrics/prometheus
      kubernetes_sd_configs:
      - position: pod
      relabel_configs:
      - source_labels: [__meta_kubernetes_pod_container_name]
        motion: preserve
        regex: '^DCGM.*$'
      - source_labels: [__address__]
        motion: change
        regex: ([^:]+)(?::d+)?
        alternative: ${1}:9400
        target_label: __address__
      - motion: labelmap
        regex: __meta_kubernetes_pod_label_(.+)
      - motion: change
        source_labels:
        - __meta_kubernetes_namespace
        target_label: Namespace
      - source_labels: [__meta_kubernetes_pod]
        motion: change
        target_label: pod
      - motion: change
        source_labels:
        - __meta_kubernetes_pod_container_name
        target_label: container_name
      - motion: change
        source_labels:
        - __meta_kubernetes_pod_controller_name
        target_label: pod_controller_name
      - motion: change
        source_labels:
        - __meta_kubernetes_pod_controller_kind
        target_label: pod_controller_kind
      - motion: change
        source_labels:
        - __meta_kubernetes_pod_phase
        target_label: pod_phase
      - motion: change
        source_labels:
        - __meta_kubernetes_pod_node_name
        target_label: NodeName
- Save the file and apply the
cwagent-dcgm configuration to your cluster
kubectl apply -f ./prometheus-eks.yaml
We get the next output:
namespace/amazon-cloudwatch created
configmap/prometheus-cwagentconfig created
configmap/prometheus-config created
serviceaccount/cwagent-prometheus created
clusterrole.rbac.authorization.k8s.io/cwagent-prometheus-role created
clusterrolebinding.rbac.authorization.k8s.io/cwagent-prometheus-role-binding created
deployment.apps/cwagent-prometheus created
- Affirm that the CloudWatch agent pod is working
kubectl -n amazon-cloudwatch get pods
We get the next output:
NAME                                  READY   STATUS    RESTARTS   AGE
cwagent-prometheus-7dfd69cc46-s4cx7   1/1     Operating   0          15m
Visualize metrics on the CloudWatch console
To visualise the metrics in CloudWatch, full the next steps:
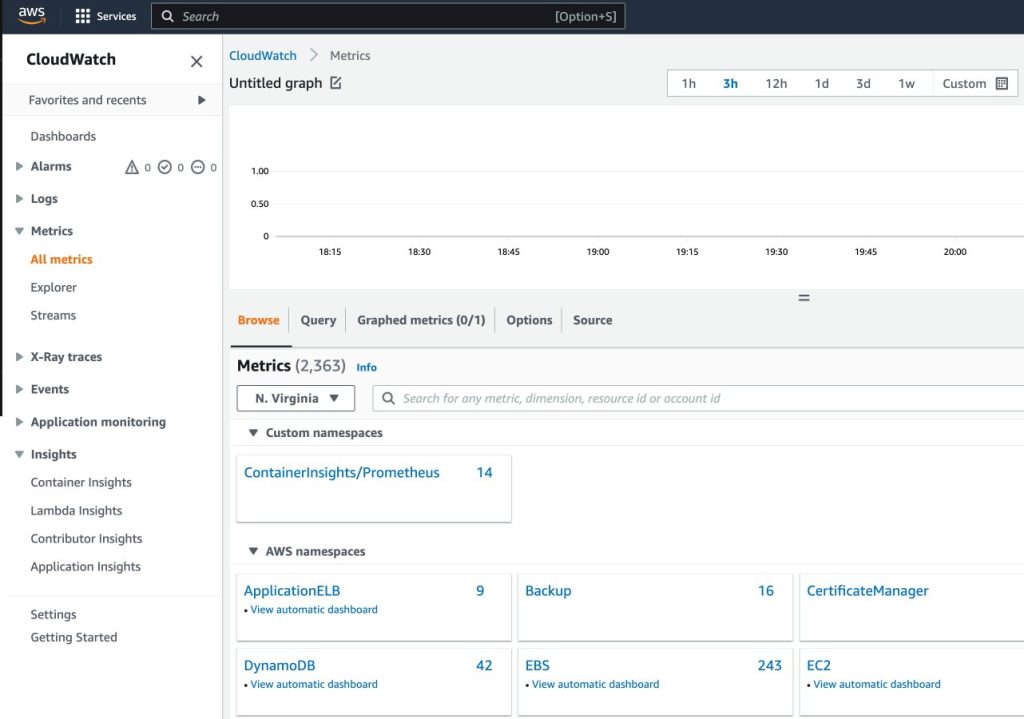
- On the CloudWatch console, underneath Metrics within the navigation pane, select All metrics
- Within the Customized namespaces part, select the brand new entry for ContainerInsights/Prometheus
For extra details about the ContainerInsights/Prometheus namespace, seek advice from Scraping additional Prometheus sources and importing those metrics.
- Drill all the way down to the metric names and select
DCGM_FI_DEV_GPU_UTIL
- On the Graphed metrics tab, set Interval to 5 seconds

- Set the refresh interval to 10 seconds
You will notice the metrics collected from DCGM exporter that visualize the gpu-burn sample on and off every 20 seconds.
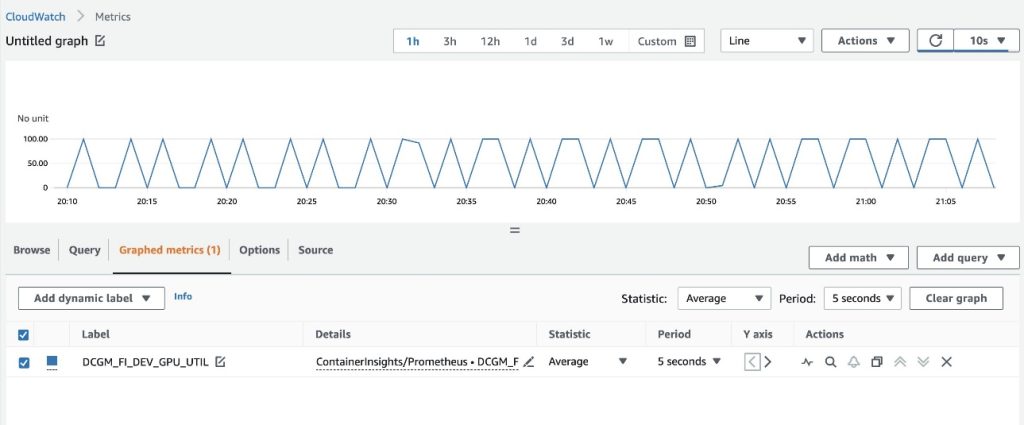
On the Browse tab, you possibly can see the information, together with the pod title for every metric.
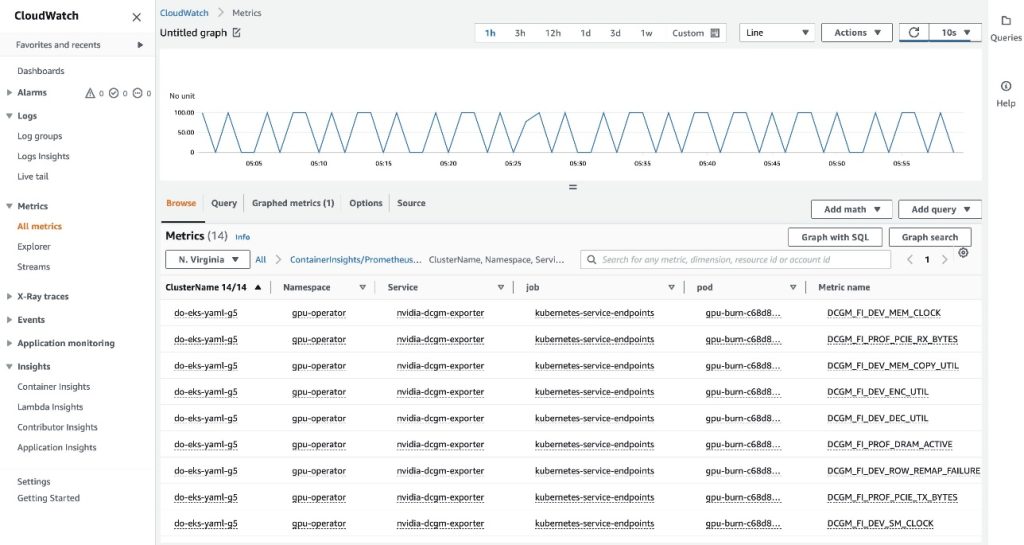
The EKS API metadata has been mixed with the DCGM metrics knowledge, ensuing within the offered pod-based GPU metrics.
This concludes the primary method of exporting DCGM metrics to CloudWatch through the CloudWatch agent.
Within the subsequent part, we configure the second structure, which exports the DCGM metrics to Prometheus, and we visualize them with Grafana.
Use Prometheus and Grafana to visualise GPU metrics from DCGM
Full the next steps:
- Add the Prometheus neighborhood helm chart
helm repo add prometheus-community https://prometheus-community.github.io/helm-charts
This chart deploys each Prometheus and Grafana. We have to make some edits to the chart earlier than working the set up command.
- Save the chart configuration values to a file in
/tmp
helm examine values prometheus-community/kube-prometheus-stack > /tmp/kube-prometheus-stack.values
- Edit the char configuration file
Edit the saved file (/tmp/kube-prometheus-stack.values) and set the next possibility by on the lookout for the setting title and setting the worth:
prometheus.prometheusSpec.serviceMonitorSelectorNilUsesHelmValues=false
- Add the next ConfigMap to the
additionalScrapeConfigs part
additionalScrapeConfigs:
- job_name: gpu-metrics
  scrape_interval: 1s
  metrics_path: /metrics
  scheme: http
  kubernetes_sd_configs:
  - position: endpoints
    namespaces:
      names:
      - gpu-operator
  relabel_configs:
  - source_labels: [__meta_kubernetes_pod_node_name]
    motion: change
    target_label: kubernetes_node
- Deploy the Prometheus stack with the up to date values
helm set up prometheus-community/kube-prometheus-stack
--create-namespace --namespace prometheus
--generate-name
--values /tmp/kube-prometheus-stack.values
We get the next output:
NAME: kube-prometheus-stack-1684965548
LAST DEPLOYED: Wed Could 24 21:59:14 2023
NAMESPACE: prometheus
STATUS: deployed
REVISION: 1
NOTES:
kube-prometheus-stack has been put in. Verify its standing by working:
  kubectl --namespace prometheus get pods -l "launch=kube-prometheus-stack-1684965548"

Go to https://github.com/prometheus-operator/kube-prometheus
 for directions on the right way to create & configure Alertmanager
and Prometheus situations utilizing the Operator.
- Affirm that the Prometheus pods are working
kubectl get pods -n prometheus
We get the next output:
NAME                                                              READY   STATUS    RESTARTS   AGE
alertmanager-kube-prometheus-stack-1684-alertmanager-0            2/2     Operating   0          6m55s
kube-prometheus-stack-1684-operator-6c87649878-j7v55              1/1     Operating   0          6m58s
kube-prometheus-stack-1684965548-grafana-dcd7b4c96-bzm8p          3/3     Operating   0          6m58s
kube-prometheus-stack-1684965548-kube-state-metrics-7d856dptlj5   1/1     Operating   0          6m58s
kube-prometheus-stack-1684965548-prometheus-node-exporter-2fbl5   1/1     Operating   0          6m58s
kube-prometheus-stack-1684965548-prometheus-node-exporter-m7zmv   1/1     Operating   0          6m58s
prometheus-kube-prometheus-stack-1684-prometheus-0                2/2     Operating   0          6m55s
Prometheus and Grafana pods are within the Operating state.
Subsequent, we validate that DCGM metrics are flowing into Prometheus.
- Port-forward the Prometheus UI
There are other ways to reveal the Prometheus UI working in EKS to requests originating exterior of the cluster. We’ll use kubectl port-forwarding. Up to now, we’ve got been executing instructions contained in the aws-do-eks container. To entry the Prometheus service working within the cluster, we’ll create a tunnel from the host. Right here the aws-do-eks container is working by executing the next command exterior of the container, in a brand new terminal shell on the host. We’ll seek advice from this as “host shell”.
kubectl -n prometheus port-forward svc/$(kubectl -n prometheus get svc | grep prometheus | grep -v alertmanager | grep -v operator | grep -v grafana | grep -v metrics | grep -v exporter | grep -v operated | minimize -d ' ' -f 1) 8080:9090 &
Whereas the port-forwarding course of is working, we’re in a position to entry the Prometheus UI from the host as described beneath.
- Open the Prometheus UI
- In case you are utilizing Cloud9, please navigate to
Preview->Preview Operating Software to open the Prometheus UI in a tab contained in the Cloud9 IDE, then click on the  icon within the upper-right nook of the tab to come out in a brand new window.
- In case you are in your native host or related to an EC2 occasion through distant desktop open a browser and go to the URL
http://localhost:8080.
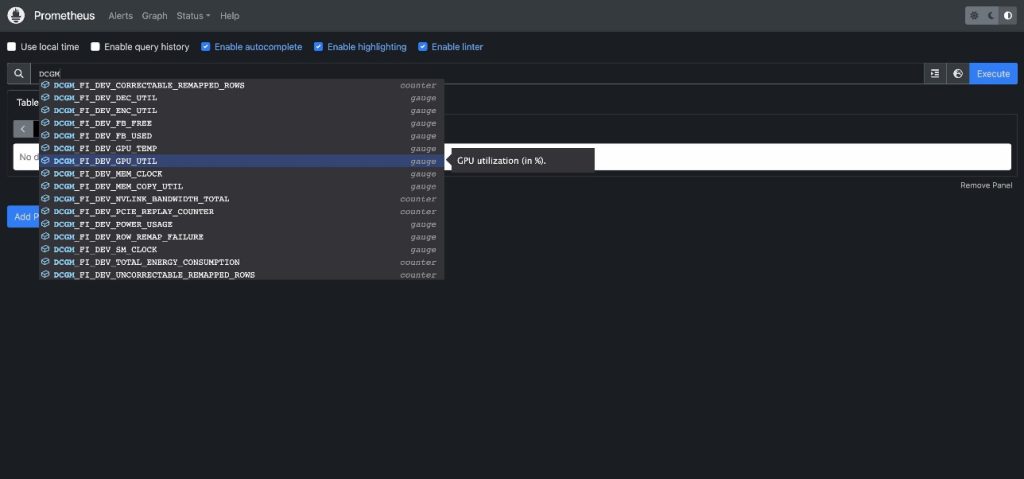
- Enter
DCGM to see the DCGM metrics which can be flowing into Prometheus
- Choose
DCGM_FI_DEV_GPU_UTIL, select Execute, after which navigate to the Graph tab to see the anticipated GPU utilization sample
- Cease the Prometheus port-forwarding course of
Run the next command line in your host shell:
kill -9 $(ps -aef | grep port-forward | grep -v grep | grep prometheus | awk '{print $2}')
Now we will visualize the DCGM metrics through Grafana Dashboard.
- Retrieve the password to log in to the Grafana UI
kubectl -n prometheus get secret $(kubectl -n prometheus get secrets and techniques | grep grafana | minimize -d ' ' -f 1) -o jsonpath="{.knowledge.admin-password}" | base64 --decode ; echo
- Port-forward the Grafana service
Run the next command line in your host shell:
kubectl port-forward -n prometheus svc/$(kubectl -n prometheus get svc | grep grafana | minimize -d ' ' -f 1) 8080:80 &
- Log in to the Grafana UI
Entry the Grafana UI login display the identical approach as you accessed the Prometheus UI earlier. If utilizing Cloud9, choose Preview->Preview Operating Software, then come out in a brand new window. If utilizing your native host or an EC2 occasion with distant desktop go to URL http://localhost:8080. Login with the consumer title admin and the password you retrieved earlier.
- Within the navigation pane, select Dashboards

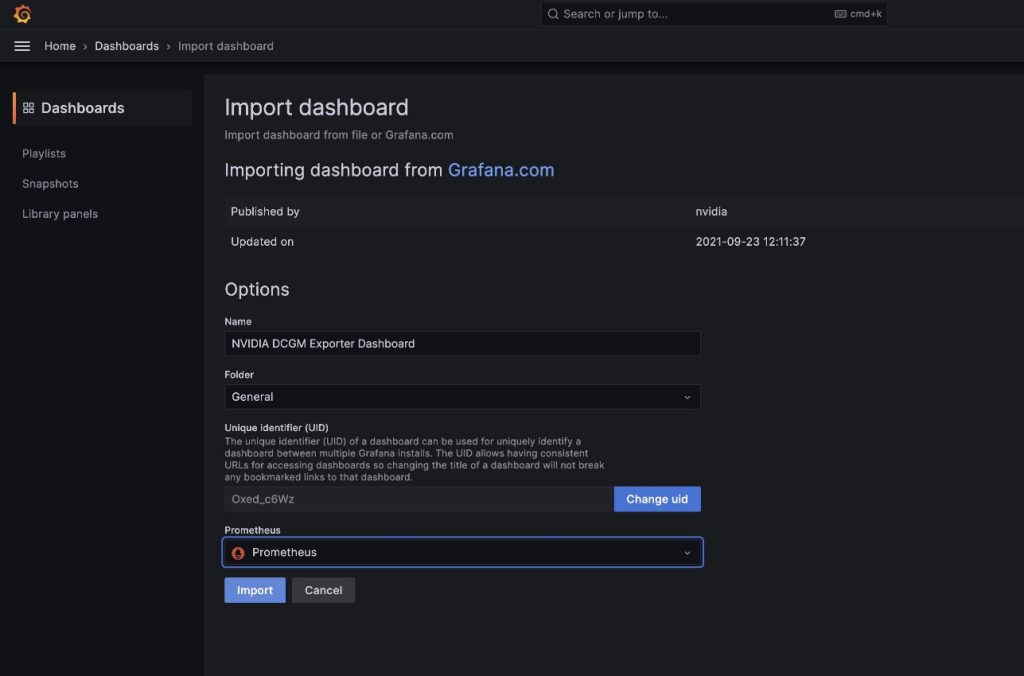
- Select New and Import
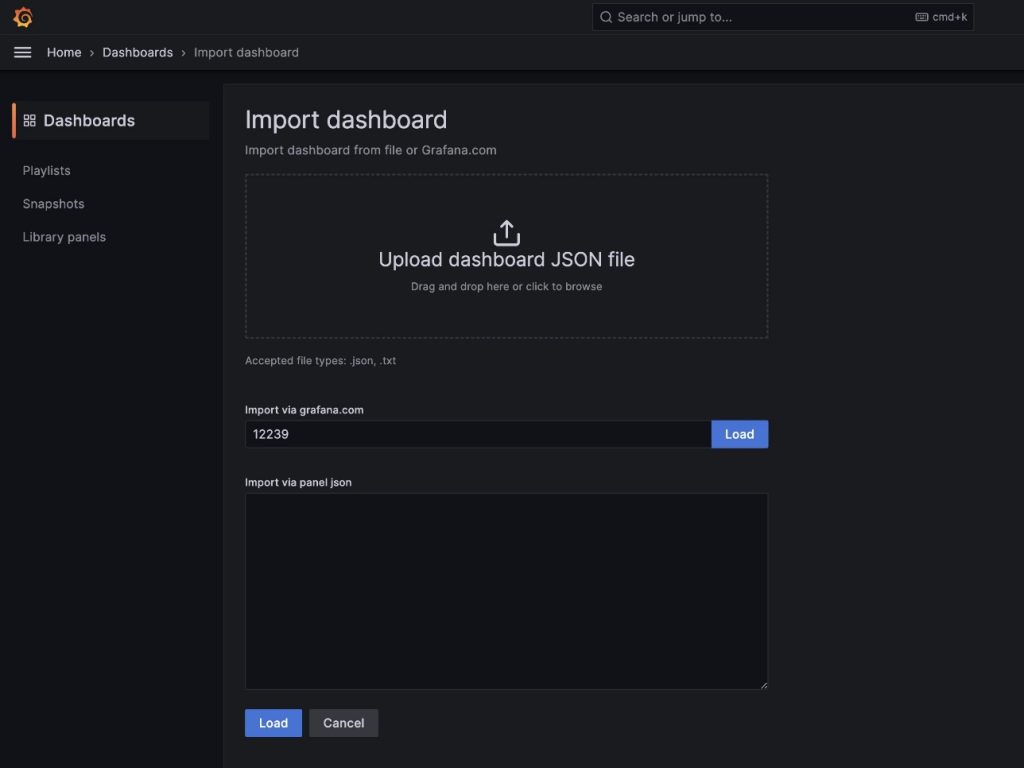
We’re going to import the default DCGM Grafana dashboard described in NVIDIA DCGM Exporter Dashboard.
- Within the discipline
import through grafana.com, enter 12239 and select Load
- Select Prometheus as the information supply
- Select Import
You will notice a dashboard just like the one within the following screenshot.
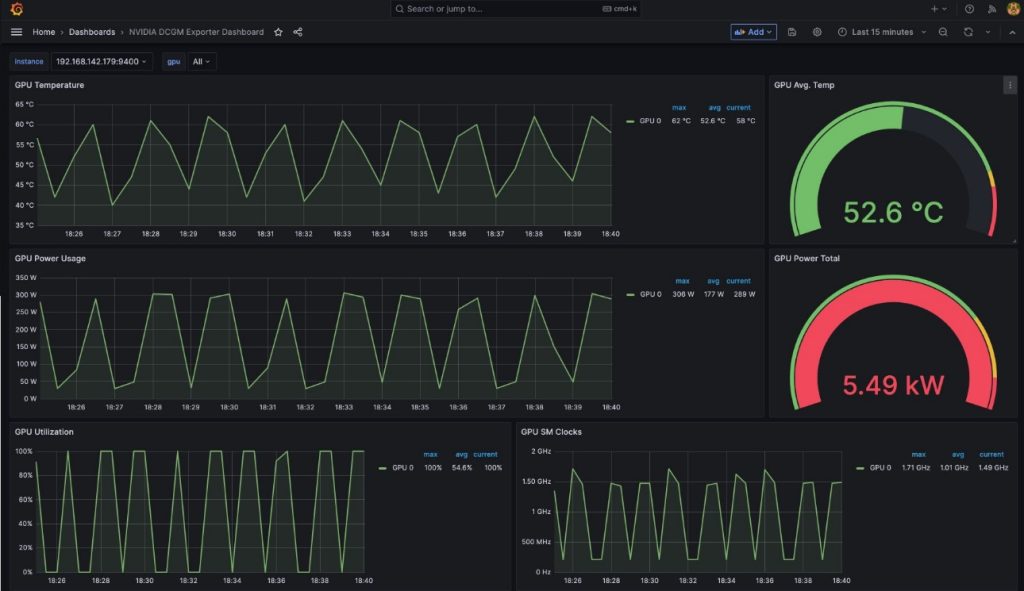
To exhibit that these metrics are pod-based, we’re going to modify the GPU Utilization pane on this dashboard.
- Select the pane and the choices menu (three dots)
- Broaden the Choices part and edit the Legend discipline
- Exchange the worth there with
Pod {{pod}}, then select Save
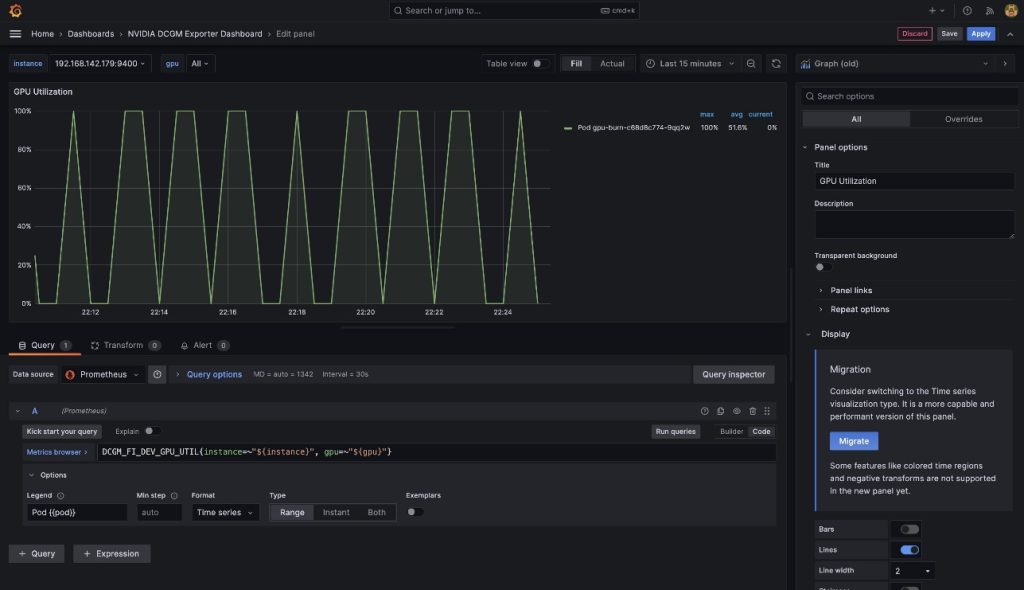
The legend now reveals the gpu-burn pod title related to the displayed GPU utilization.
- Cease port-forwarding the Grafana UI service
Run the next in your host shell:
kill -9 $(ps -aef | grep port-forward | grep -v grep | grep prometheus | awk '{print $2}')
On this put up, we demonstrated utilizing open-source Prometheus and Grafana deployed to the EKS cluster. If desired, this deployment will be substituted with Amazon Managed Service for Prometheus and Amazon Managed Grafana.
Clear up
To wash up the sources you created, run the next script from the aws-do-eks container shell:
Conclusion
On this put up, we utilized NVIDIA DCGM Exporter to gather GPU metrics and visualize them with both CloudWatch or Prometheus and Grafana. We invite you to make use of the architectures demonstrated right here to allow GPU utilization monitoring with NVIDIA DCGM in your personal AWS setting.
Further sources
Concerning the authors
 Amr Ragab is a former Principal Options Architect, EC2 Accelerated Computing at AWS. He’s dedicated to serving to clients run computational workloads at scale. In his spare time, he likes touring and discovering new methods to combine know-how into every day life.
 Alex Iankoulski is a Principal Options Architect, Self-managed Machine Studying at AWS. He’s a full-stack software program and infrastructure engineer who likes to do deep, hands-on work. In his position, he focuses on serving to clients with containerization and orchestration of ML and AI workloads on container-powered AWS companies. He’s additionally the creator of the open-source do framework and a Docker captain who loves making use of container applied sciences to speed up the tempo of innovation whereas fixing the world’s greatest challenges. Through the previous 10 years, Alex has labored on democratizing AI and ML, combating local weather change, and making journey safer, healthcare higher, and power smarter.
 Keita Watanabe is a Senior Options Architect of Frameworks ML Options at Amazon Net Providers the place he helps develop the business’s greatest cloud primarily based Self-managed Machine Studying options. His background is in Machine Studying analysis and growth. Previous to becoming a member of AWS, Keita was working within the e-commerce business. Keita holds a Ph.D. in Science from the College of Tokyo.