Deploy generative AI fashions from Amazon SageMaker JumpStart utilizing the AWS CDK
The seeds of a machine studying (ML) paradigm shift have existed for many years, however with the prepared availability of just about infinite compute capability, a large proliferation of knowledge, and the speedy development of ML applied sciences, prospects throughout industries are quickly adopting and utilizing ML applied sciences to remodel their companies.
Only recently, generative AI functions have captured everybody’s consideration and creativeness. We’re really at an thrilling inflection level within the widespread adoption of ML, and we consider each buyer expertise and utility can be reinvented with generative AI.
Generative AI is a sort of AI that may create new content material and concepts, together with conversations, tales, photographs, movies, and music. Like all AI, generative AI is powered by ML fashions—very massive fashions which can be pre-trained on huge corpora of knowledge and generally known as basis fashions (FMs).
The dimensions and general-purpose nature of FMs make them totally different from conventional ML fashions, which usually carry out particular duties, like analyzing textual content for sentiment, classifying photographs, and forecasting developments.
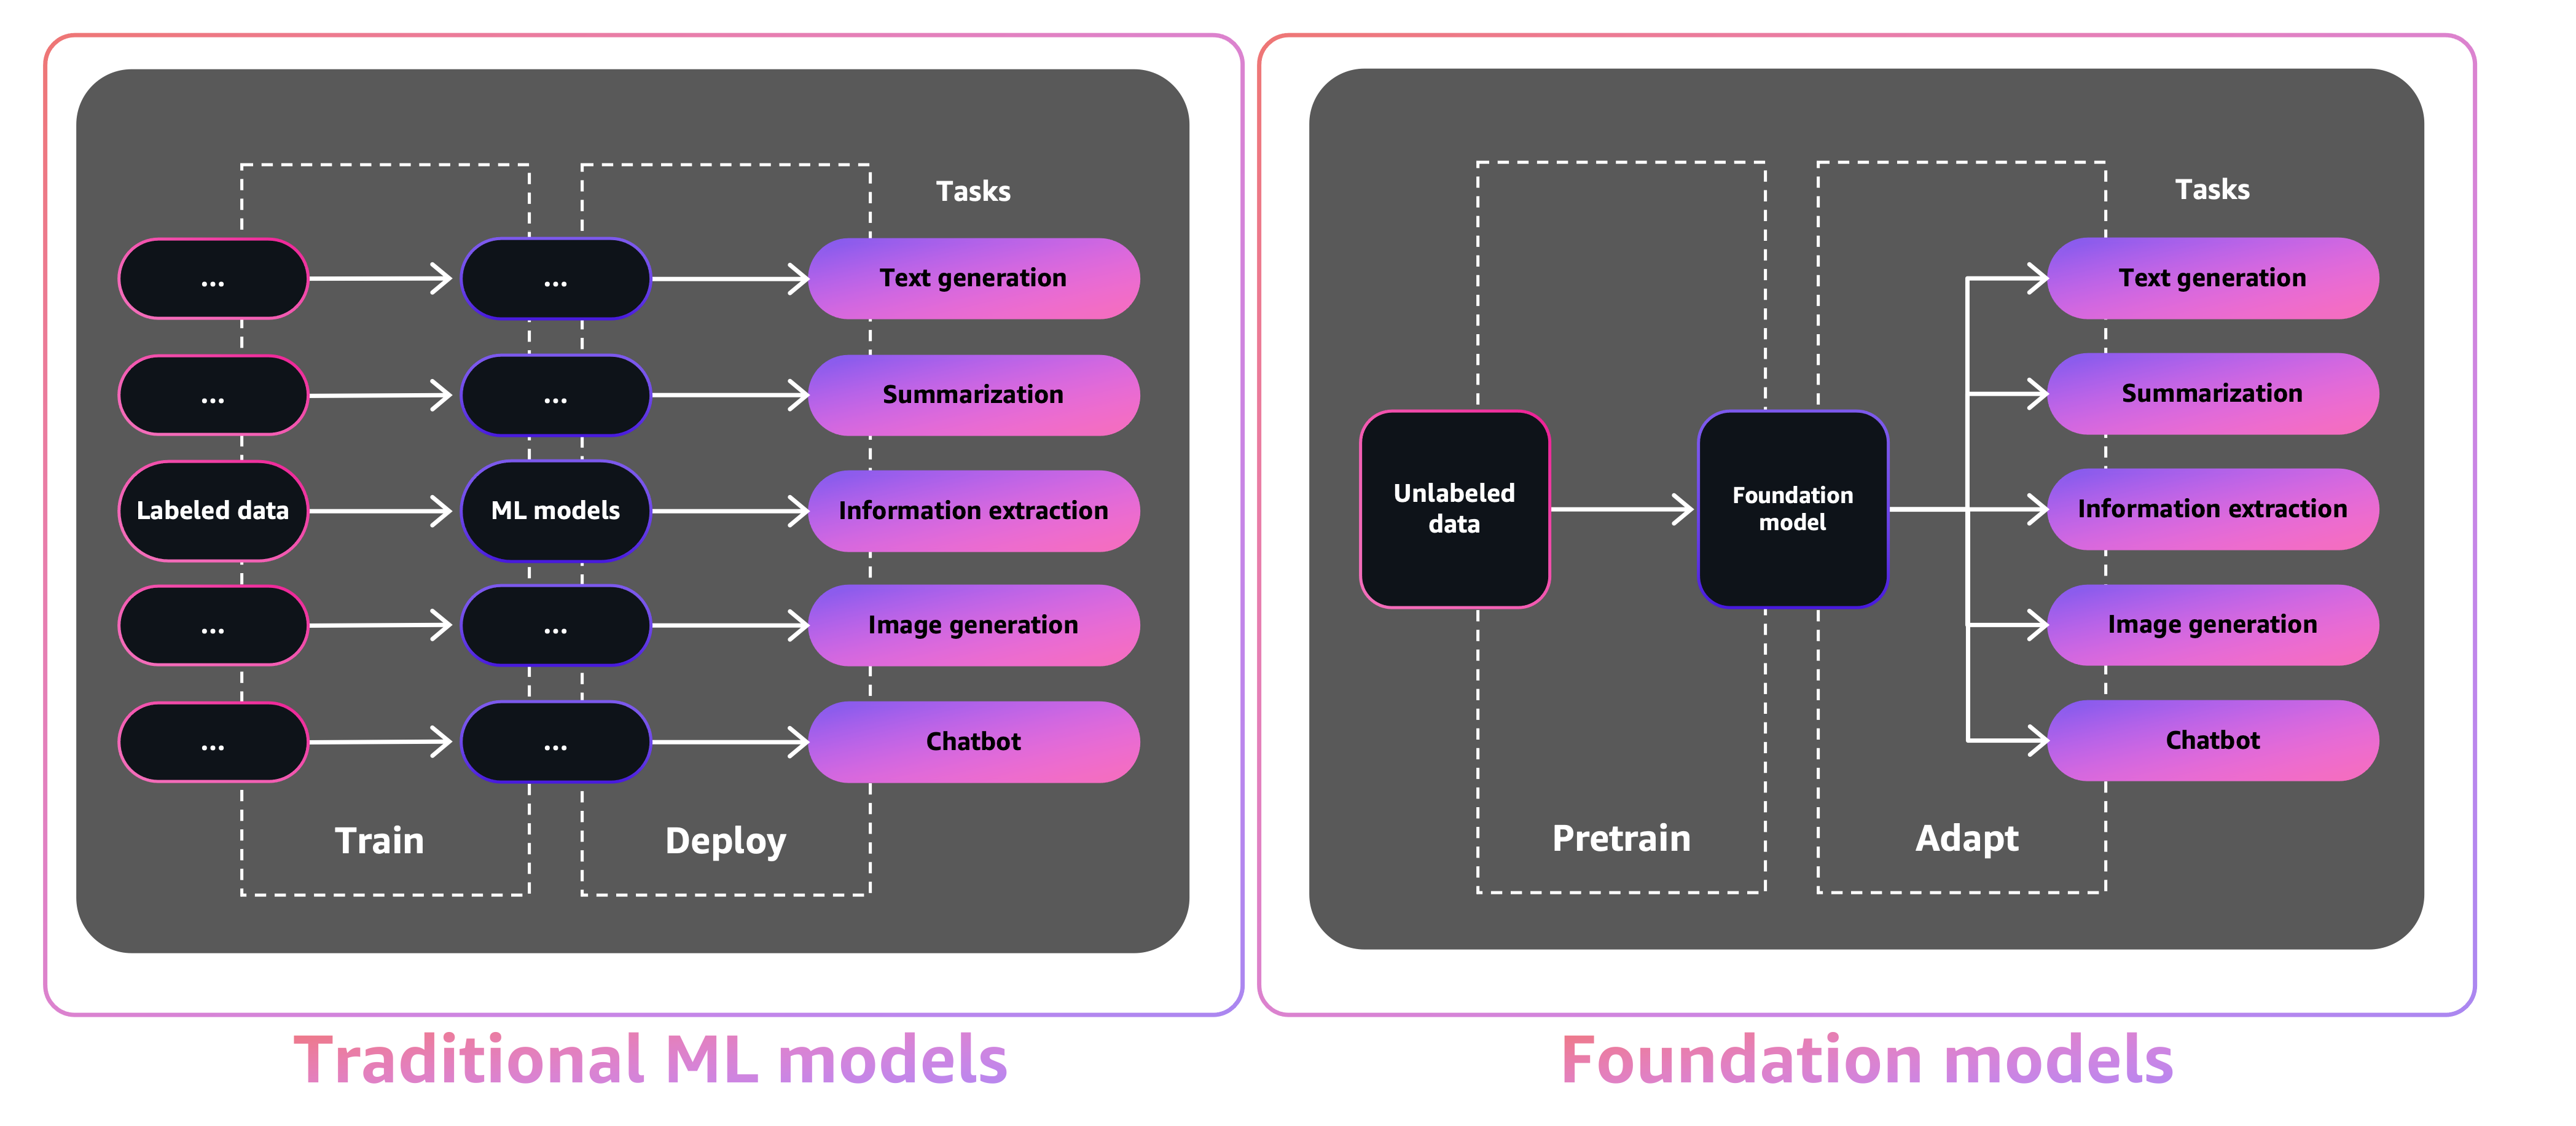
With custom ML fashions, with a view to obtain every particular job, it’s worthwhile to collect labeled information, practice a mannequin, and deploy that mannequin. With basis fashions, as an alternative of gathering labeled information for every mannequin and coaching a number of fashions, you should use the identical pre-trained FM to adapt numerous duties. You can even customise FMs to carry out domain-specific capabilities which can be differentiating to your companies, utilizing solely a small fraction of the info and compute required to coach a mannequin from scratch.
Generative AI has the potential to disrupt many industries by revolutionizing the way in which content material is created and consumed. Unique content material manufacturing, code era, customer support enhancement, and doc summarization are typical use circumstances of generative AI.
Amazon SageMaker JumpStart offers pre-trained, open-source fashions for a variety of drawback sorts that will help you get began with ML. You possibly can incrementally practice and tune these fashions earlier than deployment. JumpStart additionally offers resolution templates that arrange infrastructure for widespread use circumstances, and executable instance notebooks for ML with Amazon SageMaker.
With over 600 pre-trained fashions out there and rising day by day, JumpStart permits builders to shortly and simply incorporate cutting-edge ML methods into their manufacturing workflows. You possibly can entry the pre-trained fashions, resolution templates, and examples by means of the JumpStart touchdown web page in Amazon SageMaker Studio. You can even entry JumpStart fashions utilizing the SageMaker Python SDK. For details about the best way to use JumpStart fashions programmatically, see Use SageMaker JumpStart Algorithms with Pretrained Models.
In April 2023, AWS unveiled Amazon Bedrock, which offers a approach to construct generative AI-powered apps by way of pre-trained fashions from startups together with AI21 Labs, Anthropic, and Stability AI. Amazon Bedrock additionally presents entry to Titan basis fashions, a household of fashions educated in-house by AWS. With the serverless expertise of Amazon Bedrock, you possibly can simply discover the fitting mannequin to your wants, get began shortly, privately customise FMs with your individual information, and simply combine and deploy them into your functions utilizing the AWS instruments and capabilities you’re aware of (together with integrations with SageMaker ML options like Amazon SageMaker Experiments to check totally different fashions and Amazon SageMaker Pipelines to handle your FMs at scale) with out having to handle any infrastructure.
On this publish, we present the best way to deploy picture and textual content generative AI fashions from JumpStart utilizing the AWS Cloud Development Kit (AWS CDK). The AWS CDK is an open-source software program growth framework to outline your cloud utility sources utilizing acquainted programming languages like Python.
We use the Secure Diffusion mannequin for picture era and the FLAN-T5-XL mannequin for natural language understanding (NLU) and textual content era from Hugging Face in JumpStart.
Resolution overview
The net utility is constructed on Streamlit, an open-source Python library that makes it simple to create and share stunning, customized net apps for ML and information science. We host the online utility utilizing Amazon Elastic Container Service (Amazon ECS) with AWS Fargate and it’s accessed by way of an Utility Load Balancer. Fargate is a know-how that you should use with Amazon ECS to run containers with out having to handle servers or clusters or digital machines. The generative AI mannequin endpoints are launched from JumpStart photographs in Amazon Elastic Container Registry (Amazon ECR). Mannequin information is saved on Amazon Simple Storage Service (Amazon S3) within the JumpStart account. The net utility interacts with the fashions by way of Amazon API Gateway and AWS Lambda capabilities as proven within the following diagram.
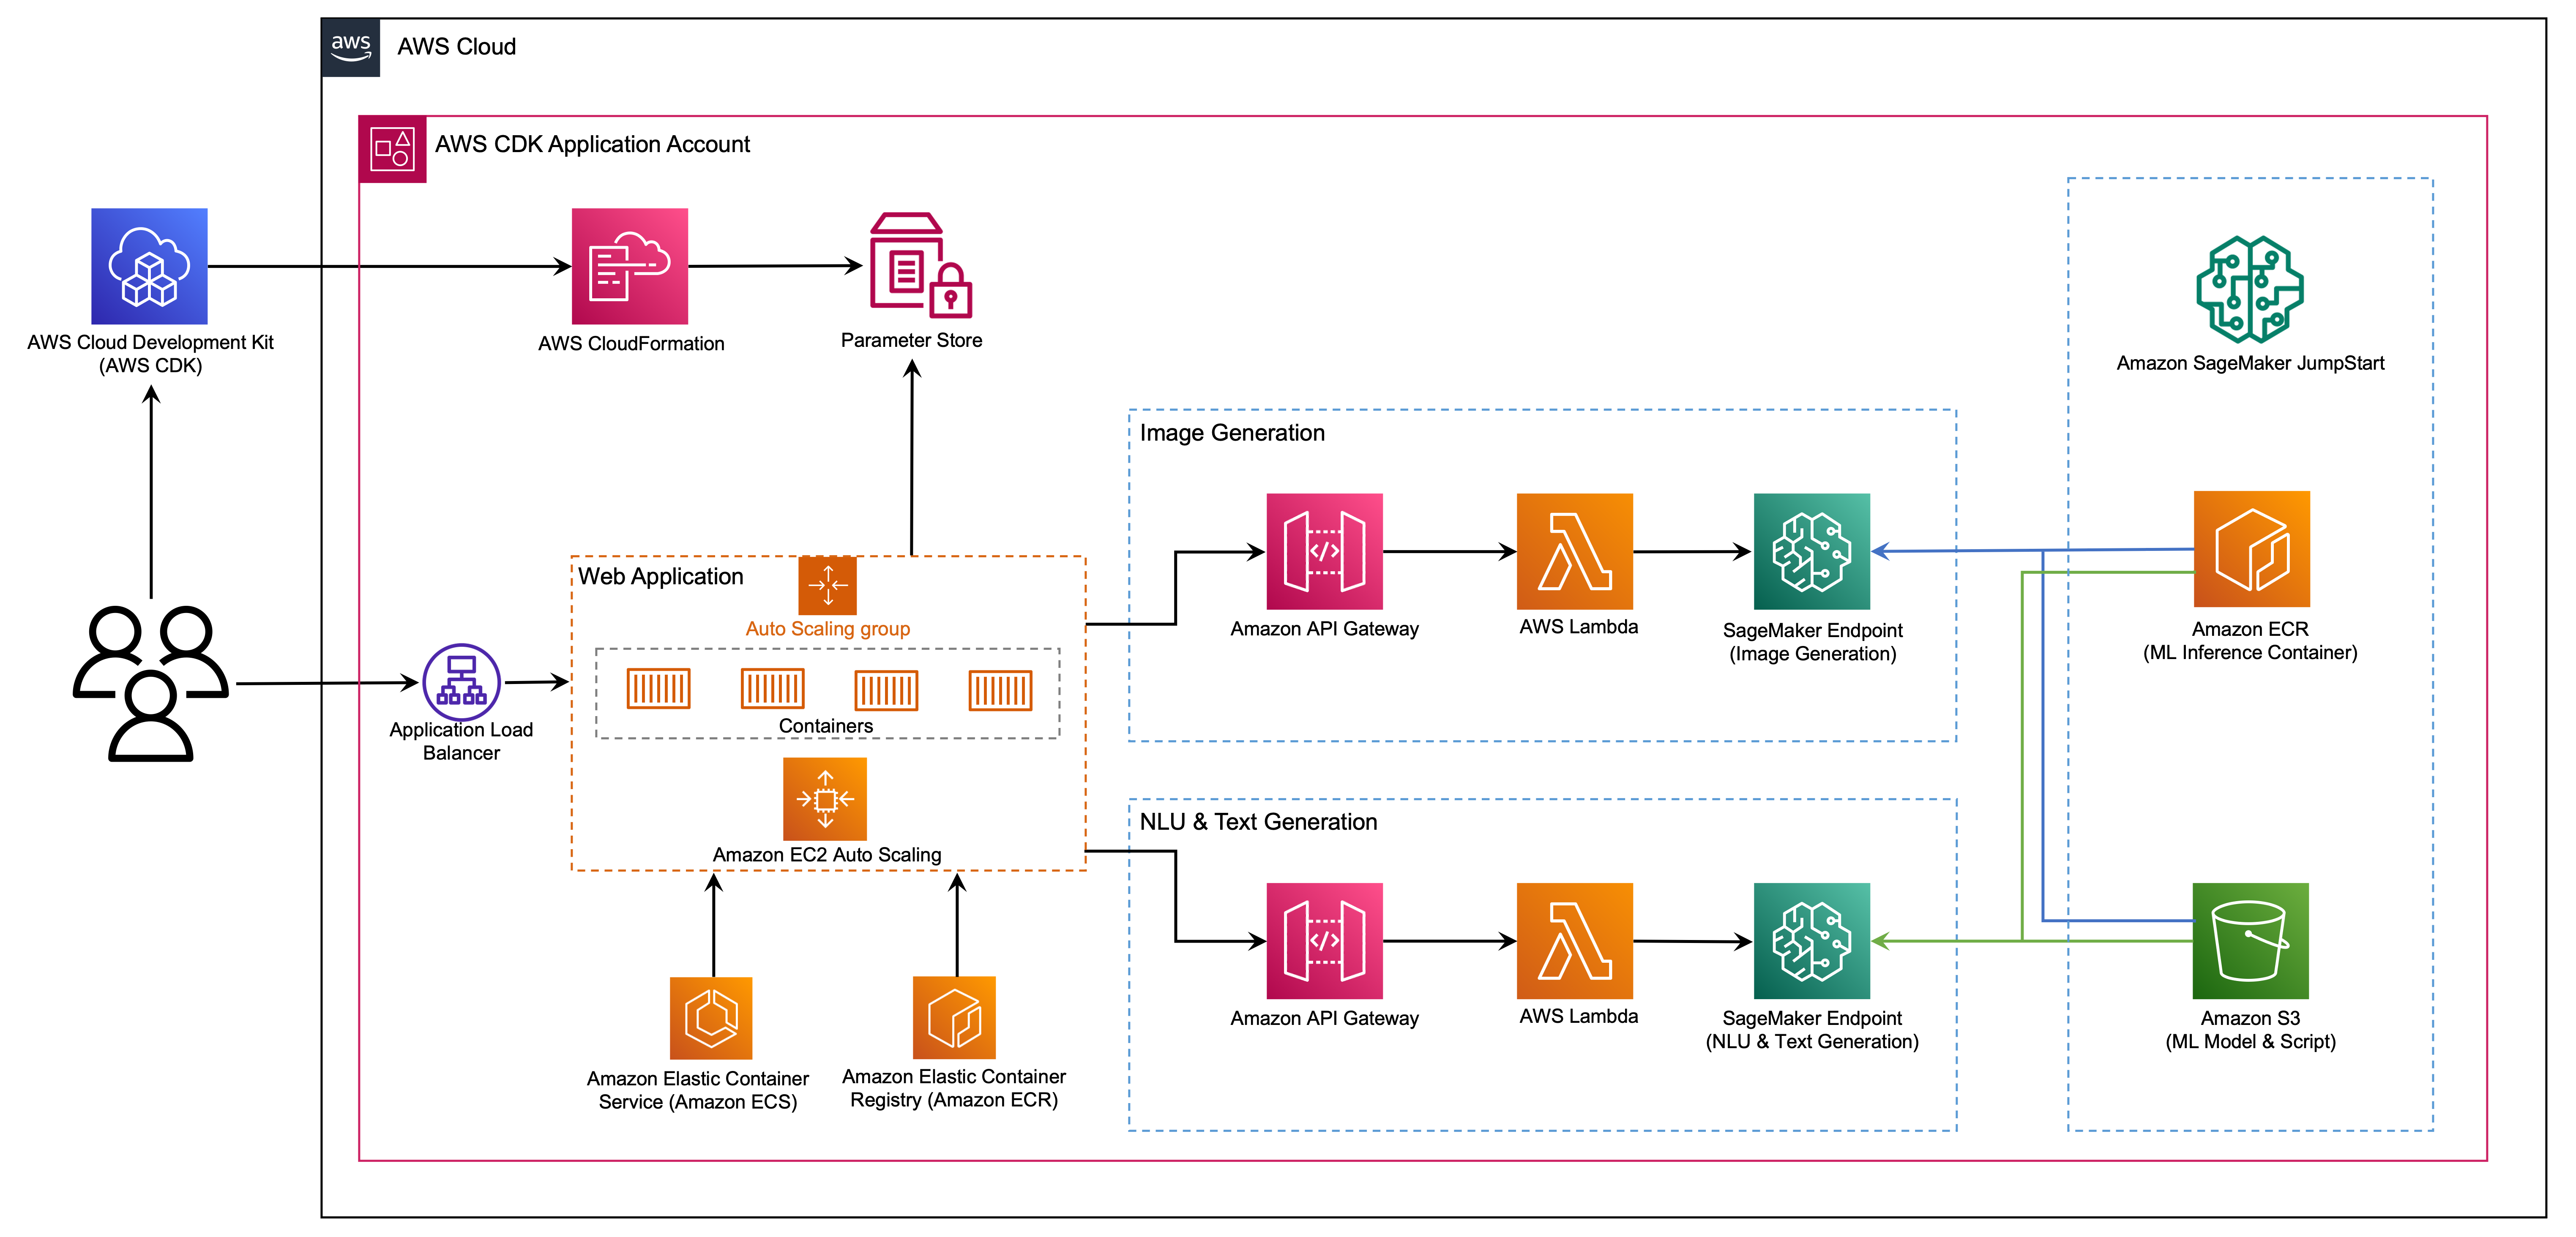
API Gateway offers the online utility and different purchasers an ordinary RESTful interface, whereas shielding the Lambda capabilities that interface with the mannequin. This simplifies the consumer utility code that consumes the fashions. The API Gateway endpoints are publicly accessible on this instance, permitting for the likelihood to increase this structure to implement totally different API access controls and combine with different functions.
On this publish, we stroll you thru the next steps:
- Set up the AWS Command Line Interface (AWS CLI) and AWS CDK v2 in your native machine.
- Clone and arrange the AWS CDK utility.
- Deploy the AWS CDK utility.
- Use the picture era AI mannequin.
- Use the textual content era AI mannequin.
- View the deployed sources on the AWS Management Console.
We offer an outline of the code on this venture within the appendix on the finish of this publish.
Conditions
It’s essential to have the next stipulations:
You possibly can deploy the infrastructure on this tutorial out of your native pc or you should use AWS Cloud9 as your deployment workstation. AWS Cloud9 comes pre-loaded with AWS CLI, AWS CDK and Docker. Should you go for AWS Cloud9, create the environment from the AWS console.
The estimated value to finish this publish is $50, assuming you permit the sources operating for 8 hours. Ensure you delete the sources you create on this publish to keep away from ongoing expenses.
Set up the AWS CLI and AWS CDK in your native machine
Should you don’t have already got the AWS CLI in your native machine, confer with Installing or updating the latest version of the AWS CLI and Configuring the AWS CLI.
Set up the AWS CDK Toolkit globally utilizing the next node bundle supervisor command:
Run the next command to confirm the right set up and print the model variety of the AWS CDK:
Ensure you have Docker put in in your native machine. Situation the next command to confirm the model:
Clone and arrange the AWS CDK utility
In your native machine, clone the AWS CDK utility with the next command:
Navigate to the venture folder:
Earlier than we deploy the appliance, let’s assessment the listing construction:
The stack folder incorporates the code for every stack within the AWS CDK utility. The code folder incorporates the code for the Lambda capabilities. The repository additionally incorporates the online utility positioned beneath the folder web-app.
The cdk.json file tells the AWS CDK Toolkit the best way to run your utility.
This utility was examined within the us-east-1 Area, nevertheless it ought to work in any Area that has the required companies and inference occasion kind ml.g4dn.4xlarge laid out in app.py.
Arrange a digital setting
This venture is about up like an ordinary Python venture. Create a Python digital setting utilizing the next code:
Use the next command to activate the digital setting:
Should you’re on a Home windows platform, activate the digital setting as follows:
After the digital setting is activated, improve pip to the most recent model:
Set up the required dependencies:
Earlier than you deploy any AWS CDK utility, it’s worthwhile to bootstrap an area in your account and the Area you’re deploying into. To bootstrap in your default Area, challenge the next command:
If you wish to deploy into a particular account and Area, challenge the next command:
For extra details about this setup, go to Getting started with the AWS CDK.
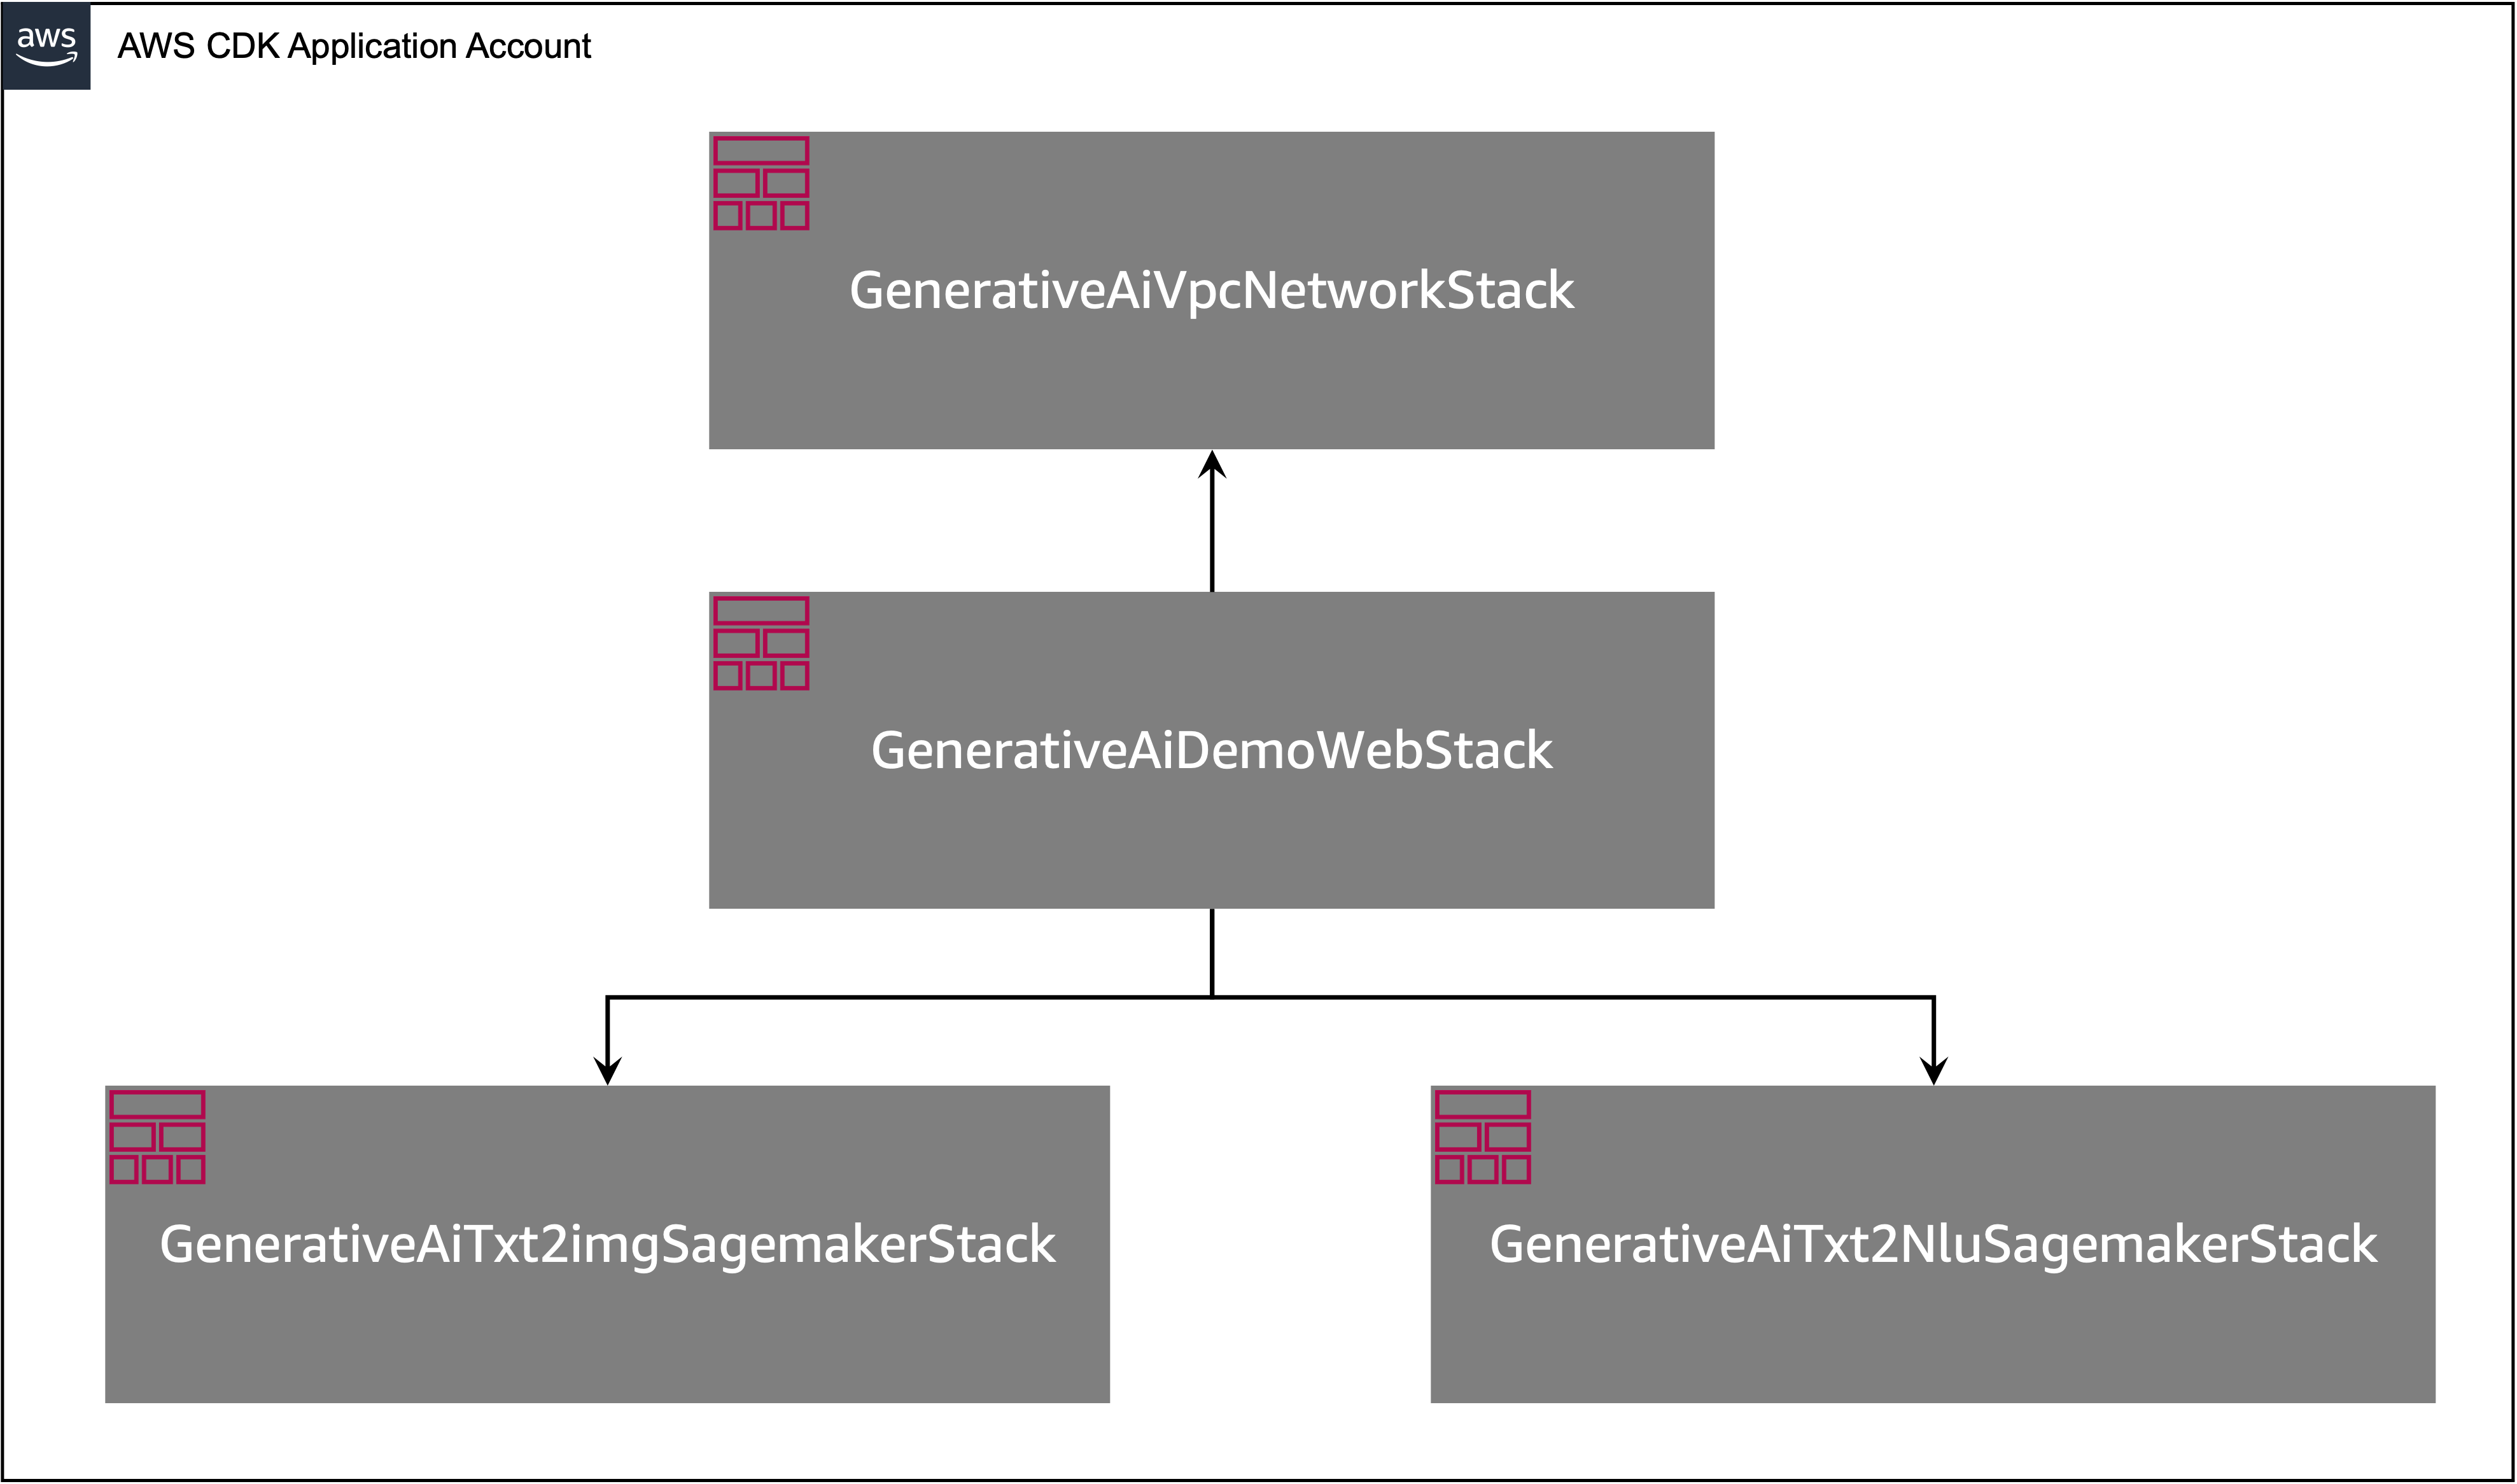
AWS CDK utility stack construction
The AWS CDK utility incorporates a number of stacks, as proven within the following diagram.
You possibly can listing the stacks in your AWS CDK utility with the next command:
The next are different helpful AWS CDK instructions:
- cdk ls – Lists all stacks within the app
- cdk synth – Emits the synthesized AWS CloudFormation template
- cdk deploy – Deploys this stack to your default AWS account and Area
- cdk diff – Compares the deployed stack with present state
- cdk docs – Opens the AWS CDK documentation
The subsequent part exhibits you the best way to deploy the AWS CDK utility.
Deploy the AWS CDK utility
The AWS CDK utility can be deployed to the default Area based mostly in your workstation configuration. If you wish to power the deployment in a particular Area, set your AWS_DEFAULT_REGION setting variable accordingly.
At this level, you possibly can deploy the AWS CDK utility. First you launch the VPC community stack:
If you’re prompted, enter y to proceed with the deployment. It is best to see a listing of AWS sources which can be being provisioned within the stack. This step takes round 3 minutes to finish.
Then you definately launch the online utility stack:
After analyzing the stack, the AWS CDK will show the useful resource listing within the stack. Enter y to proceed with the deployment. This step takes round 5 minutes.
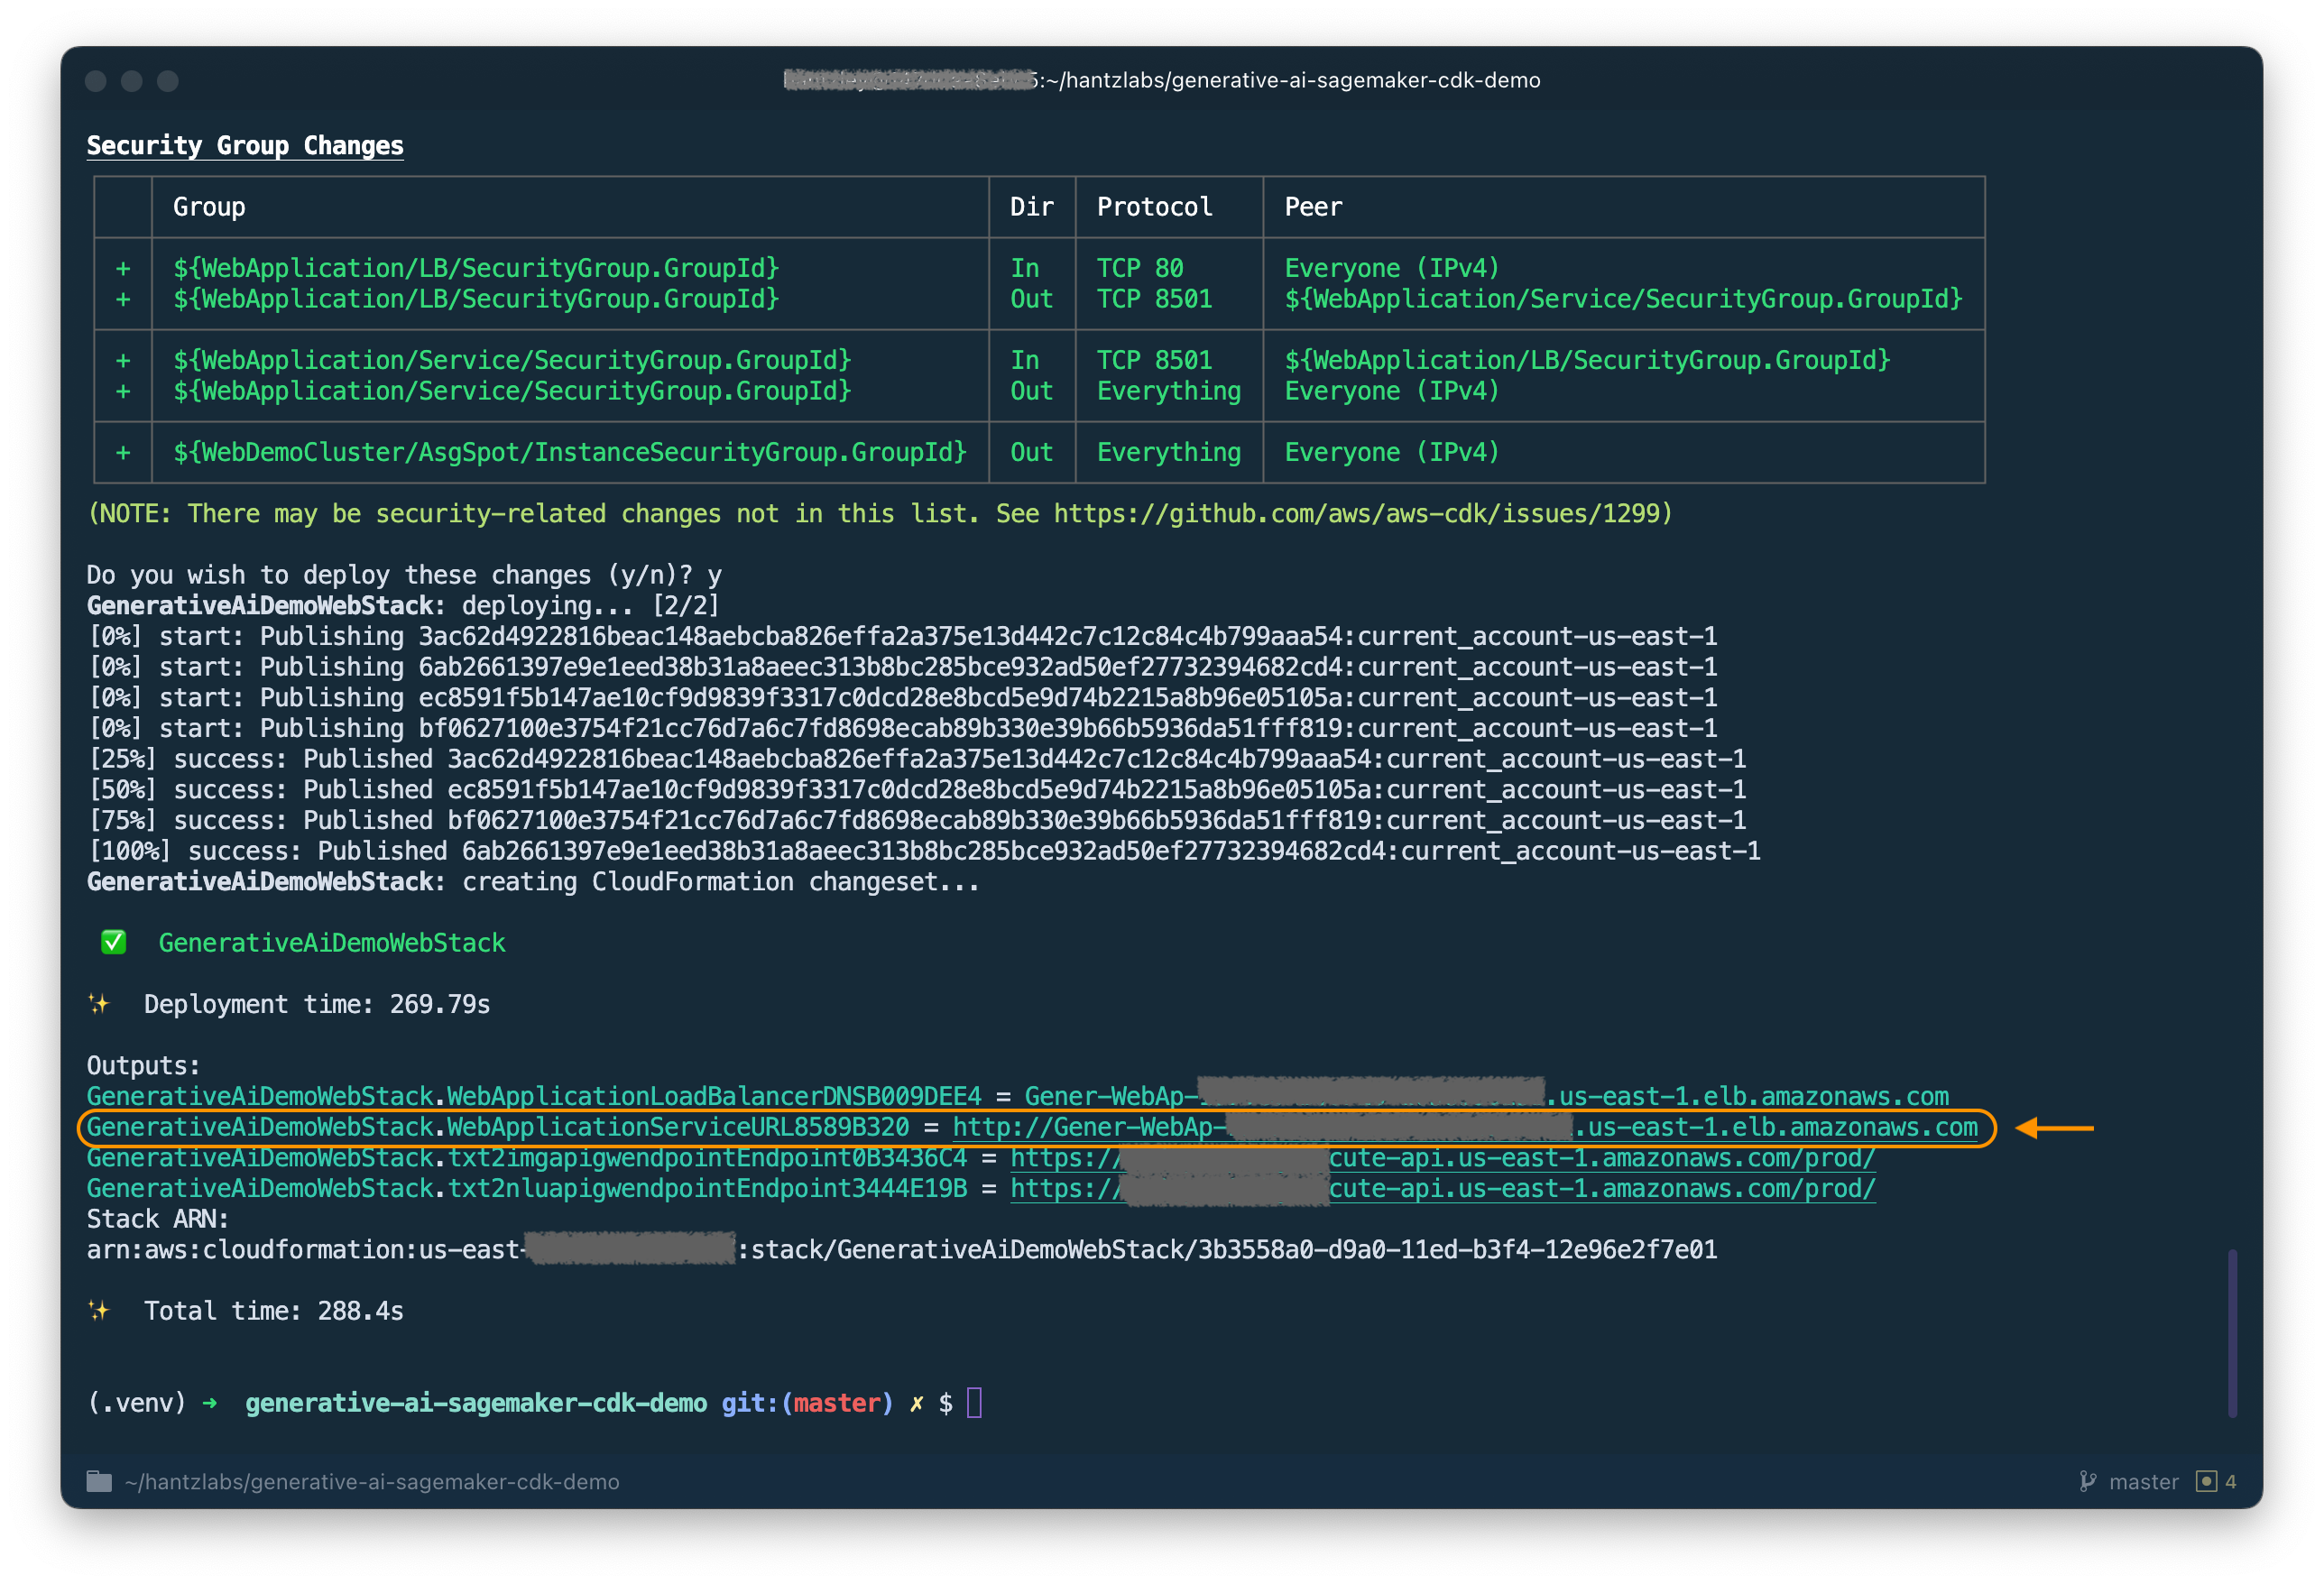
Word down the WebApplicationServiceURL from the output to make use of later. You can even retrieve it on the AWS CloudFormation console, beneath the GenerativeAiDemoWebStack stack outputs.
Now, launch the picture era AI mannequin endpoint stack:
This step takes round 8 minutes. The picture era mannequin endpoint is deployed, we will now use it.
Use the picture era AI mannequin
The primary instance demonstrates the best way to make the most of Secure Diffusion, a robust generative modeling approach that permits the creation of high-quality photographs from textual content prompts.
- Entry the online utility utilizing the
WebApplicationServiceURLfrom the output ofGenerativeAiDemoWebStackin your browser.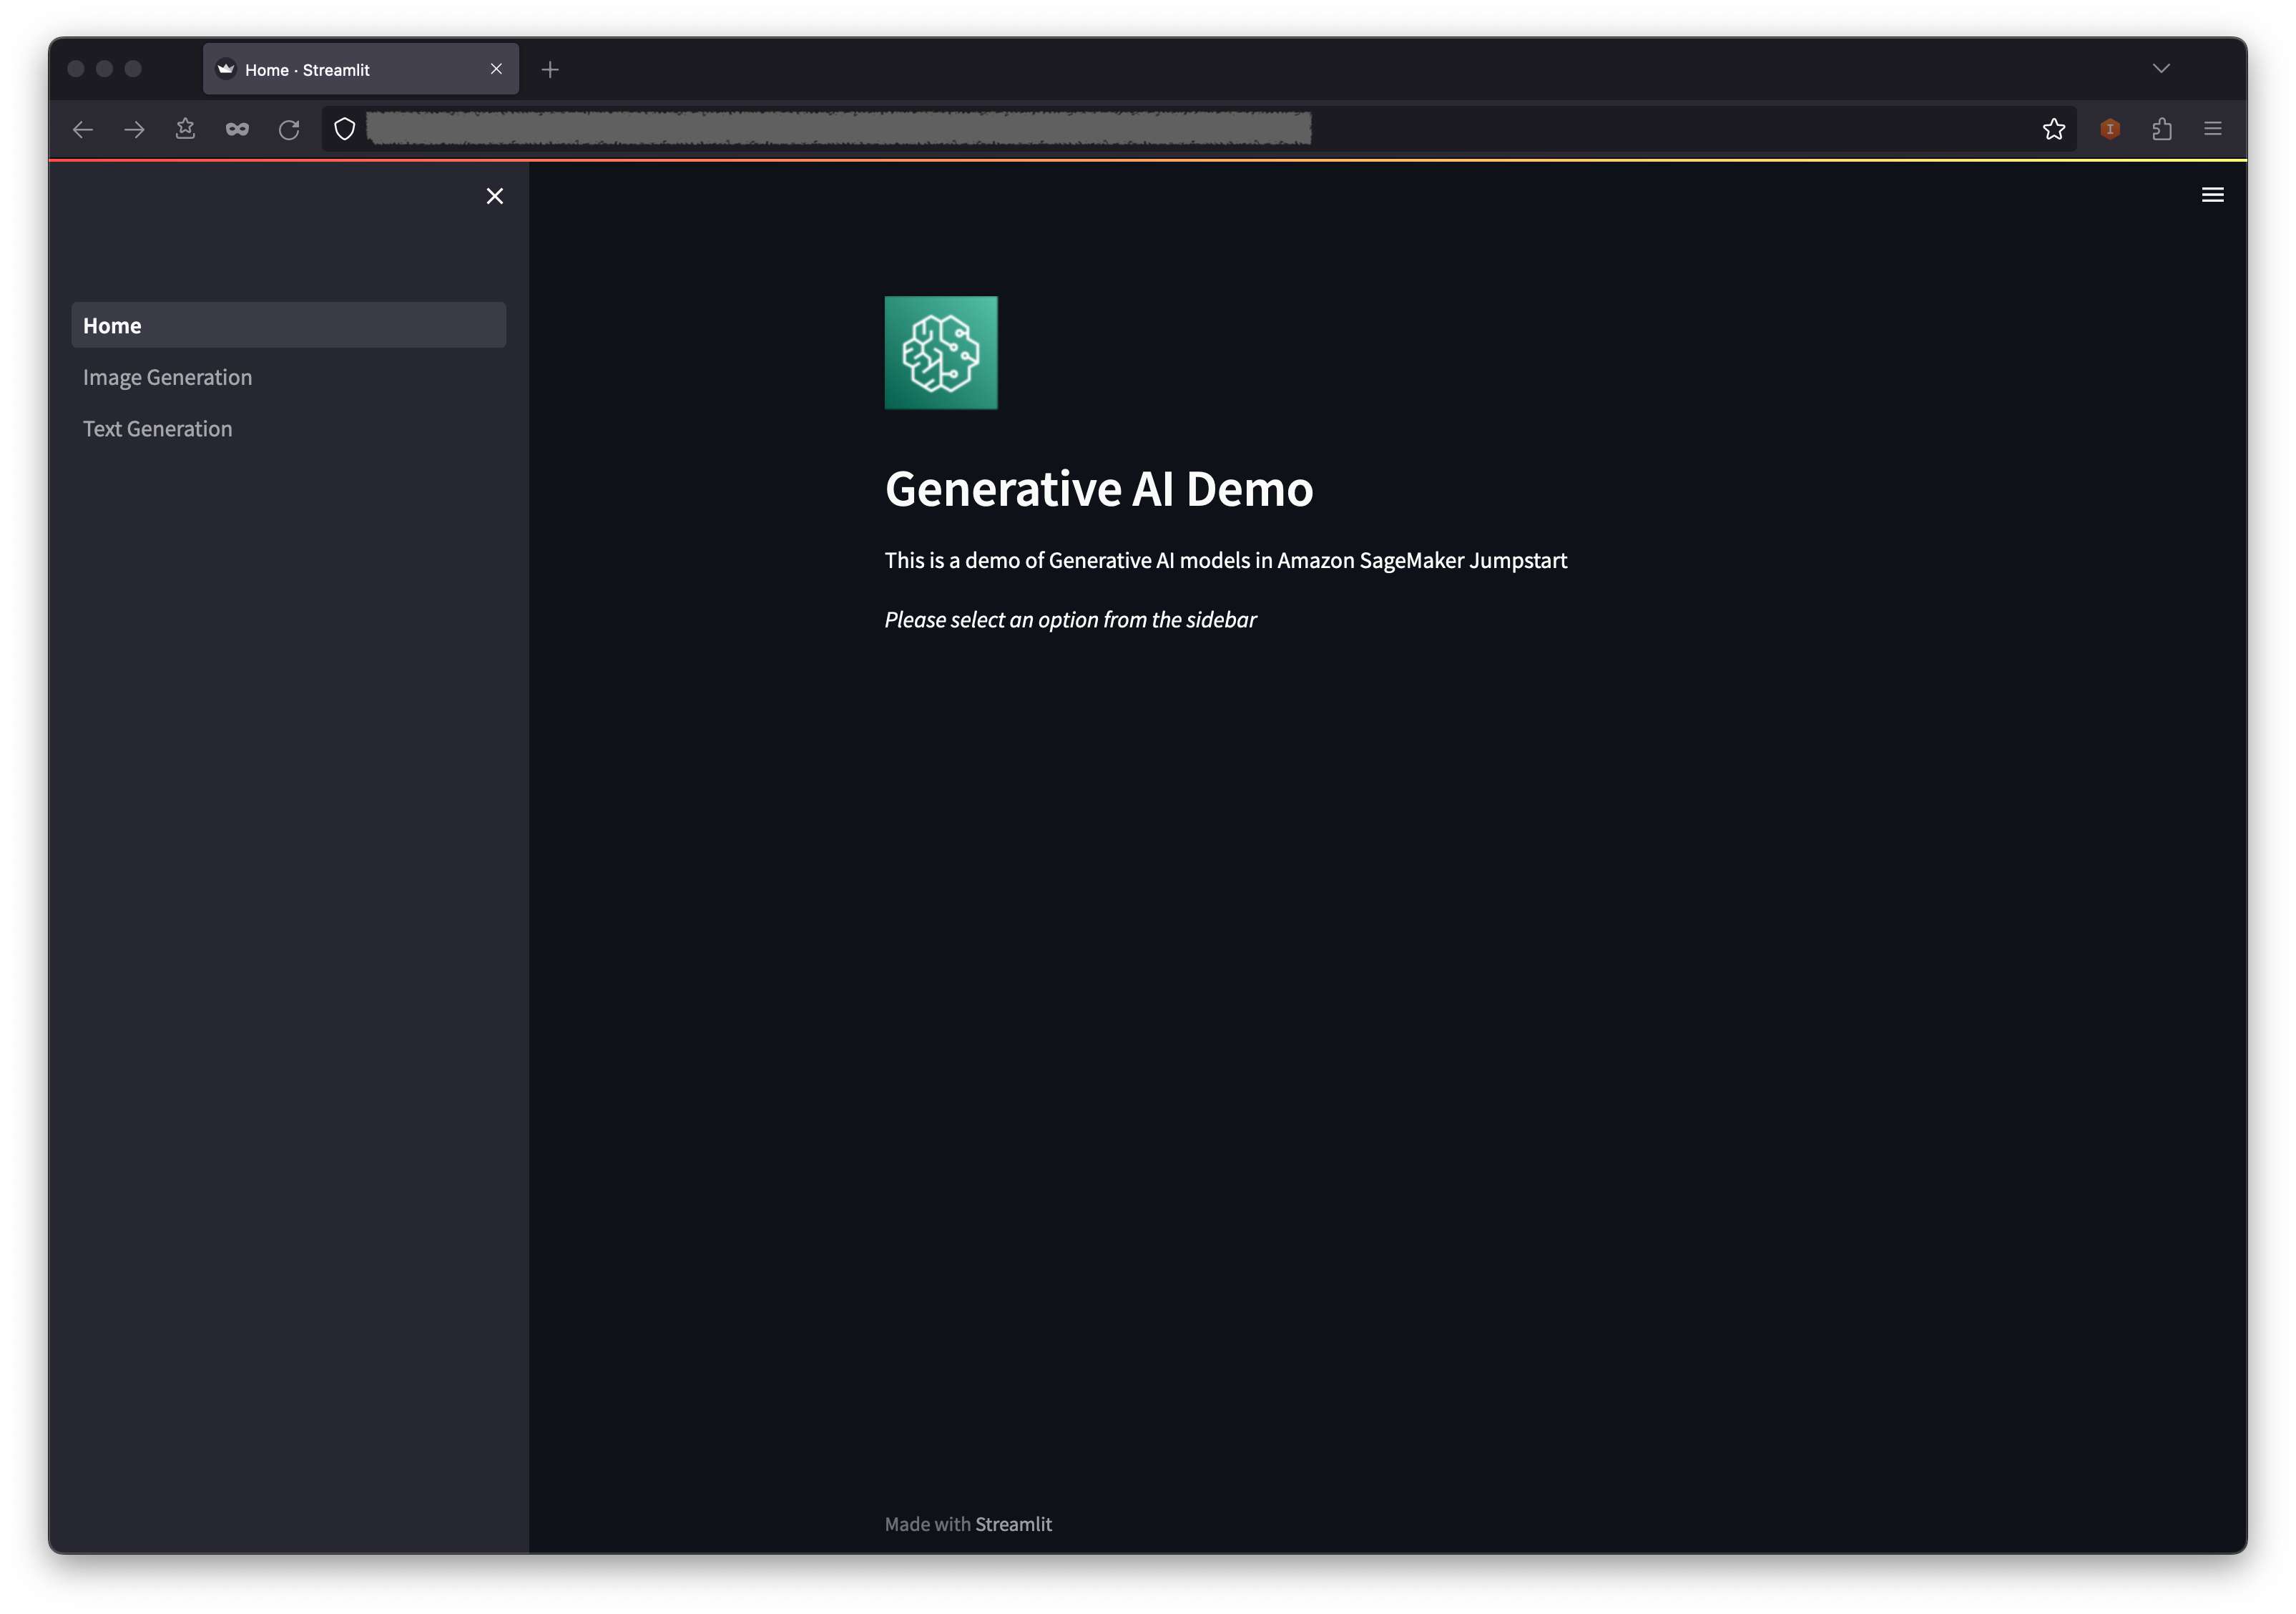
- Within the navigation pane, select Picture Era.
- The SageMaker Endpoint Title and API GW Url fields can be pre-populated, however you possibly can change the immediate for the picture description when you’d like.
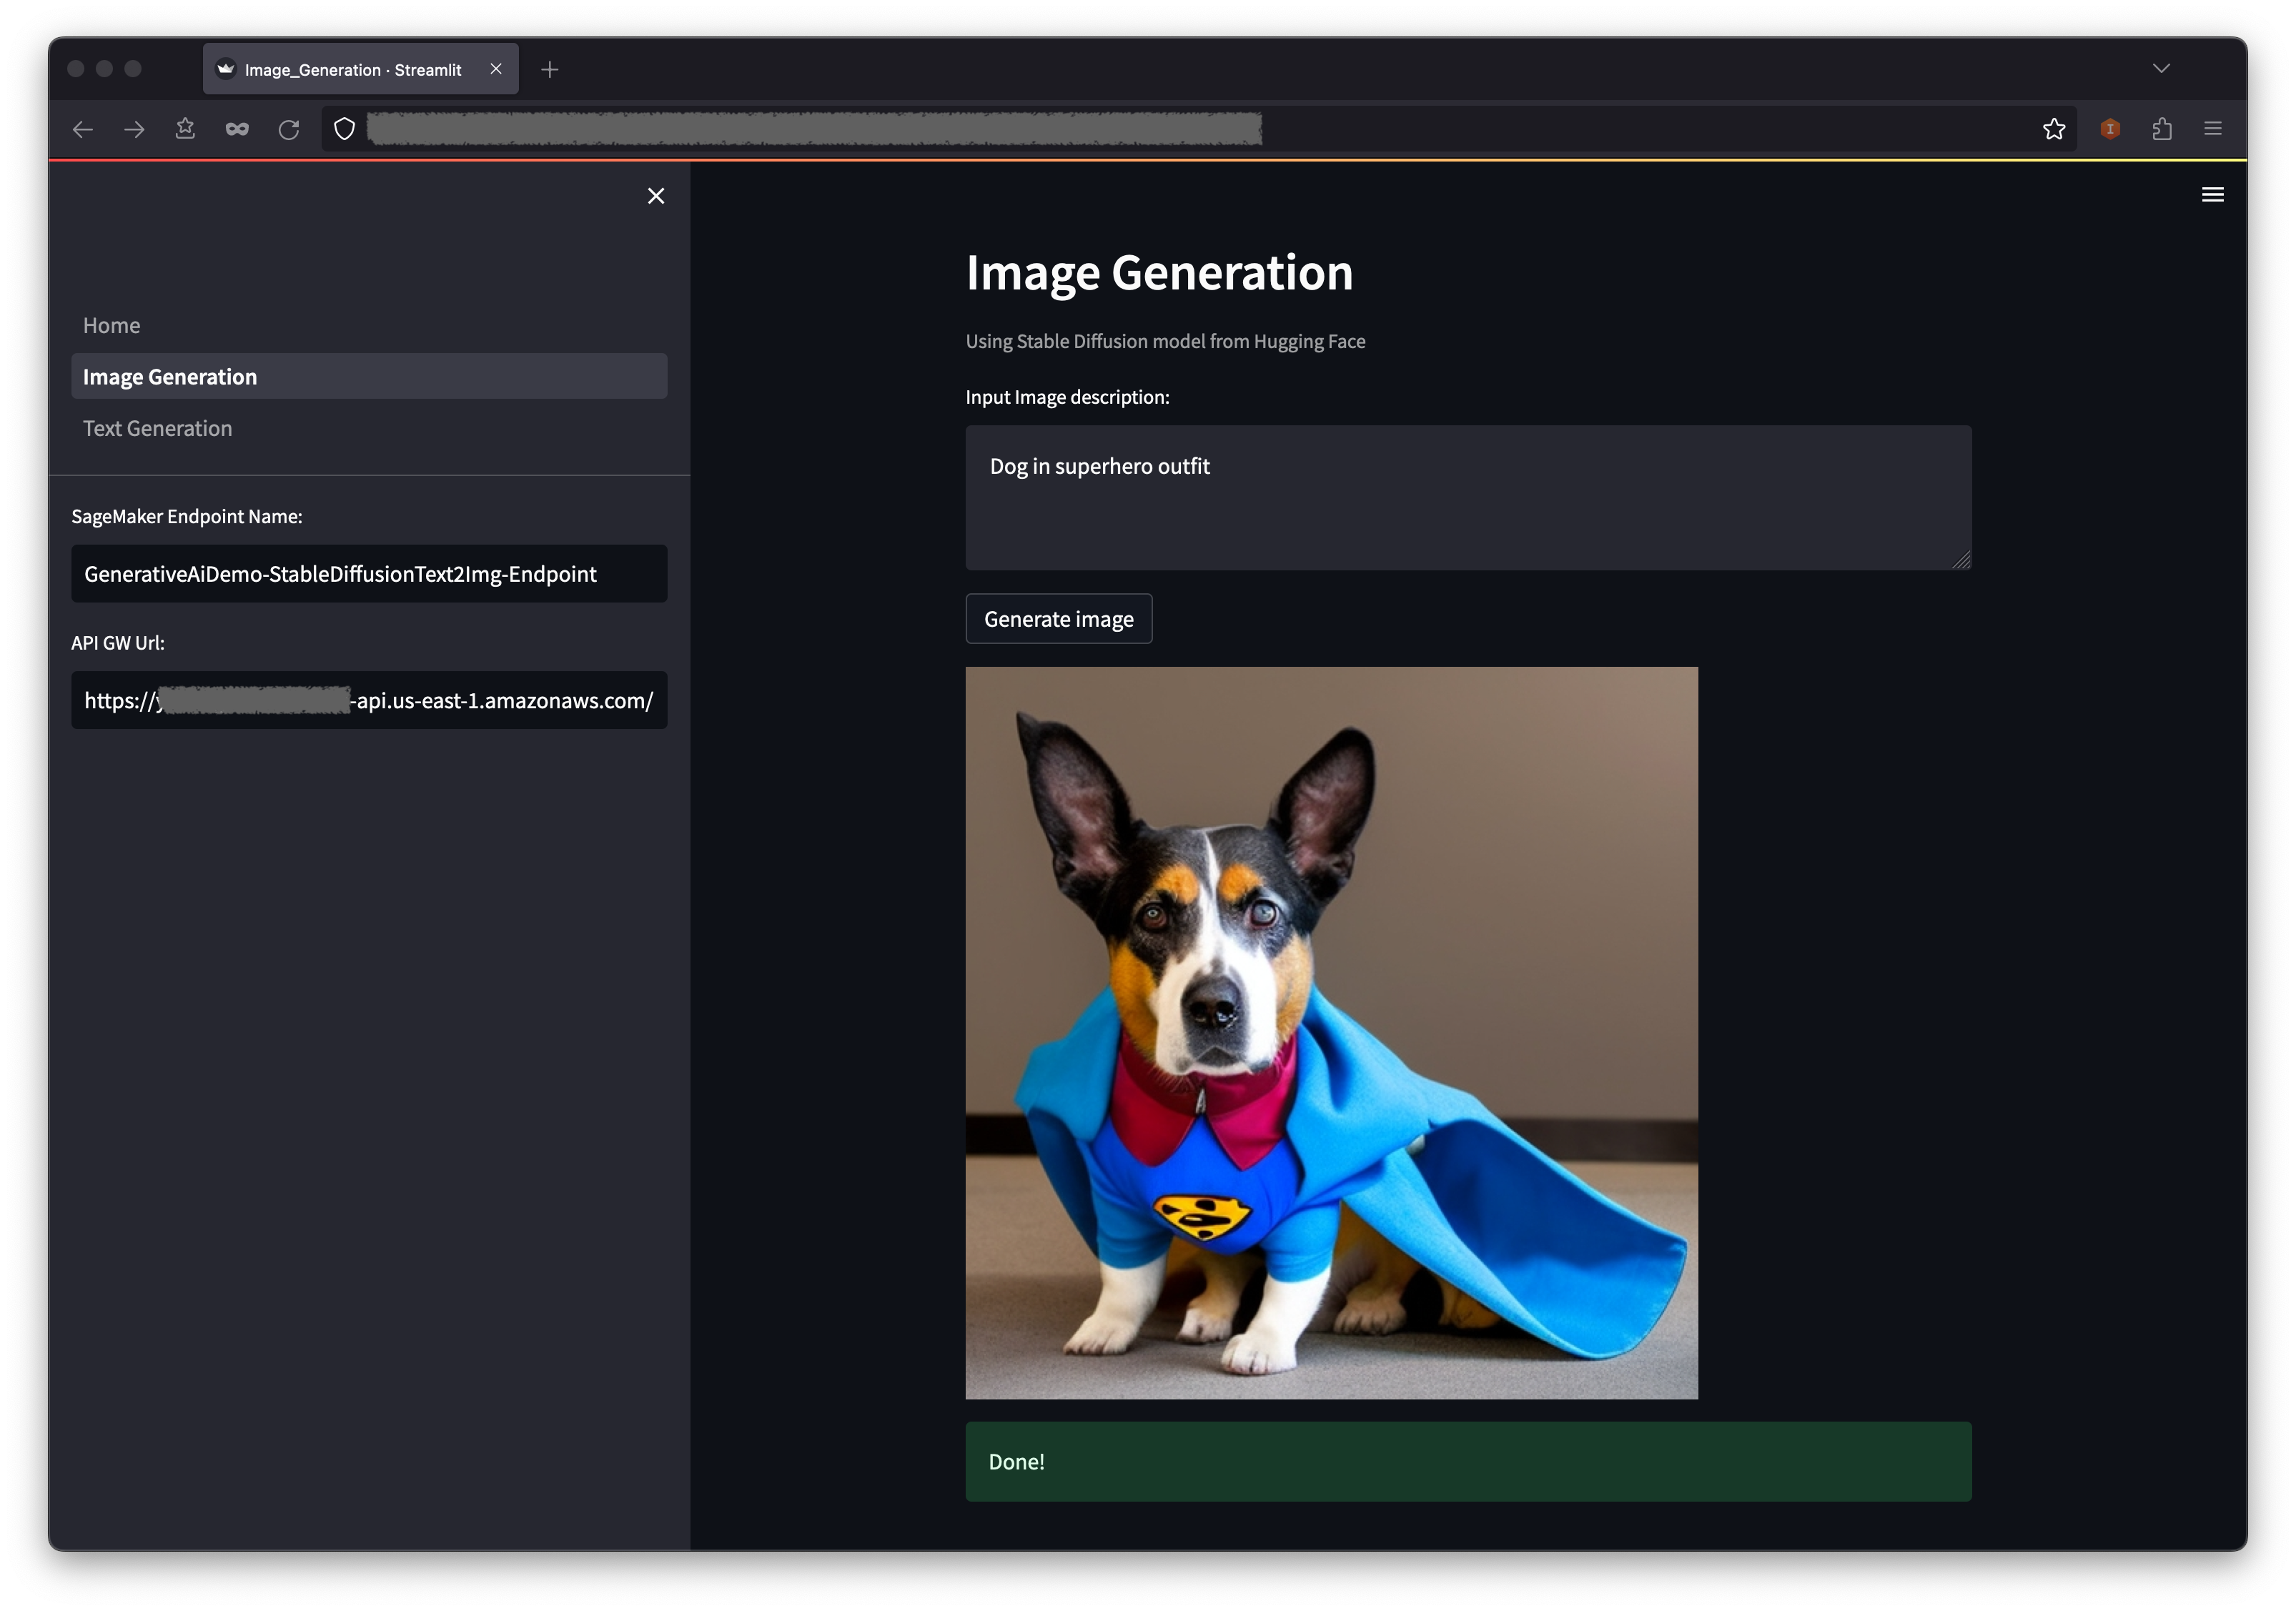
- Select Generate picture.
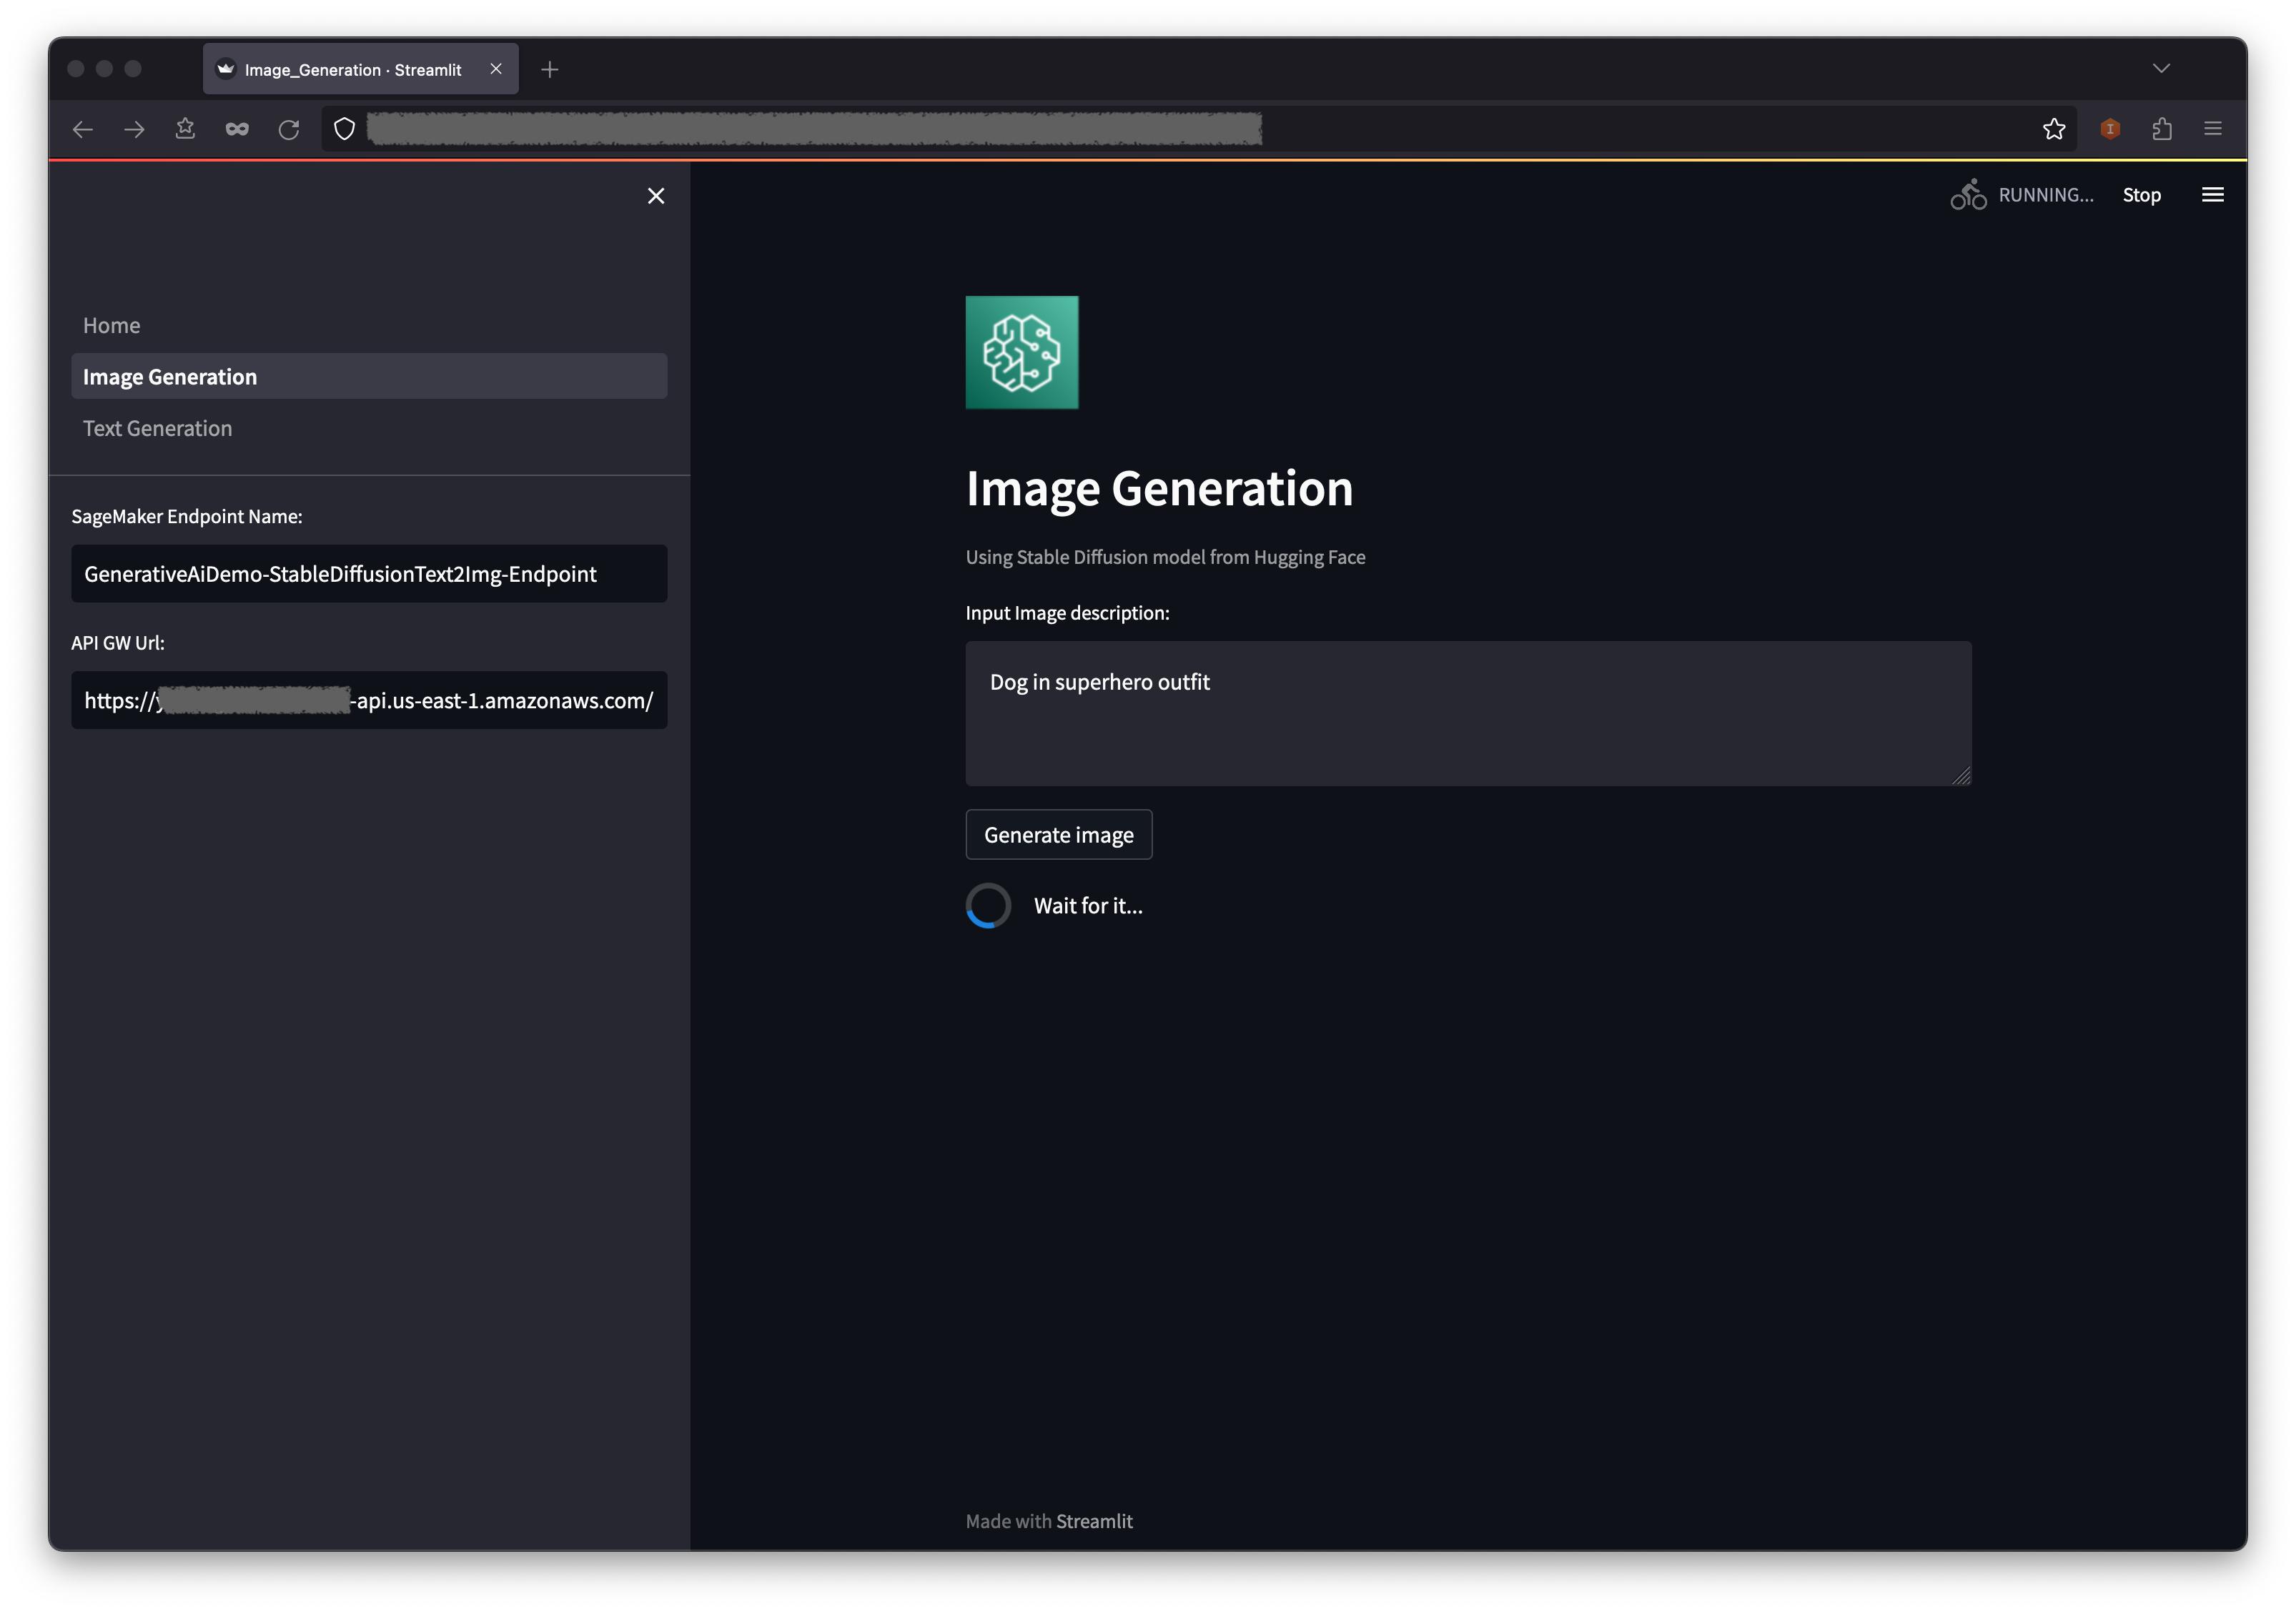
- The applying will make a name to the SageMaker endpoint. It takes a couple of seconds. An image with the traits in your picture description can be displayed.
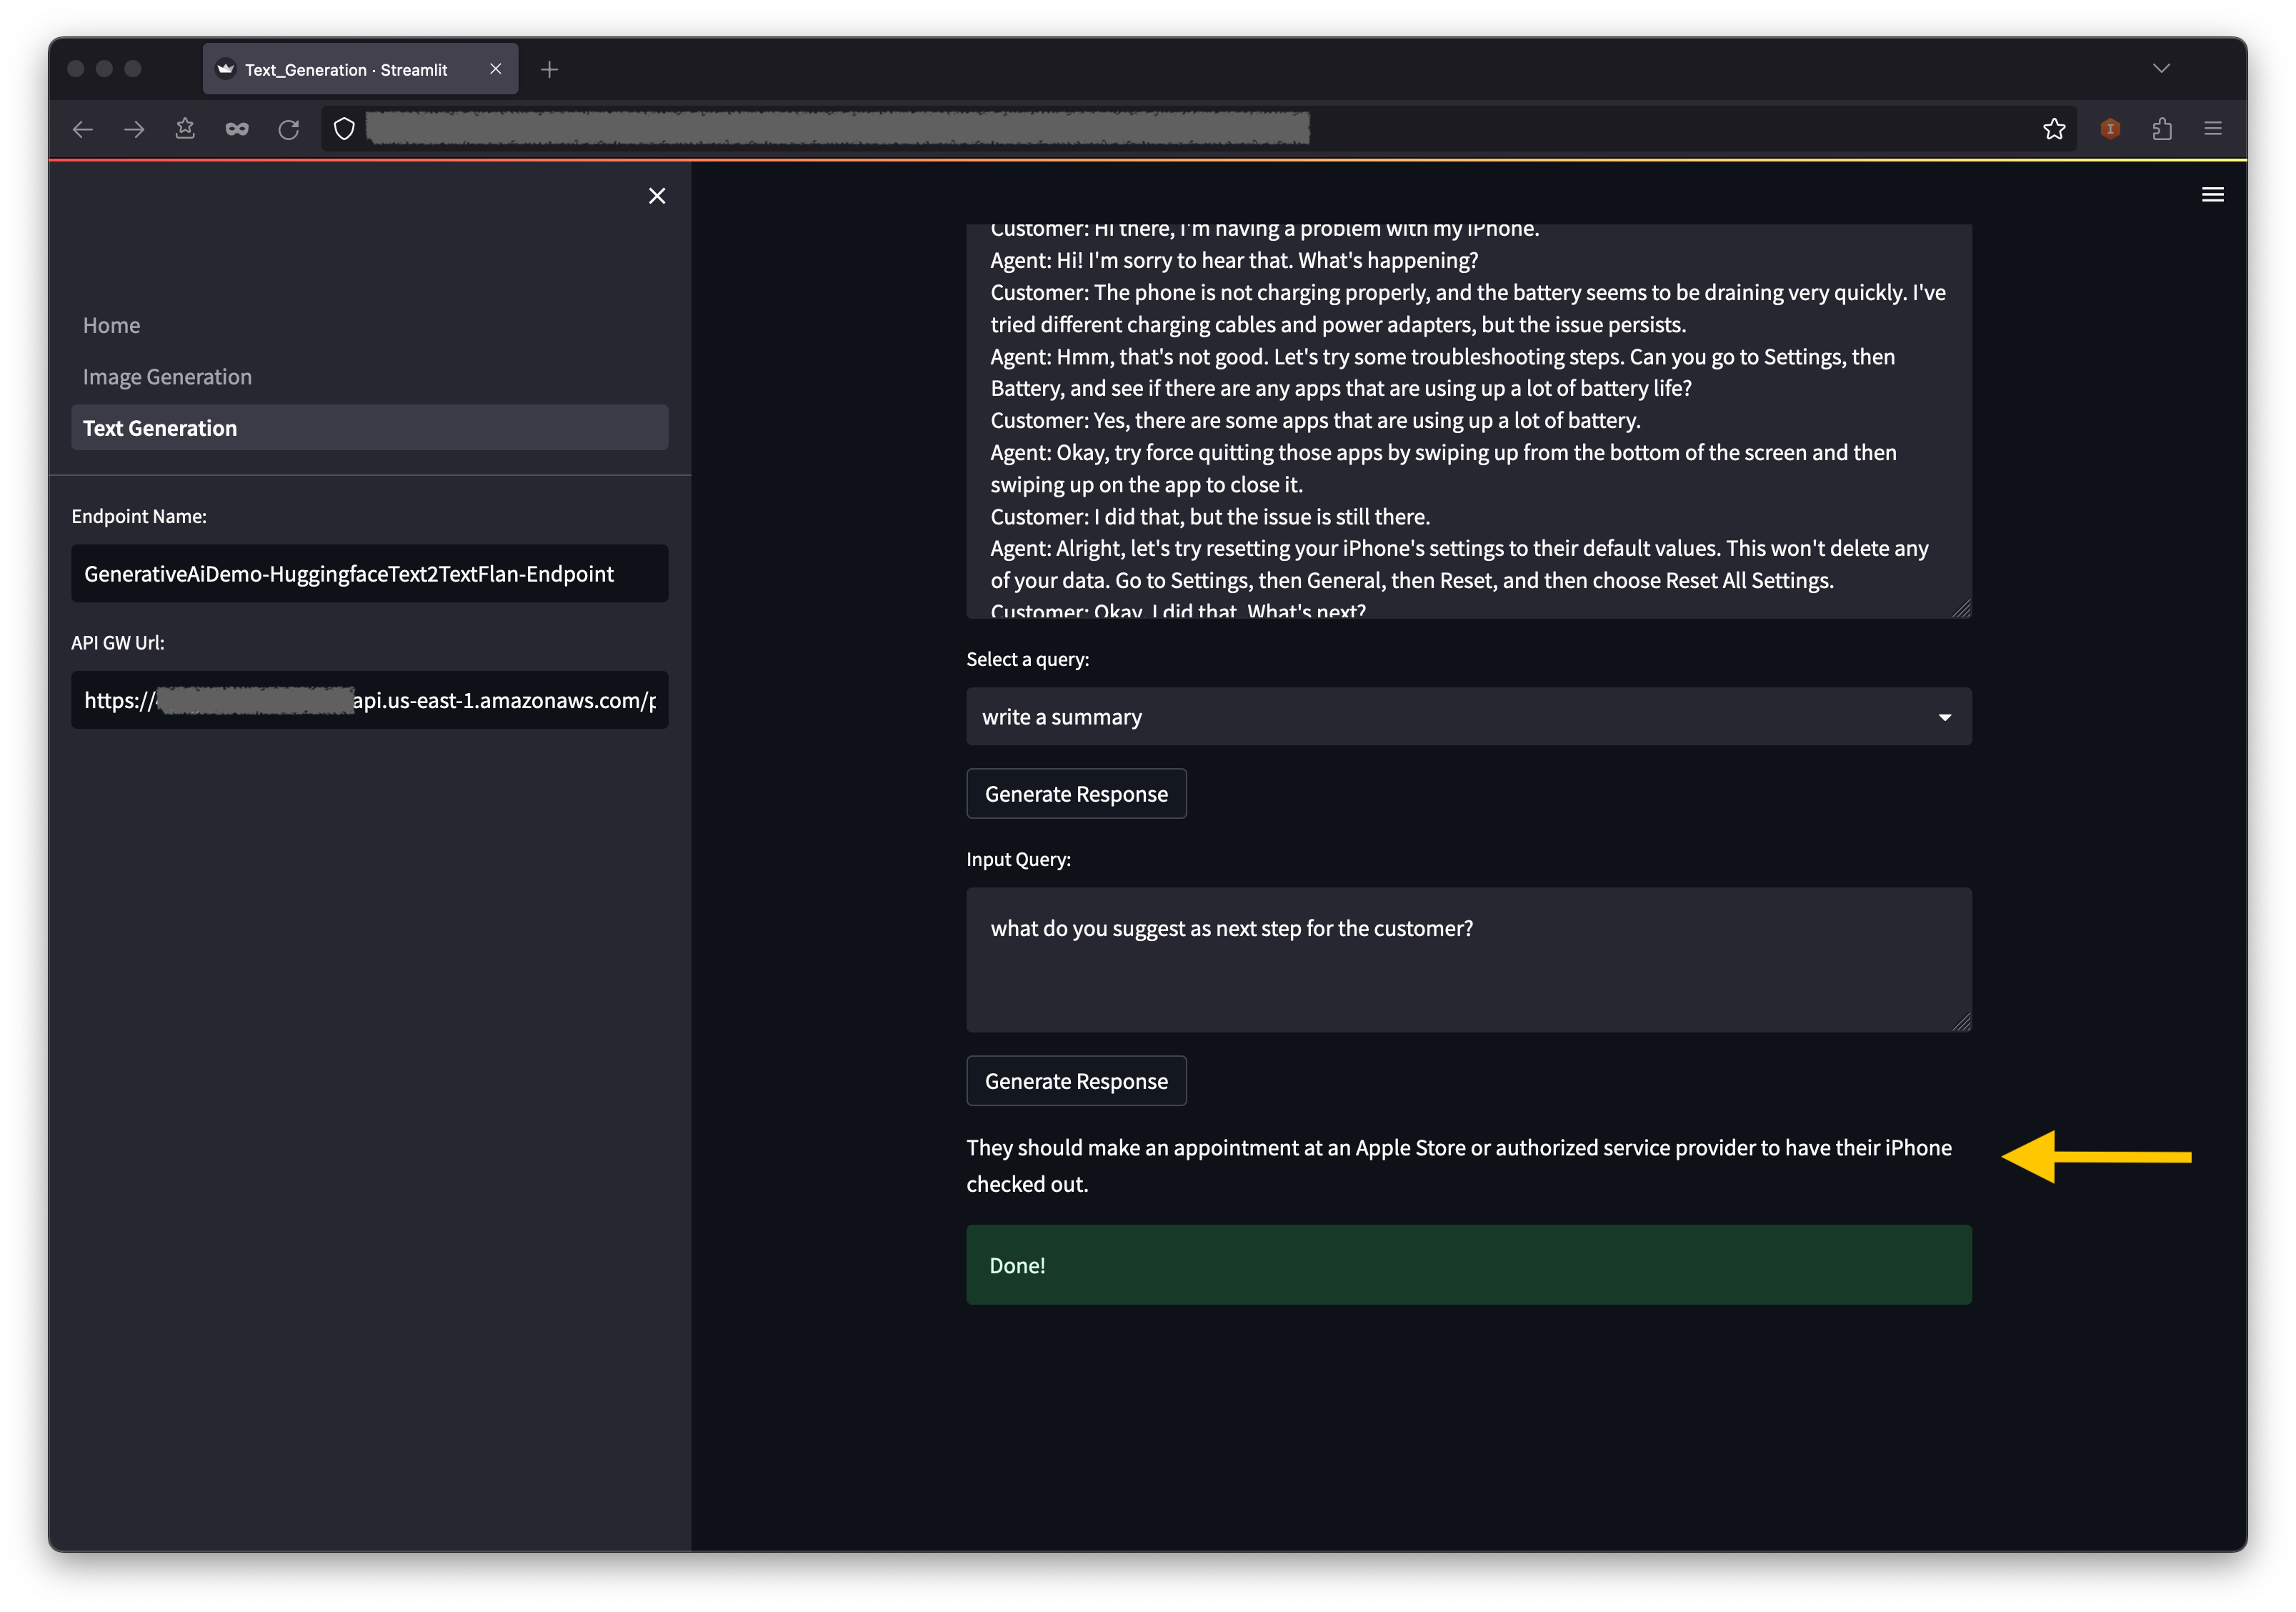
Use the textual content era AI mannequin
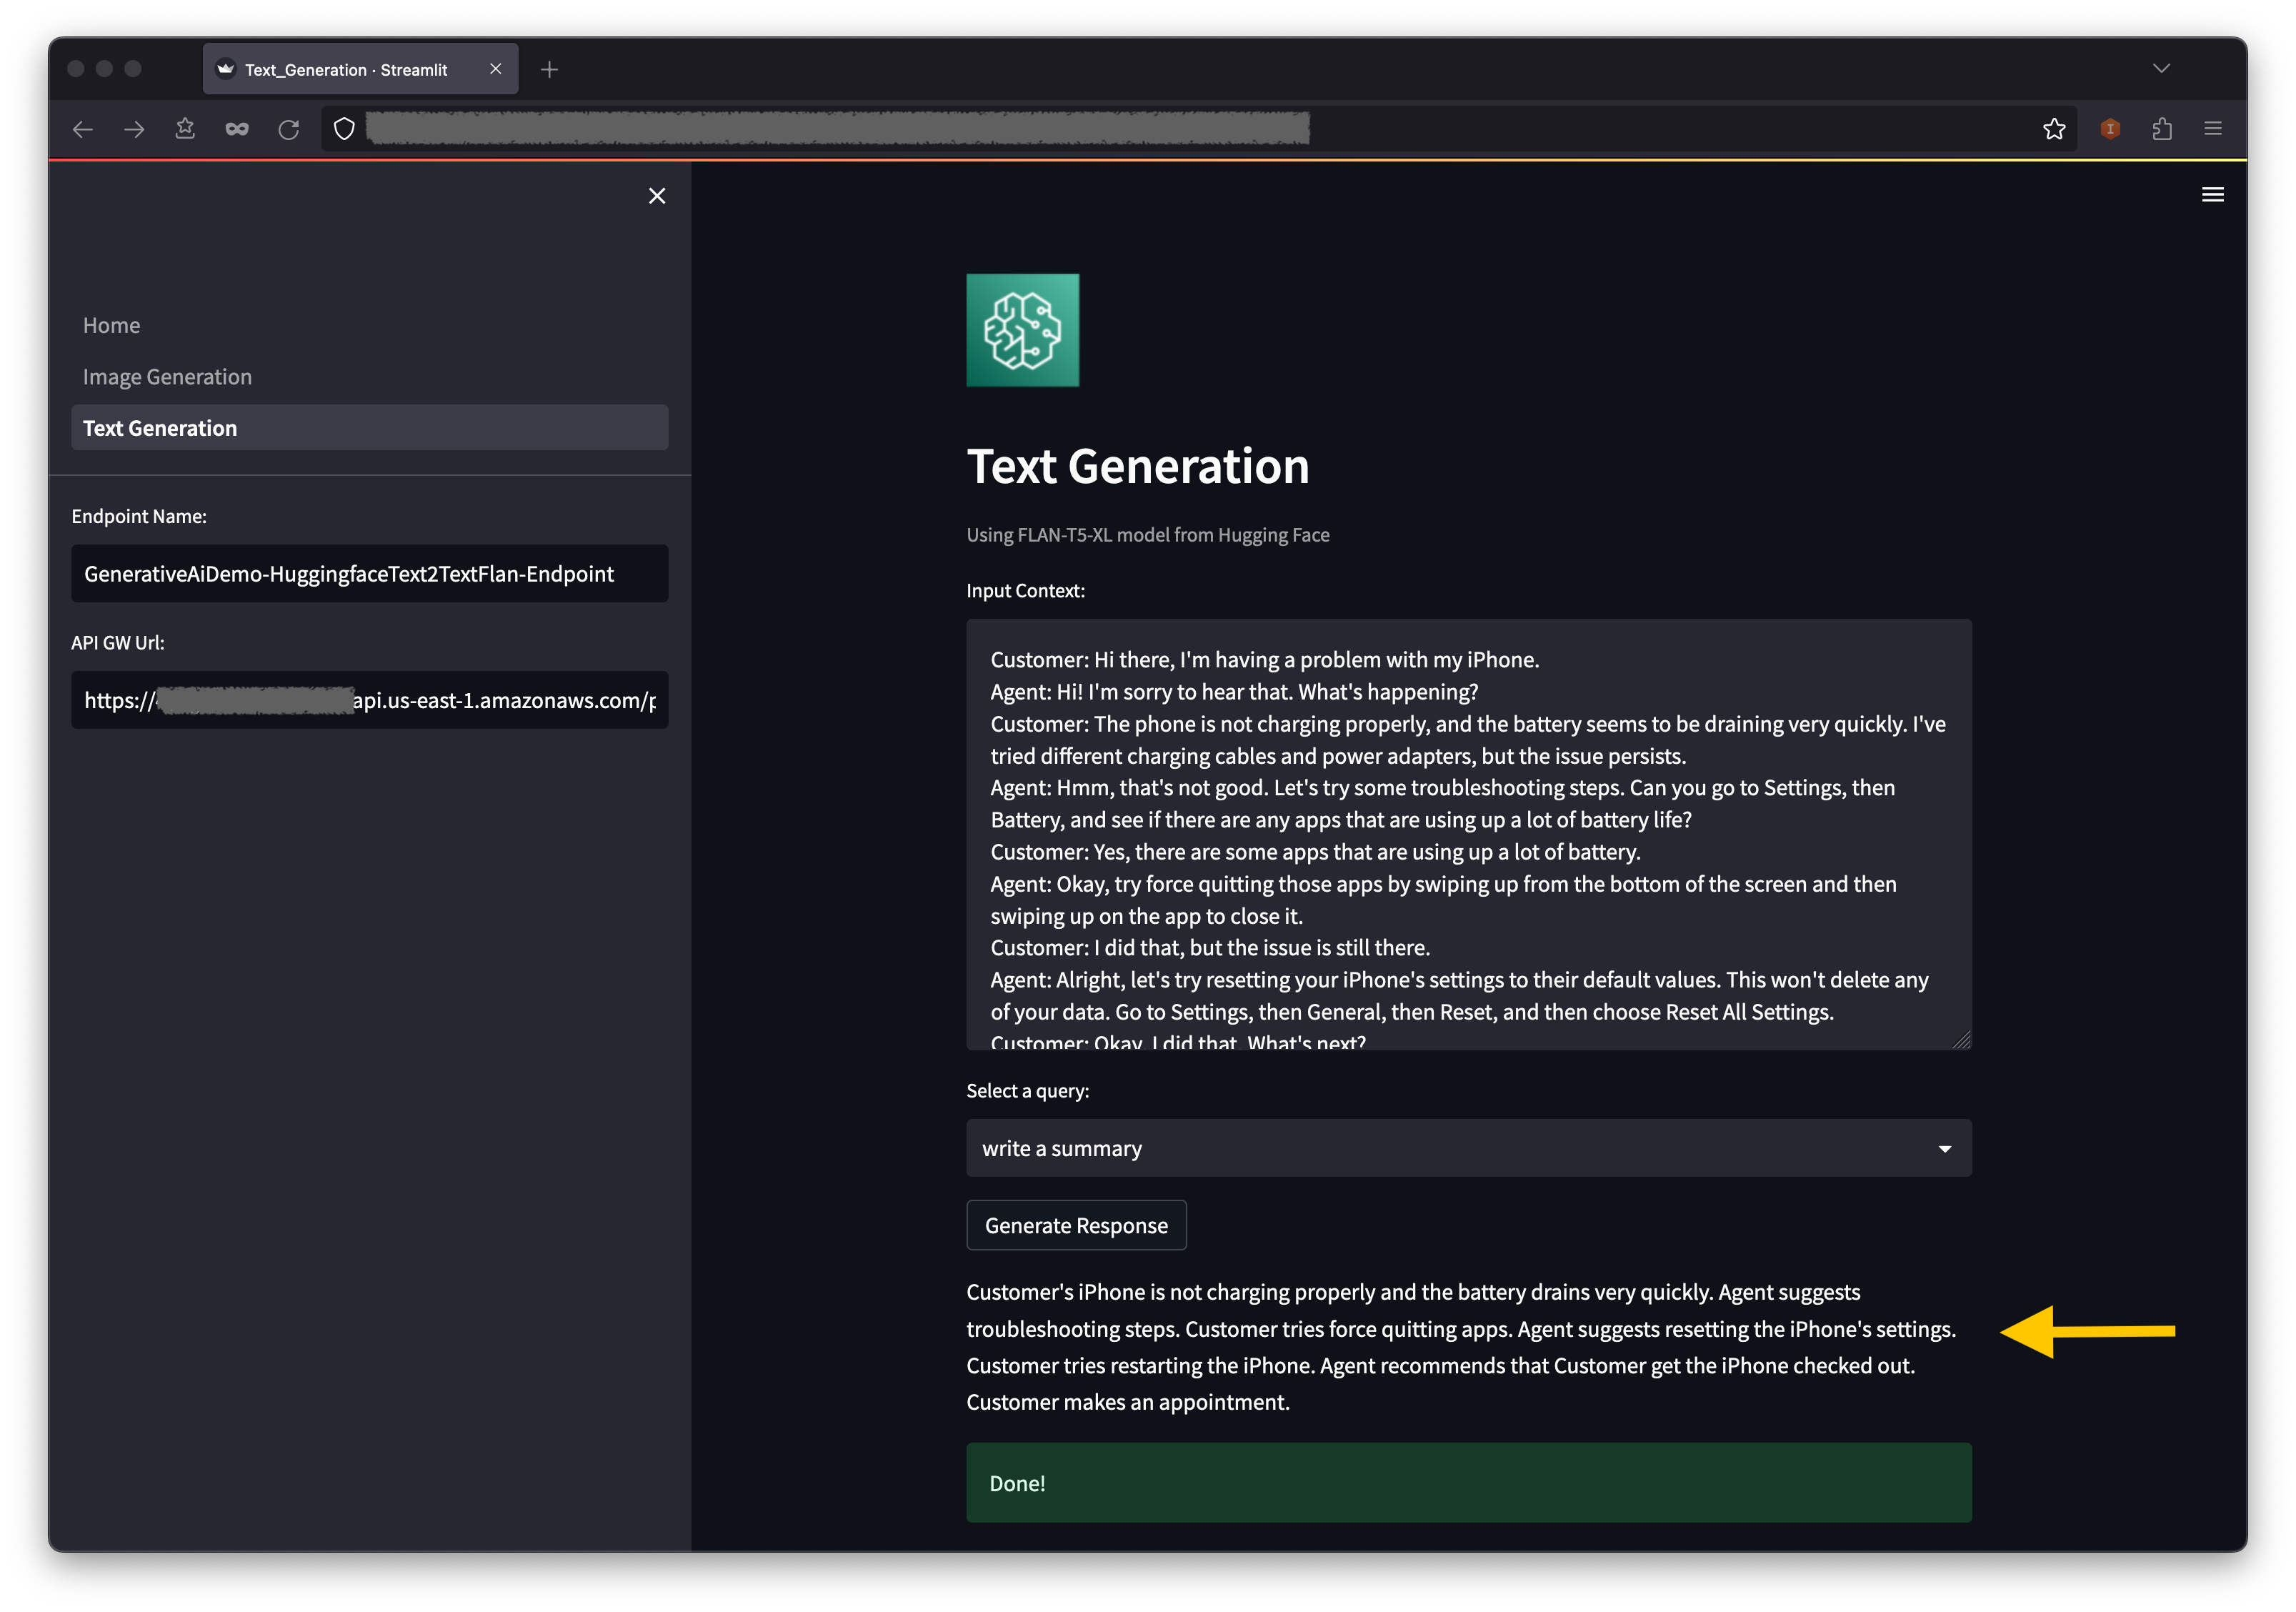
The second instance facilities round utilizing the FLAN-T5-XL mannequin, which is a basis or massive language mannequin (LLM), to attain in-context studying for textual content era whereas additionally addressing a broad vary of pure language understanding (NLU) and pure language era (NLG) duties.
Some environments would possibly restrict the variety of endpoints you possibly can launch at a time. If that is so, you possibly can launch one SageMaker endpoint at a time. To cease a SageMaker endpoint within the AWS CDK app, you must destroy the deployed endpoint stack and earlier than launching the opposite endpoint stack. To show down the picture era AI mannequin endpoint, challenge the next command:
Then launch the textual content era AI mannequin endpoint stack:
Enter y on the prompts.
After the textual content era mannequin endpoint stack is launched, full the next steps:
- Return to the online utility and select Textual content Era within the navigation pane.
- The Enter Context discipline is pre-populated with a dialog between a buyer and an agent concerning a difficulty with the purchasers telephone, however you possibly can enter your individual context when you’d like.
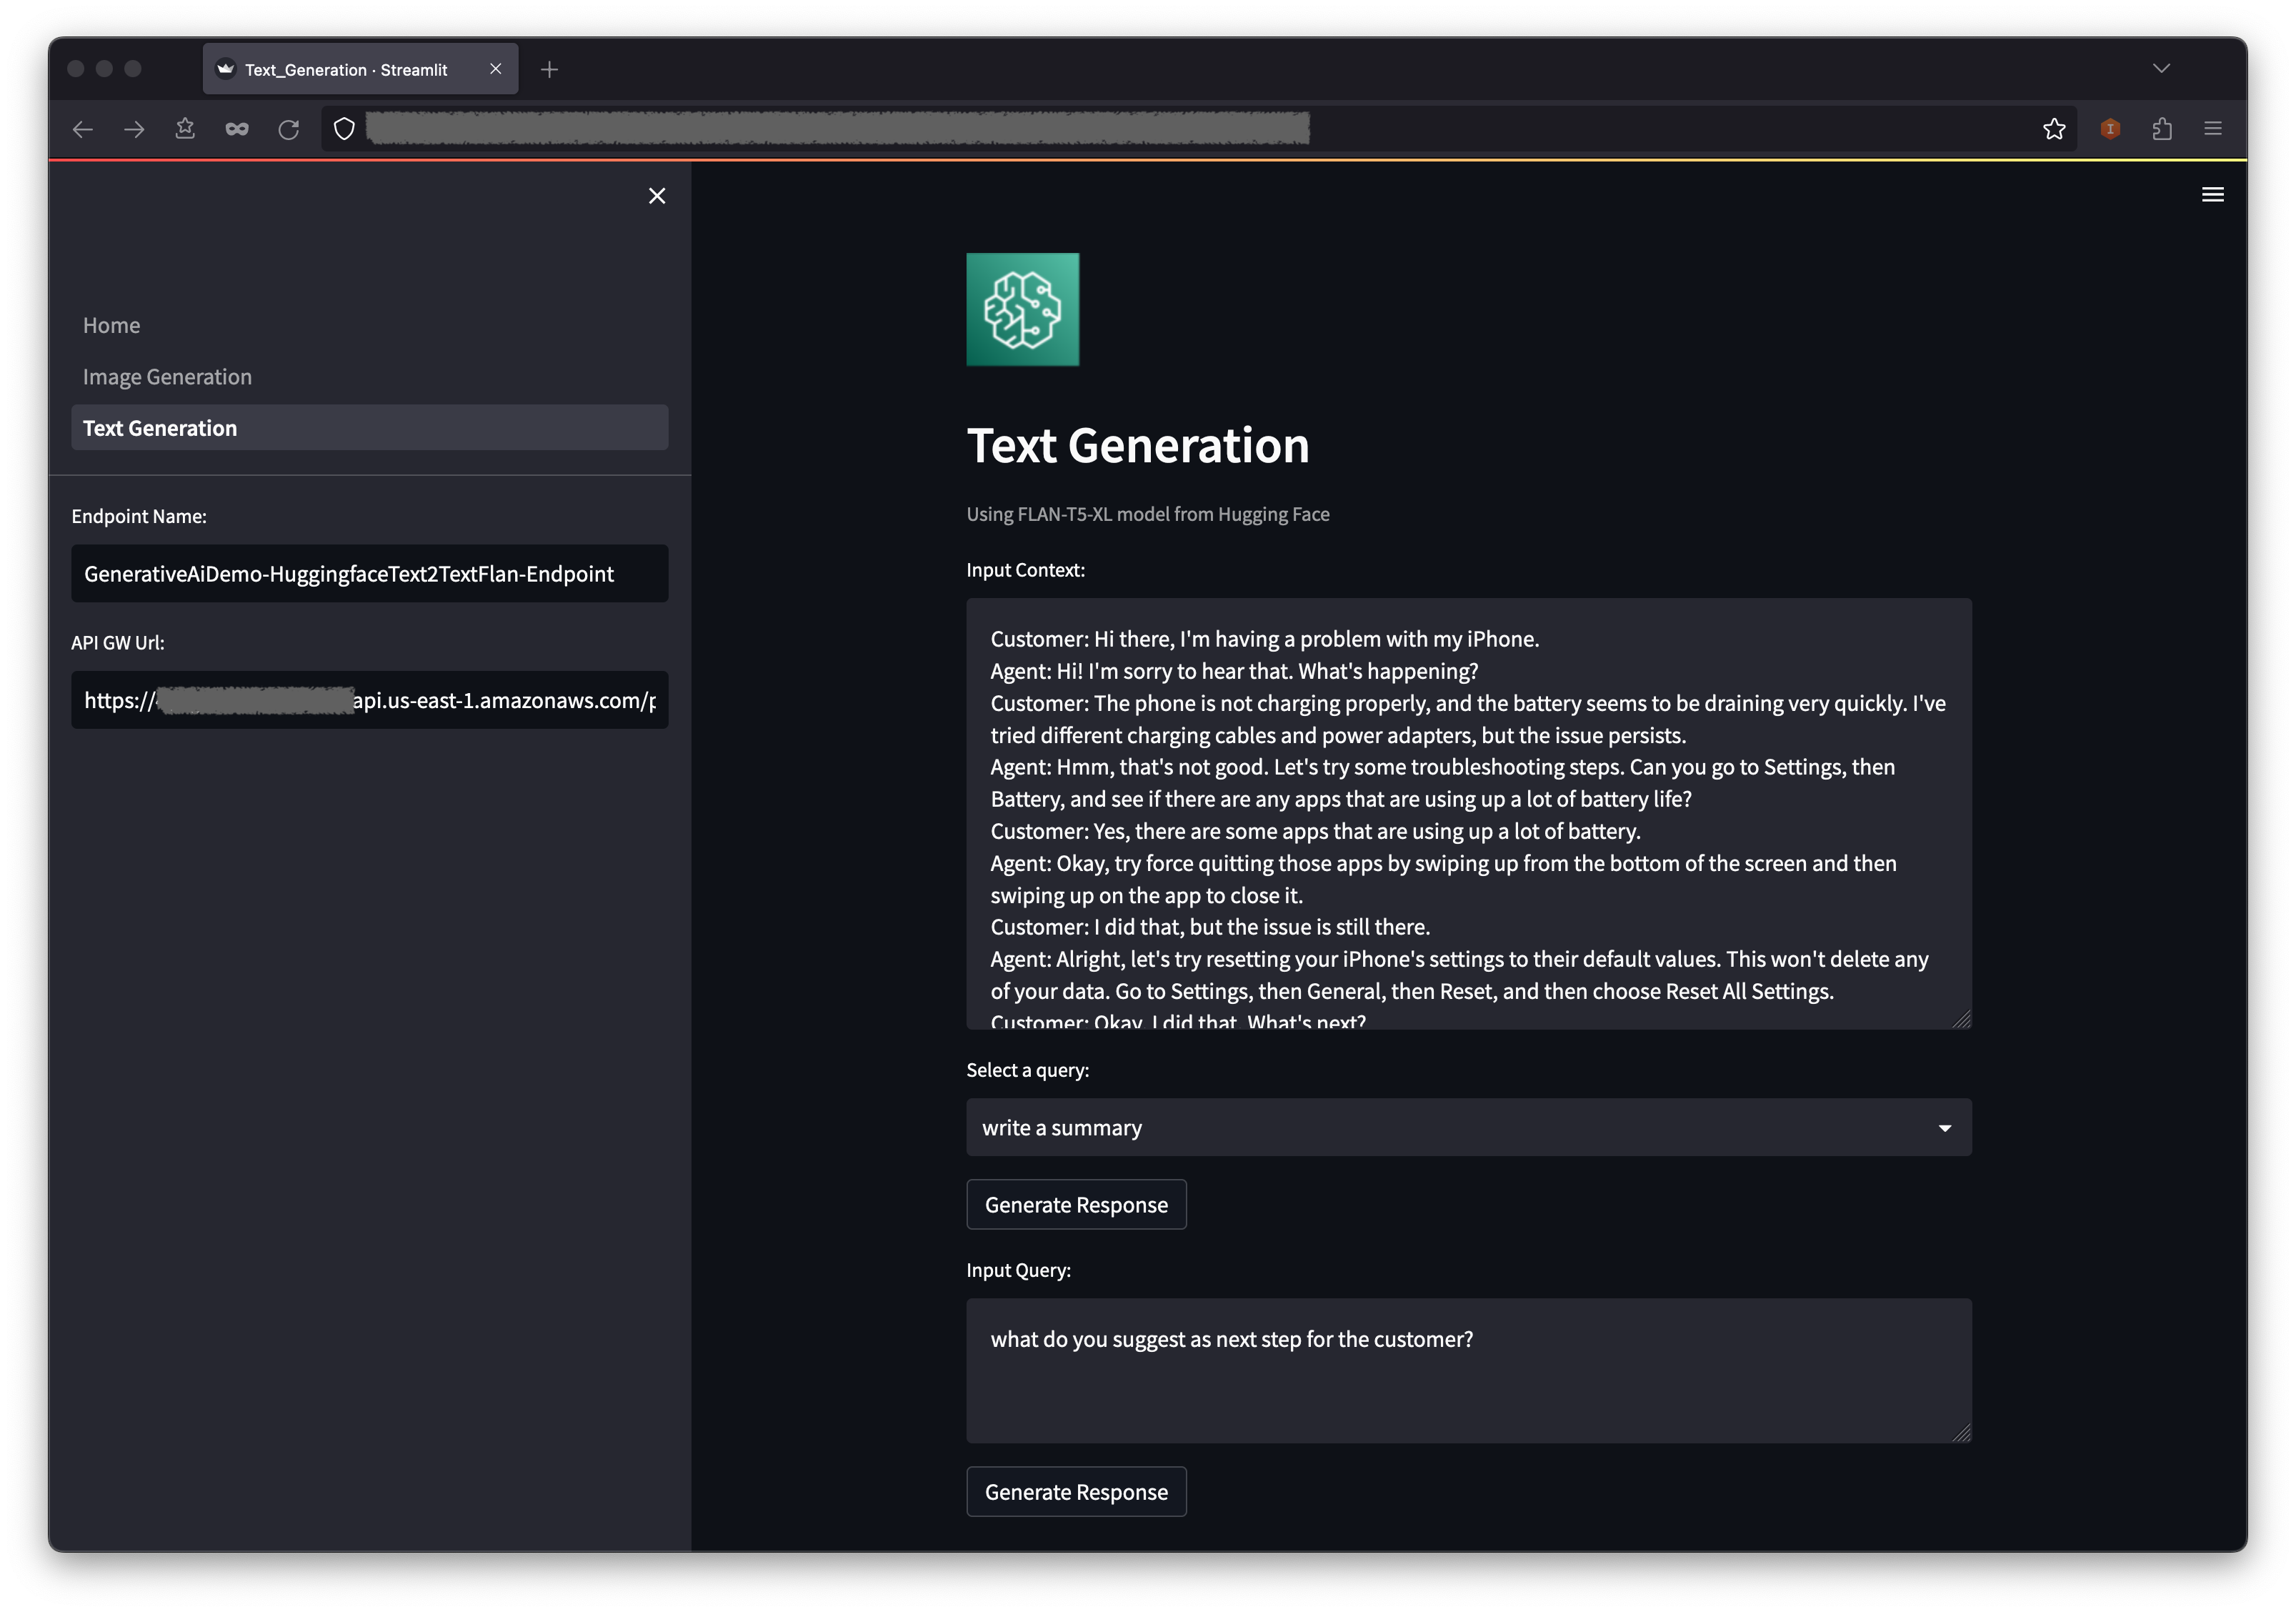
- Beneath the context, one can find some pre-populated queries on the drop-down menu. Select a question and select Generate Response.
- You can even enter your individual question within the Enter Question discipline after which select Generate Response.
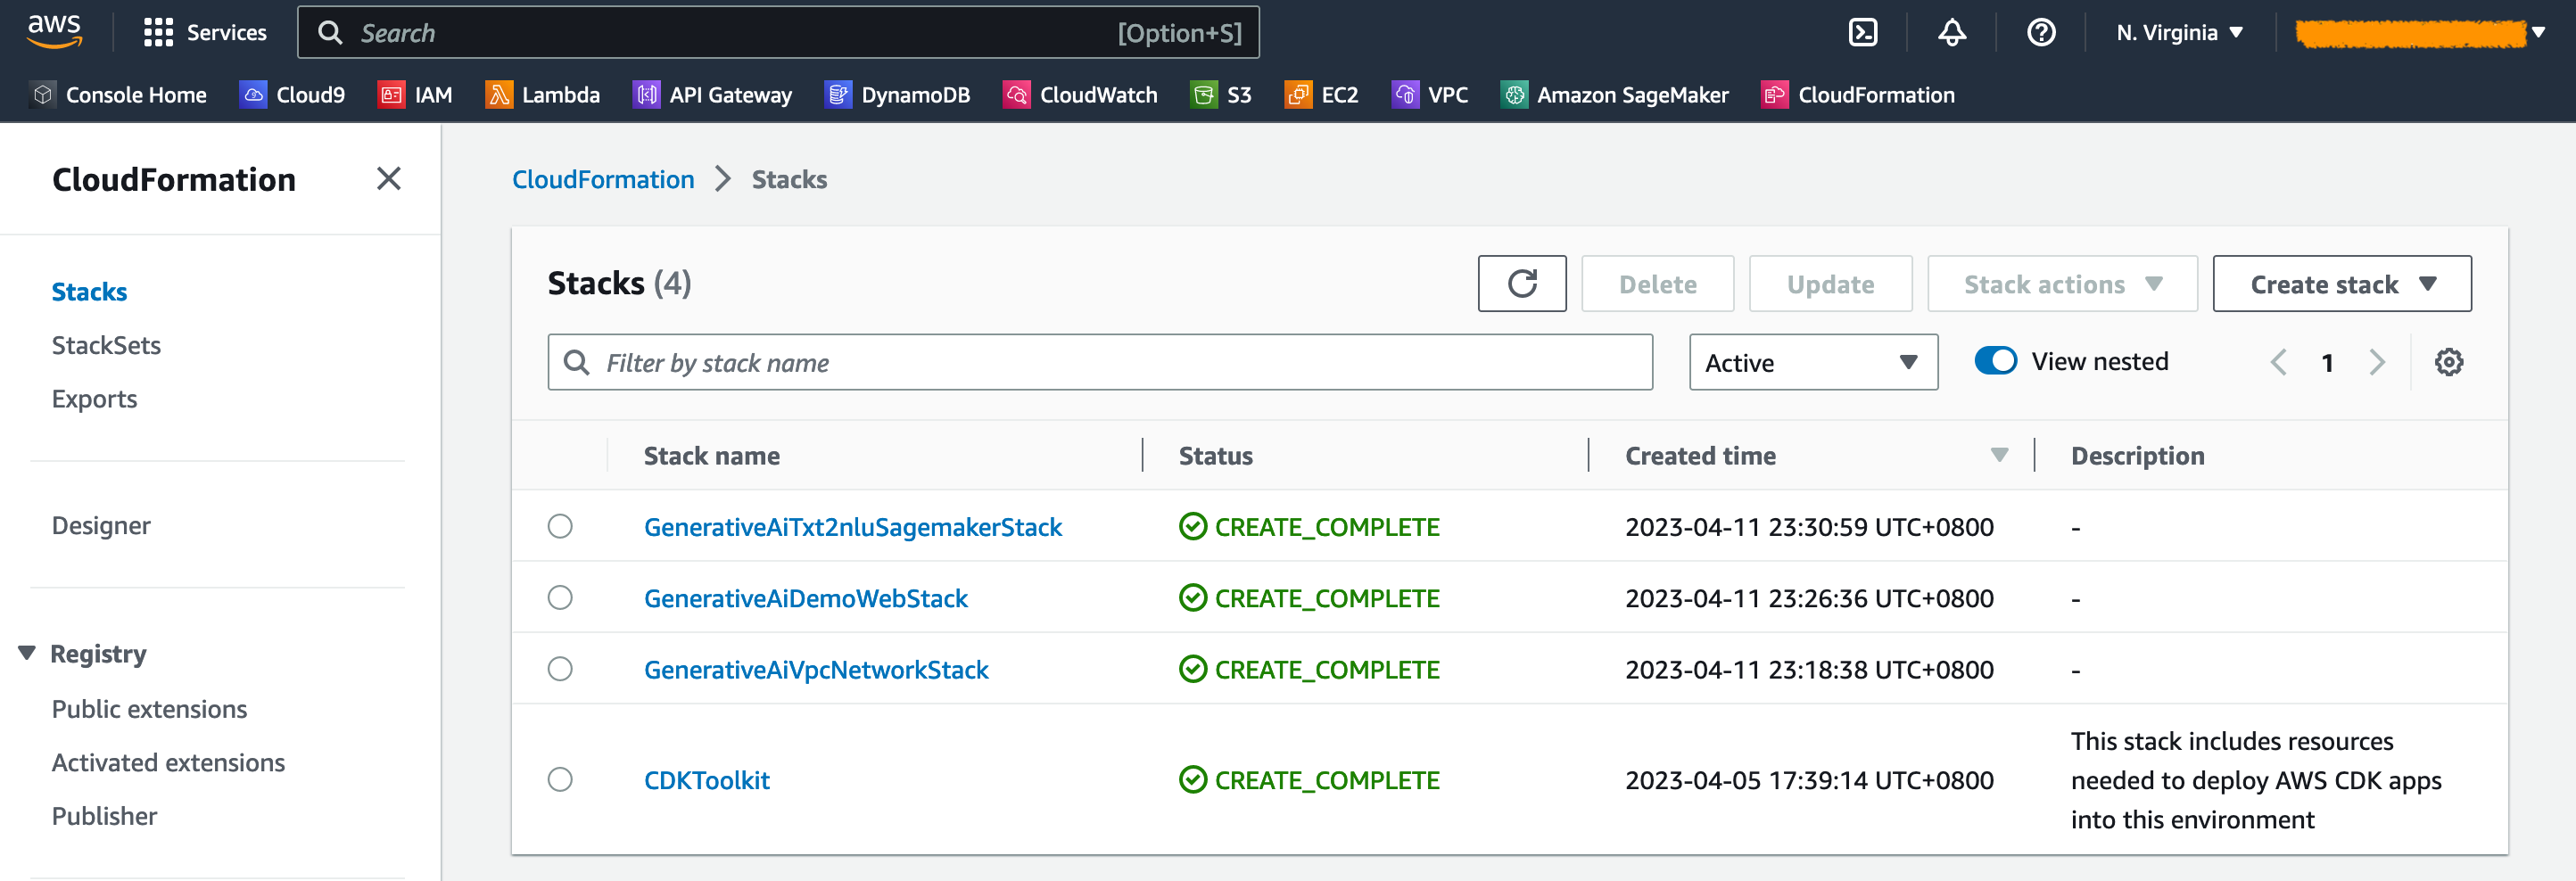
View the deployed sources on the console
On the AWS CloudFormation console, select Stacks within the navigation pane to view the stacks deployed.
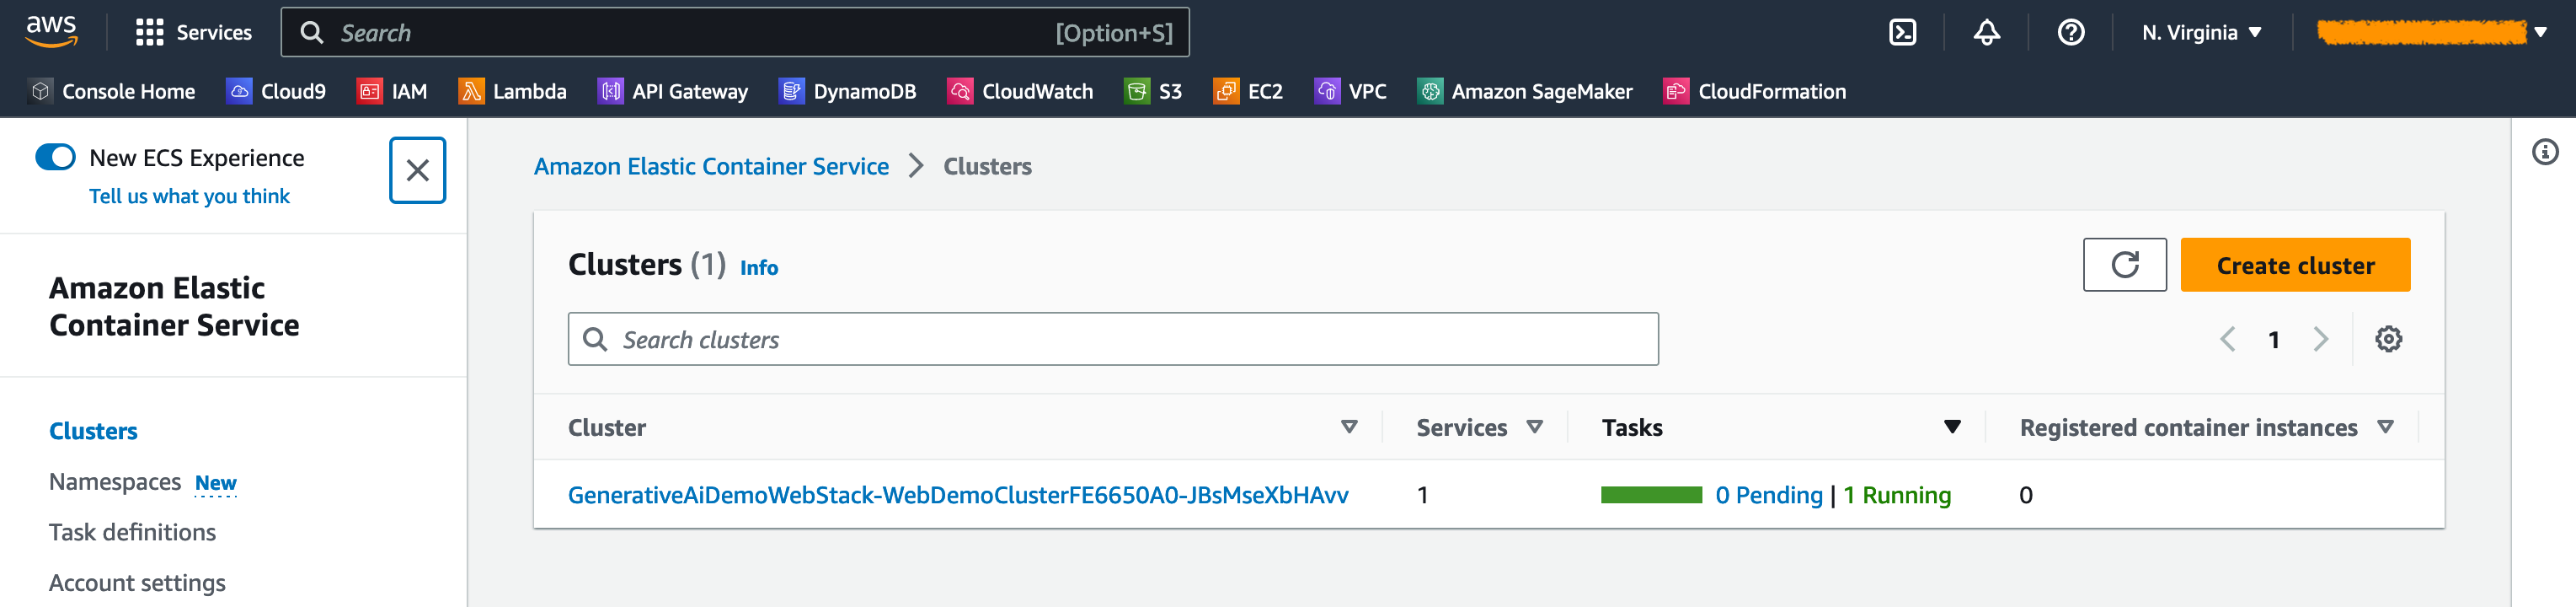
On the Amazon ECS console, you possibly can see the clusters on the Clusters web page.
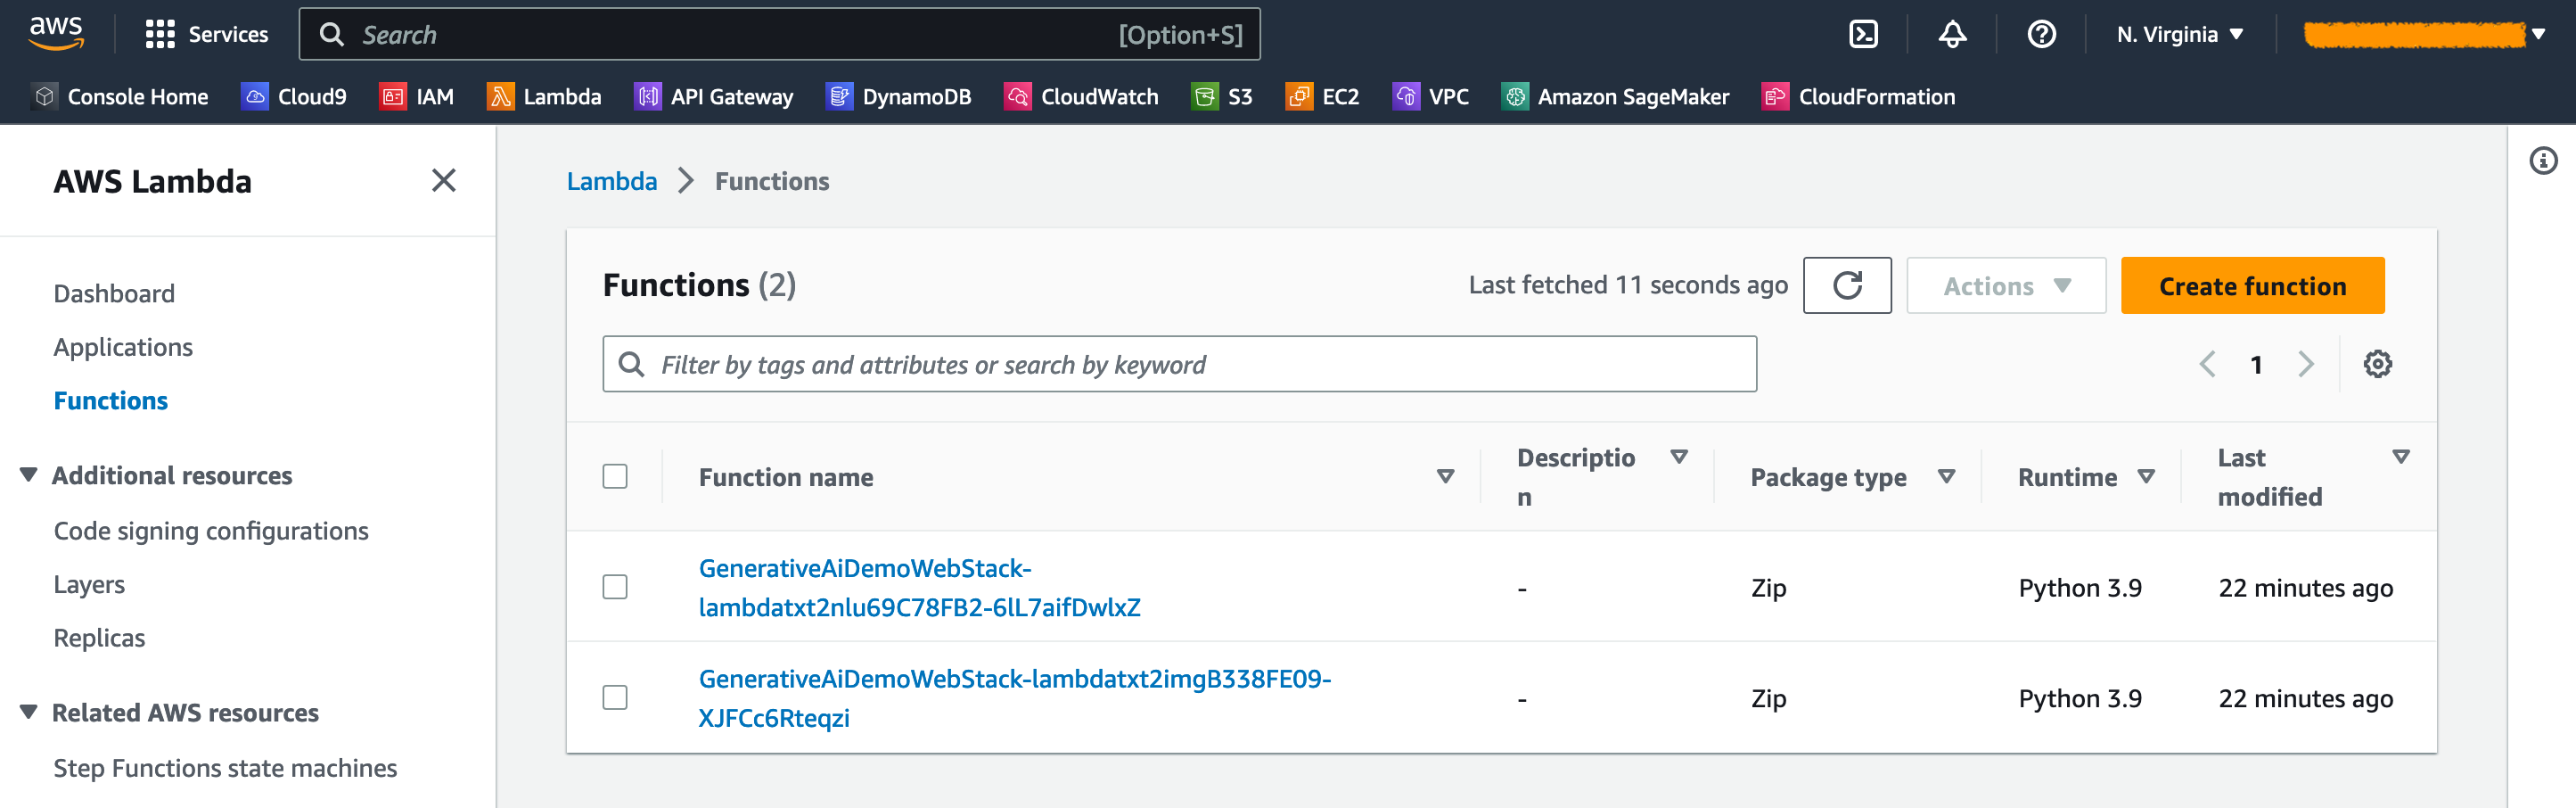
On the AWS Lambda console, you possibly can see the capabilities on the Features web page.
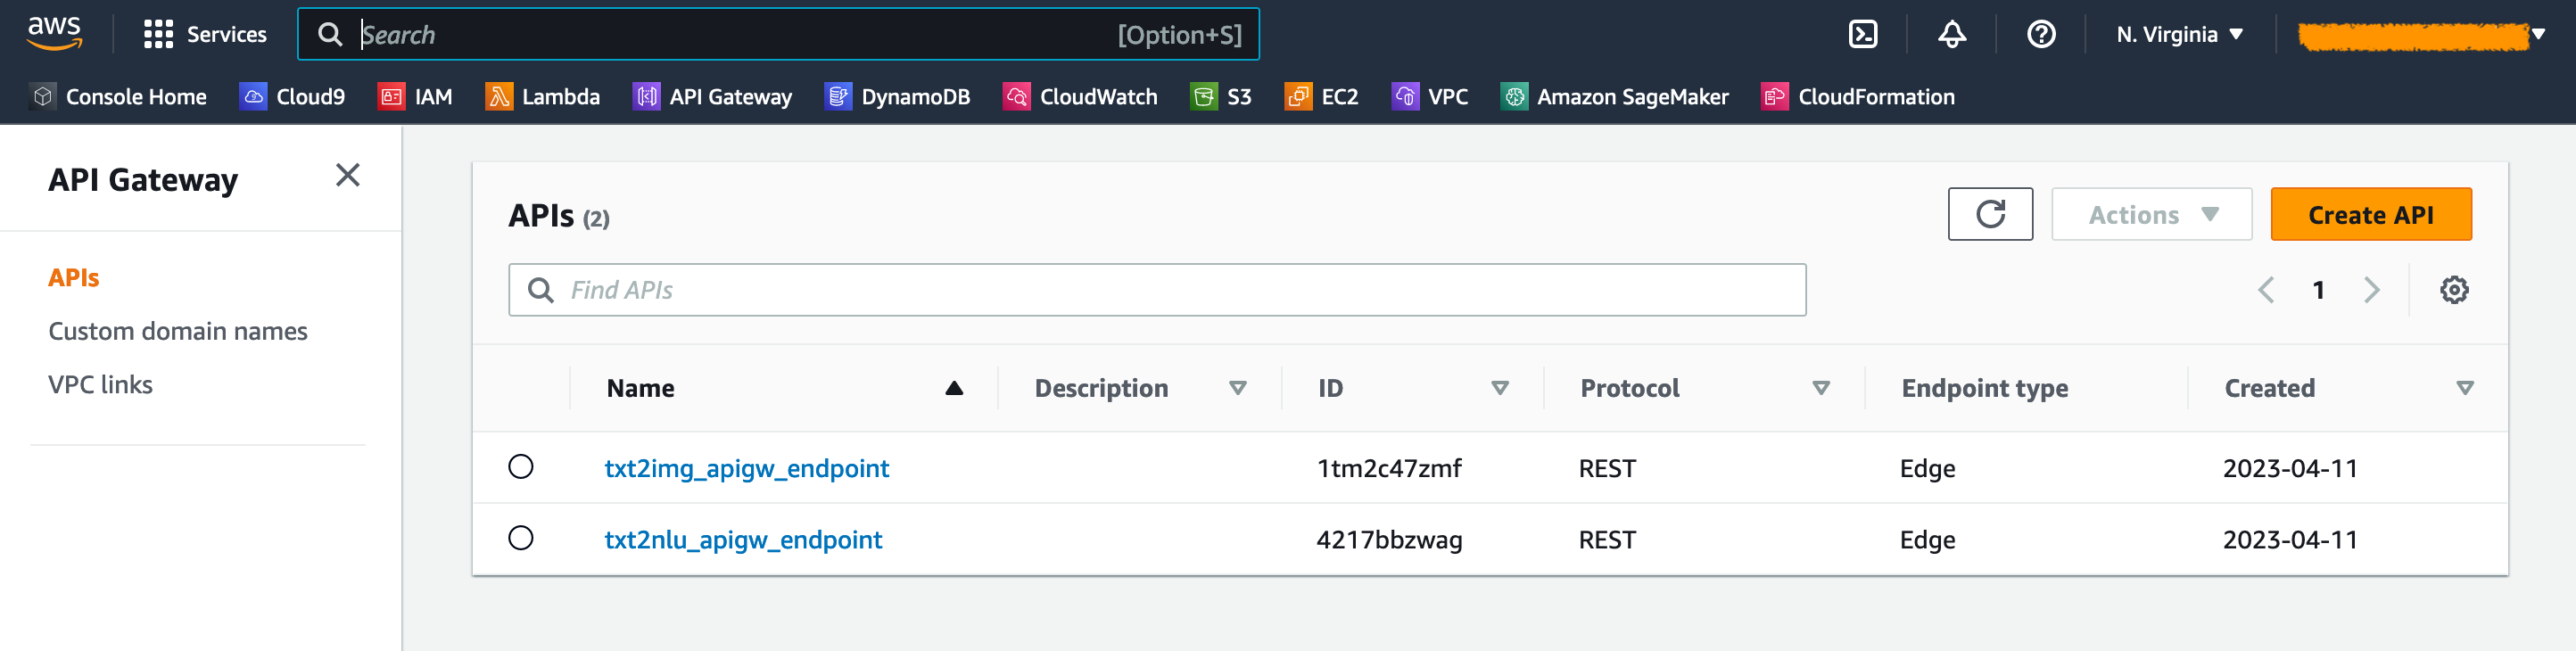
On the API Gateway console, you possibly can see the API Gateway endpoints on the APIs web page.
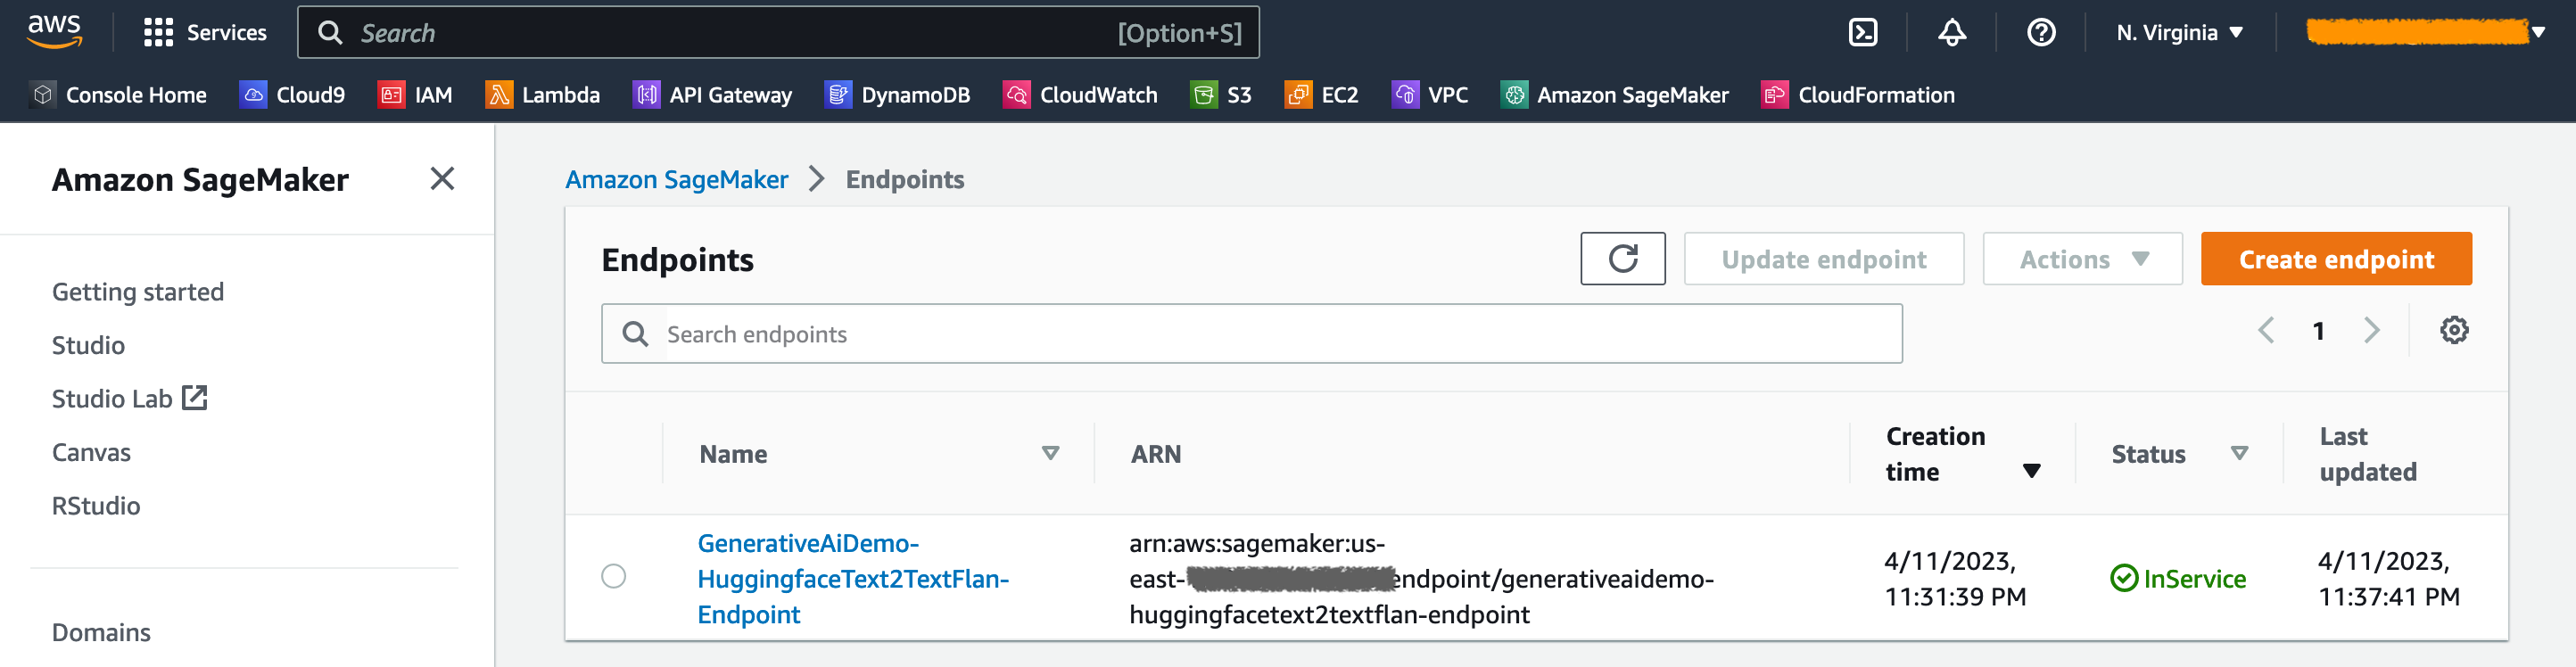
On the SageMaker console, you possibly can see the deployed mannequin endpoints on the Endpoints web page.
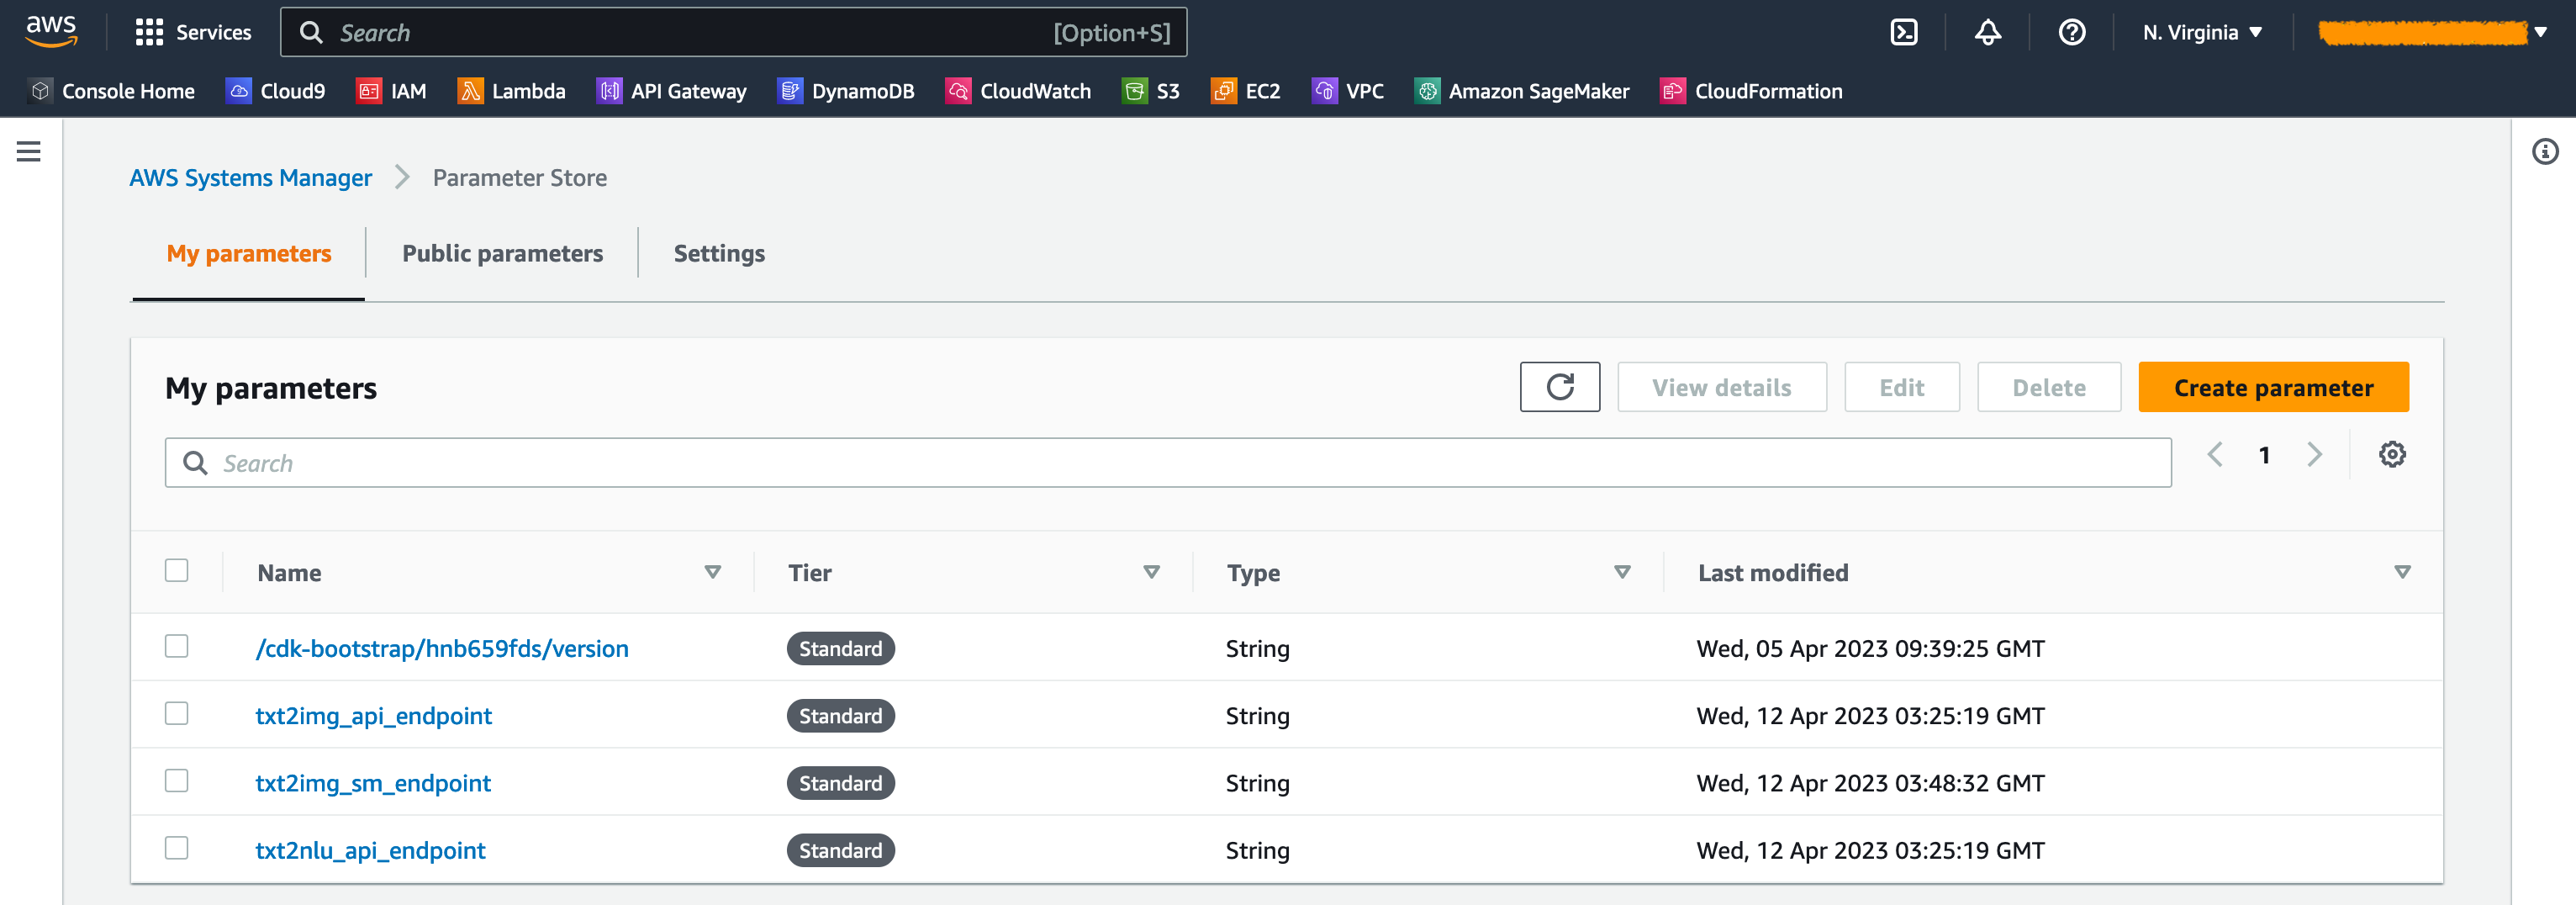
When the stacks are launched, some parameters are generated. These are saved within the AWS Systems Manager Parameter Store. To view them, select Parameter Retailer within the navigation pane on the AWS Systems Manager console.
Clear up
To keep away from pointless value, clear up all of the infrastructure created with the next command in your workstation:
Enter y on the immediate. This step takes round 10 minutes. Test if all sources are deleted on the console. Additionally delete the property S3 buckets created by the AWS CDK on the Amazon S3 console in addition to the property repositories on Amazon ECR.
Conclusion
As demonstrated on this publish, you should use the AWS CDK to deploy generative AI fashions in JumpStart. We confirmed a picture era instance and a textual content era instance utilizing a person interface powered by Streamlit, Lambda, and API Gateway.
Now you can construct your generative AI initiatives utilizing pre-trained AI fashions in JumpStart. You can even prolong this venture to fine-tune the muse fashions to your use case and management entry to API Gateway endpoints.
We invite you to check the answer and contribute to the venture on GitHub. Share your ideas on this tutorial within the feedback!
License abstract
This pattern code is made out there beneath a modified MIT license. See the LICENSE file for extra data. Additionally, assessment the respective licenses for the stable diffusion and flan-t5-xl fashions on Hugging Face.
In regards to the authors
 Hantzley Tauckoor is an APJ Companion Options Structure Chief based mostly in Singapore. He has 20 years’ expertise within the ICT trade spanning a number of practical areas, together with options structure, enterprise growth, gross sales technique, consulting, and management. He leads a workforce of Senior Options Architects that allow companions to develop joint options, construct technical capabilities, and steer them by means of the implementation part as prospects migrate and modernize their functions to AWS.
 Kwonyul Choi is a CTO at BABITALK, a Korean magnificence care platform startup, based mostly in Seoul. Previous to this position, Kownyul labored as Software program Improvement Engineer at AWS with a give attention to AWS CDK and Amazon SageMaker.
 Arunprasath Shankar is a Senior AI/ML Specialist Options Architect with AWS, serving to world prospects scale their AI options successfully and effectively within the cloud. In his spare time, Arun enjoys watching sci-fi films and listening to classical music.
 Satish Upreti is a Migration Lead PSA and Safety SME within the companion group in APJ. Satish has 20 years of expertise spanning on-premises personal cloud and public cloud applied sciences. Since becoming a member of AWS in August 2020 as a migration specialist, he offers in depth technical recommendation and assist to AWS companions to plan and implement advanced migrations.
Appendix: Code walkthrough
On this part, we offer an outline of the code on this venture.
AWS CDK utility
The primary AWS CDK utility is contained within the app.py file within the root listing. The venture consists of a number of stacks, so now we have to import the stacks:
We outline our generative AI fashions and get the associated URIs from SageMaker:
The operate get_sagemaker_uris retrieves all of the mannequin data from JumpStart. See script/sagemaker_uri.py.
Then, we instantiate the stacks:
The primary stack to launch is the VPC stack, GenerativeAiVpcNetworkStack. The net utility stack, GenerativeAiDemoWebStack, relies on the VPC stack. The dependency is completed by means of parameter passing vpc=network_stack.vpc.
See app.py for the total code.
VPC community stack
Within the GenerativeAiVpcNetworkStack stack, we create a VPC with a public subnet and a non-public subnet spanning throughout two Availability Zones:
See /stack/generative_ai_vpc_network_stack.py for the total code.
Demo net utility stack
Within the GenerativeAiDemoWebStack stack, we launch Lambda capabilities and respective API Gateway endpoints by means of which the online utility interacts with the SageMaker mannequin endpoints. See the next code snippet:
The net utility is containerized and hosted on Amazon ECS with Fargate. See the next code snippet:
See /stack/generative_ai_demo_web_stack.py for the total code.
Picture era SageMaker mannequin endpoint stack
The GenerativeAiTxt2imgSagemakerStack stack creates the picture era mannequin endpoint from JumpStart and shops the endpoint identify in Techniques Supervisor Parameter Retailer. This parameter can be utilized by the online utility. See the next code:
See /stack/generative_ai_txt2img_sagemaker_stack.py for the total code.
NLU and textual content era SageMaker mannequin endpoint stack
The GenerativeAiTxt2nluSagemakerStack stack creates the NLU and textual content era mannequin endpoint from JumpStart and shops the endpoint identify in Techniques Supervisor Parameter Retailer. This parameter may even be utilized by the online utility. See the next code:
See /stack/generative_ai_txt2nlu_sagemaker_stack.py for the total code.
Internet utility
The net utility is positioned within the /web-app listing. It’s a Streamlit utility that’s containerized as per the Dockerfile:
To be taught extra about Streamlit, see Streamlit documentation.