Put together coaching and validation dataset for facies classification utilizing Snowflake integration and prepare utilizing Amazon SageMaker Canvas
This put up is co-written with Thatcher Thornberry from bpx vitality.
Facies classification is the method of segmenting lithologic formations from geologic information on the wellbore location. Throughout drilling, wireline logs are obtained, which have depth-dependent geologic info. Geologists are deployed to investigate this log information and decide depth ranges for potential facies of curiosity from the various kinds of log information. Precisely classifying these areas is essential for the drilling processes that observe.
Facies classification utilizing AI and machine studying (ML) has turn out to be an more and more fashionable space of investigation for a lot of oil majors. Many information scientists and enterprise analysts at giant oil firms don’t have the required skillset to run superior ML experiments on necessary duties reminiscent of facies classification. To deal with this, we present you the right way to simply put together and prepare a best-in-class ML classification mannequin on this drawback.
On this put up, aimed primarily at those that are already utilizing Snowflake, we clarify how one can import each coaching and validation information for a facies classification activity from Snowflake into Amazon SageMaker Canvas and subsequently prepare the mannequin utilizing a 3+ class prediction mannequin.
Answer overview
Our resolution consists of the next steps:
- Add facies CSV information out of your native machine to Snowflake. For this put up, we use information from the next open-source GitHub repo.
- Configure AWS Identity and Access Management (IAM) roles for Snowflake and create a Snowflake integration.
- Create a secret for Snowflake credentials (optionally available, however suggested).
- Import Snowflake straight into Canvas.
- Construct a facies classification mannequin.
- Analyze the mannequin.
- Run batch and single predictions utilizing the multi-class mannequin.
- Share the skilled mannequin to Amazon SageMaker Studio.
Stipulations
Stipulations for this put up embody the next:
Add facies CSV information to Snowflake
On this part, we take two open-source datasets and add them straight from our native machine to a Snowflake database. From there, we arrange an integration layer between Snowflake and Canvas.
- Obtain the training_data.csv and validation_data_nofacies.csv information to your native machine. Make be aware of the place you saved them.
- Making certain that you’ve the proper Snowflake credentials and have put in the Snowflake CLI desktop app, you possibly can federate in. For extra info, consult with Log into SnowSQL.

- Choose the suitable Snowflake warehouse to work inside, which in our case is
COMPUTE_WH:

- Select a database to make use of for the rest of the walkthrough:
- Create a named file format that can describe a set of staged information to entry or load into Snowflake tables.
This may be run both within the Snowflake CLI or in a Snowflake worksheet on the net software. For this put up, we run a SnowSQL question within the net software. See Getting Started With Worksheets for directions to create a worksheet on the Snowflake net software.

- Create a desk in Snowflake utilizing the CREATE assertion.
The next assertion creates a brand new desk within the present or specified schema (or replaces an current desk).
It’s necessary that the info varieties and the order through which they seem are appropriate, and align with what’s discovered within the CSV information that we beforehand downloaded. In the event that they’re inconsistent, we’ll run into points later after we attempt to copy the info throughout.

- Do the identical for the validation database.
Notice that the schema is just a little totally different to the coaching information. Once more, be certain that the info varieties and column or characteristic orders are appropriate.

- Load the CSV information file out of your native system into the Snowflake staging surroundings:
- The next is the syntax of the assertion for Home windows OS:
- The next is the syntax of the assertion for Mac OS:
The next screenshot reveals an instance command and output from inside the SnowSQL CLI.

- Copy the info into the goal Snowflake desk.
Right here, we load the coaching CSV information to the goal desk, which we created earlier. Notice that you must do that for each the coaching and validation CSV information, copying them into the coaching and validation tables, respectively.

- Confirm that the info has been loaded into the goal desk by working a SELECT question (you are able to do this for each the coaching and validation information):

Configure Snowflake IAM roles and create the Snowflake integration
As a prerequisite for this part, please observe the official Snowflake documentation on the right way to configure a Snowflake Storage Integration to Access Amazon S3.
Retrieve the IAM person to your Snowflake account
After you have efficiently configured your Snowflake storage integration, run the next DESCRIBE INTEGRATION command to retrieve the ARN for the IAM person that was created robotically to your Snowflake account:

Report the next values from the output:
- STORAGE_AWS_IAM_USER_ARN – The IAM person created to your Snowflake account
- STORAGE_AWS_EXTERNAL_ID – The exterior ID wanted to ascertain a belief relationship
Replace the IAM function belief coverage
Now we replace the belief coverage:
- On the IAM console, select Roles within the navigation pane.
- Select the function you created.
- On the Belief relationship tab, select Edit belief relationship.
- Modify the coverage doc as proven within the following code with the DESC STORAGE INTEGRATION output values you recorded within the earlier step.
- Select Replace belief coverage.
Create an exterior stage in Snowflake
We use an exterior stage inside Snowflake for loading information from an S3 bucket in your personal account into Snowflake. On this step, we create an exterior (Amazon S3) stage that references the storage integration you created. For extra info, see Creating an S3 Stage.
This requires a task that has the CREATE_STAGE privilege for the schema in addition to the USAGE privilege on the storage integration. You may grant these privileges to the function as proven within the code within the subsequent step.
Create the stage utilizing the CREATE_STAGE command with placeholders for the exterior stage and S3 bucket and prefix. The stage additionally references a named file format object known as my_csv_format:
Create a secret for Snowflake credentials
Canvas lets you use the ARN of an AWS Secrets Manager secret or a Snowflake account identify, person identify, and password to entry Snowflake. In the event you intend to make use of the Snowflake account identify, person identify, and password choice, skip to the subsequent part, which covers including the info supply.
To create a Secrets and techniques Supervisor secret manually, full the next steps:
- On the Secrets and techniques Supervisor console, select Retailer a brand new secret.
- For Choose secret sort¸ choose Different forms of secrets and techniques.
- Specify the small print of your secret as key-value pairs.

The names of the important thing are case-sensitive and have to be lowercase.
In the event you choose, you need to use the plaintext choice and enter the key values as JSON:
- Select Subsequent.
- For Secret identify, add the prefix
AmazonSageMaker(for instance, our secret isAmazonSageMaker-CanvasSnowflakeCreds). - Within the Tags part, add a tag with the important thing SageMaker and worth true.

- Select Subsequent.
- The remainder of the fields are optionally available; select Subsequent till you’ve gotten the choice to decide on Retailer to retailer the key.
- After you retailer the key, you’re returned to the Secrets and techniques Supervisor console.
- Select the key you simply created, then retrieve the key ARN.
- Retailer this in your most popular textual content editor to be used later while you create the Canvas information supply.
Import Snowflake straight into Canvas
To import your facies dataset straight into Canvas, full the next steps:
- On the SageMaker console, select Amazon SageMaker Canvas within the navigation pane.
- Select your person profile and select Open Canvas.
- On the Canvas touchdown web page, select Datasets within the navigation pane.
- Select Import.

- Click on on Snowflake within the under picture after which instantly “Add Connection”.

- Enter the ARN of the Snowflake secret that we beforehand created, the storage integration identify (
SAGEMAKER_CANVAS_INTEGRATION), and a singular connection identify of your selecting. - Select Add connection.

If all of the entries are legitimate, it is best to see all of the databases related to the connection within the navigation pane (see the next instance for NICK_FACIES).

- Select the
TRAINING_DATAdesk, then select Preview dataset.
In the event you’re proud of the info, you possibly can edit the customized SQL within the information visualizer.
- Select Edit in SQL.
- Run the next SQL command earlier than importing into Canvas. (This assumes that the database known as
NICK_FACIES. Substitute this worth along with your database identify.)
One thing much like the next screenshot ought to seem within the Import preview part.
- In the event you’re proud of the preview, select Import information.

- Select an applicable information identify, guaranteeing that it’s distinctive and fewer than 32 characters lengthy.
- Use the next command to import the validation dataset, utilizing the identical technique as earlier:
Construct a facies classification mannequin
To construct your facies classification mannequin, full the next steps:
- Select Fashions within the navigation pane, then select New Mannequin.
- Give your mannequin an acceptable identify.
- On the Choose tab, select the lately imported coaching dataset, then select Choose dataset.
- On the Construct tab, drop the
WELL_NAMEcolumn.
We do that as a result of the nicely names themselves aren’t helpful info for the ML mannequin. They’re merely arbitrary names that we discover helpful to tell apart between the wells themselves. The identify we give a selected nicely is irrelevant to the ML mannequin.
- Select FACIES because the goal column.
- Depart Mannequin sort as 3+ class prediction.
- Validate the info.
- Select Customary construct.
Your web page ought to look much like the next screenshot simply earlier than constructing your mannequin.

After you select Customary construct, the mannequin enters the analyze stage. You’re offered an anticipated construct time. Now you can shut this window, log off of Canvas (to be able to keep away from expenses), and return to Canvas at a later time.
Analyze the facies classification mannequin
To research the mannequin, full the next steps:
- Federate again into Canvas.
- Find your beforehand created mannequin, select View, then select Analyze.
- On the Overview tab, you possibly can see the influence that particular person options are having on the mannequin output.
- In the proper pane, you possibly can visualize the influence {that a} given characteristic (X axis) is having on the prediction of every facies class (Y axis).
These visualizations will change accordingly relying on the characteristic you choose. We encourage you to discover this web page by biking by means of all 9 lessons and 10 options.
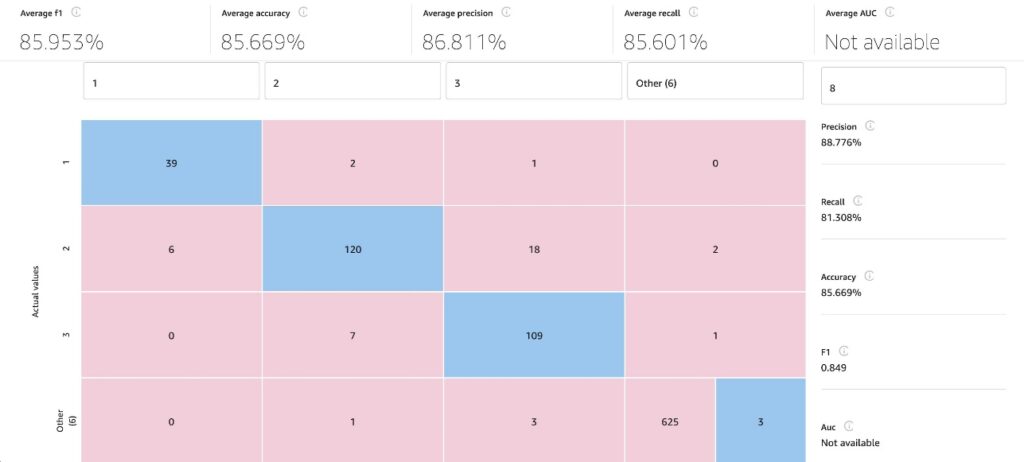
- On the Scoring tab, we will see the anticipated vs. precise facies classification.
- Select Superior metrics to view F1 scores, common accuracy, precision, recall, and AUC.
- Once more, we encourage viewing all of the totally different lessons.
- Select Obtain to obtain a picture to your native machine.
Within the following picture, we will see various totally different superior metrics, such because the F1 rating. In statistical evaluation, the F1 rating conveys the steadiness between the precision and the recall of a classification mannequin, and is computed utilizing the next equation: 2*((Precision * Recall)/ (Precision + Recall)).

Run batch and single prediction utilizing the multi-class facies classification mannequin
To run a prediction, full the next steps:
- Select Single prediction to change the characteristic values as wanted, and get a facies classification returned on the proper of the web page.
You may then copy the prediction chart picture to your clipboard, and likewise obtain the predictions right into a CSV file.

- Select Batch prediction after which select Choose dataset to decide on the validation dataset you beforehand imported.
- Select Generate predictions.
You’re redirected to the Predict web page, the place the Standing will learn Producing predictions for just a few seconds.
After the predictions are returned, you possibly can preview, obtain, or delete the predictions by selecting the choices menu (three vertical dots) subsequent to the predictions.

The next is an instance of a predictions preview.

Share a skilled mannequin in Studio
Now you can share the newest model of the mannequin with one other Studio person. This enables information scientists to assessment the mannequin intimately, take a look at it, make any modifications that will enhance accuracy, and share the up to date mannequin again with you.
The power to share your work with a extra technical person inside Studio is a key characteristic of Canvas, given the important thing distinction between ML personas’ workflows. Notice the sturdy focus right here on collaboration between cross-functional groups with differing technical talents.
- Select Share to share the mannequin.

- Select which mannequin model to share.
- Enter the Studio person to share the mannequin with.
- Add an optionally available be aware.
- Select Share.

Conclusion
On this put up, we confirmed how with just some clicks in Amazon SageMaker Canvas you possibly can put together and import your information from Snowflake, be part of your datasets, analyze estimated accuracy, confirm which columns are impactful, prepare the perfect performing mannequin, and generate new particular person or batch predictions. We’re excited to listen to your suggestions and aid you clear up much more enterprise issues with ML. To construct your personal fashions, see Getting started with using Amazon SageMaker Canvas.
Concerning the Authors
 Nick McCarthy is a Machine Studying Engineer within the AWS Skilled Providers staff. He has labored with AWS shoppers throughout numerous industries together with healthcare, finance, sports activities, telecoms and vitality to speed up their enterprise outcomes by means of using AI/ML. Working with the bpx information science staff, Nick lately completed constructing bpx’s Machine Studying platform on Amazon SageMaker.
 Thatcher Thornberry is a Machine Studying Engineer at bpx Vitality. He helps bpx’s information scientists by growing and sustaining the corporate’s core Knowledge Science platform in Amazon SageMaker. In his free time he likes to hack on private coding initiatives and spend time outdoor together with his spouse.