Automate the deployment of an Amazon Forecast time-series forecasting mannequin
Time collection forecasting refers back to the means of predicting future values of time collection information (information that’s collected at common intervals over time). Easy strategies for time collection forecasting use historic values of the identical variable whose future values should be predicted, whereas extra advanced, machine studying (ML)-based strategies use further info, such because the time collection information of associated variables.
Amazon Forecast is an ML-based time collection forecasting service that features algorithms which are primarily based on over 20 years of forecasting expertise utilized by Amazon.com, bringing the identical know-how used at Amazon to builders as a completely managed service, eradicating the necessity to handle assets. Forecast makes use of ML to study not solely the perfect algorithm for every merchandise, but in addition the perfect ensemble of algorithms for every merchandise, routinely creating the perfect mannequin in your information.
This put up describes learn how to deploy recurring Forecast workloads (time collection forecasting workloads) with no code utilizing AWS CloudFormation, AWS Step Functions, and AWS Systems Manager. The tactic offered right here helps you construct a pipeline that means that you can use the identical workflow ranging from the primary day of your time collection forecasting experimentation via the deployment of the mannequin into manufacturing.
Time collection forecasting utilizing Forecast
The workflow for Forecast includes the next widespread ideas:
- Importing datasets – In Forecast, a dataset group is a group of datasets, schema, and forecast outcomes that go collectively. Every dataset group can have as much as three datasets, one in all every dataset kind: goal time collection (TTS), associated time collection (RTS), and merchandise metadata. A dataset is a group of information that include information that’s related for a forecasting activity. A dataset should conform to the schema outlined inside Forecast. For extra particulars, seek advice from Importing Datasets.
- Coaching predictors – A predictor is a Forecast-trained mannequin used for making forecasts primarily based on time collection information. Throughout coaching, Forecast calculates accuracy metrics that you simply use to guage the predictor and resolve whether or not to make use of the predictor to generate a forecast. For extra info, seek advice from Training Predictors.
- Producing forecasts – You may then use the skilled mannequin for producing forecasts for a future time horizon, referred to as the forecasting horizon. Forecast gives forecasts at numerous specified quantiles. For instance, a forecast on the 0.90 quantile will estimate a price that’s decrease than the noticed worth 90% of the time. By default, Forecast makes use of the next values for the predictor forecast varieties: 0.1 (P10), 0.5 (P50), and 0.9 (P90). Forecasts at numerous quantiles are sometimes used to supply a prediction interval (an higher and decrease sure for forecasts) to account for forecast uncertainty.
You may implement this workflow in Forecast both from the AWS Management Console, the AWS Command Line Interface (AWS CLI), through API calls using Python notebooks, or through automation options. The console and AWS CLI strategies are greatest suited to fast experimentation to examine the feasibility of time collection forecasting utilizing your information. The Python pocket book technique is nice for information scientists already conversant in Jupyter notebooks and coding, and gives most management and tuning. Nonetheless, the notebook-based technique is tough to operationalize. Our automation method facilitates fast experimentation, eliminates repetitive duties, and permits simpler transition between numerous environments (improvement, staging, manufacturing).
On this put up, we describe an automation method to utilizing Forecast that means that you can use your individual information and gives a single workflow that you should utilize seamlessly all through the lifecycle of the event of your forecasting answer, from the primary days of experimentation via the deployment of the answer in your manufacturing surroundings.
Answer overview
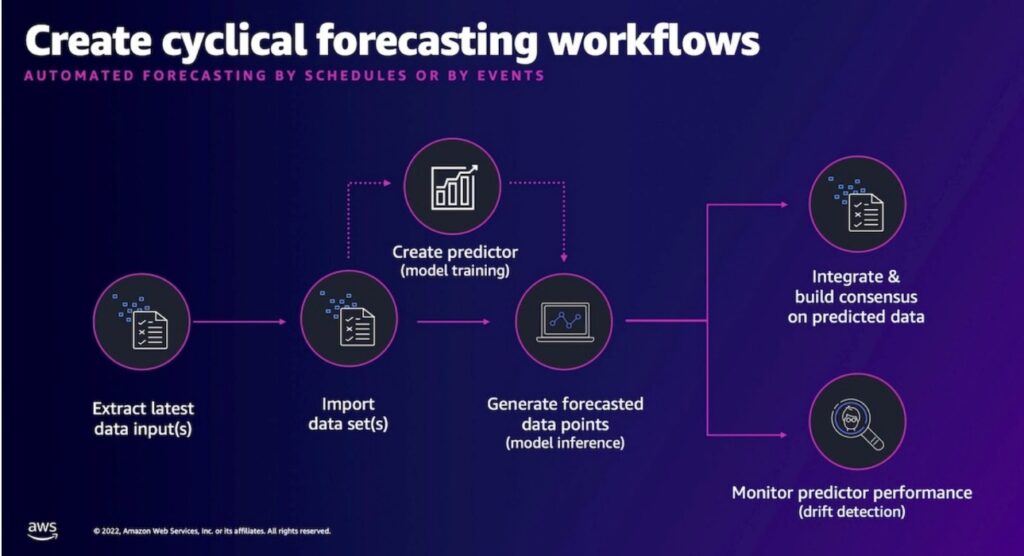
Within the following sections, we describe an entire end-to-end workflow that serves as a template to observe for automated deployment of time collection forecasting fashions utilizing Forecast. This workflow creates forecasted information factors from an open-source enter dataset; nonetheless, you should utilize the identical workflow in your personal information, so long as you possibly can format your information in accordance with the steps outlined on this put up. After you add the info, we stroll you thru the steps to create Forecast dataset teams, import information, prepare ML fashions, and produce forecasted information factors on future unseen time horizons from uncooked information. All of that is attainable with out having to jot down or compile code.
The next diagram illustrates the forecasting workflow.

The answer is deployed utilizing two CloudFormation templates: the dependencies template and the workload template. CloudFormation lets you carry out AWS infrastructure deployments predictably and repeatedly through the use of templates describing the assets to be deployed. A deployed template is known as a stack. We’ve taken care of defining the infrastructure within the answer for you within the two offered templates. The dependencies template defines prerequisite assets utilized by the workload template, akin to an Amazon Simple Storage Service (Amazon S3) bucket for object storage and AWS Identity and Access Management (IAM) permissions for AWS API actions. The assets outlined within the dependencies template could also be shared by a number of workload templates. The workload template defines the assets used to ingest information, prepare a predictor, and generate a forecast.

Deploy the dependencies CloudFormation template
First, let’s deploy the dependencies template to create our prerequisite assets. The dependencies template deploys an non-compulsory S3 bucket, AWS Lambda capabilities, and IAM roles. Amazon S3 is a low-cost, extremely out there, resilient, object storage service. We use an S3 bucket on this answer to retailer supply information and set off the workflow, leading to a forecast. Lambda is a serverless, event-driven compute service that permits you to run code with out provisioning or managing servers. The dependencies template contains capabilities to do issues like create a dataset group in Forecast and purge objects inside an S3 bucket earlier than deleting the bucket. IAM roles outline permissions inside AWS for customers and companies. The dependencies template deploys a job for use by Lambda and one other for Step Capabilities, a workflow administration service that can coordinate the duties of knowledge ingestion and processing, in addition to predictor coaching and inference utilizing Forecast.
Full the next steps to deploy the dependencies template:
- On the console, choose the specified Region supported by Forecast for answer deployment.
- On the AWS CloudFormation console, select Stacks within the navigation pane.
- Select Create stack and select With new assets (normal).

- For Template supply, choose Amazon S3 URL.
- Enter the template URL:
https://amazon-forecast-samples.s3.us-west-2.amazonaws.com/ml_ops/forecast-mlops-dependency.yaml. - Select Subsequent.

- For Stack title, enter
forecast-mlops-dependency. - Underneath Parameters, select to make use of an current S3 bucket or create a brand new one, then present the title of the bucket.
- Select Subsequent.
- Select Subsequent to just accept the default stack choices.
- Choose the examine field to acknowledge the stack creates IAM assets, then select Create stack to deploy the template.
You need to see the template deploy because the forecast-mlops-dependency stack. When the standing adjustments to CREATE_COMPLETE, it’s possible you’ll transfer to the following step.
Deploy the workload CloudFormation template
Subsequent, let’s deploy the workload template to create our prerequisite assets. The workload template deploys Step Capabilities state machines for workflow administration, AWS Systems Manager Parameter Store parameters to retailer parameter values from AWS CloudFormation and inform the workflow, an Amazon Simple Notification Service (Amazon SNS) matter for workflow notifications, and an IAM function for workflow service permissions.
The answer creates 5 state machines:
- CreateDatasetGroupStateMachine – Creates a Forecast dataset group for information to be imported into.
- CreateImportDatasetStateMachine – Imports supply information from Amazon S3 right into a dataset group for coaching.
- CreateForecastStateMachine – Manages the duties required to coach a predictor and generate a forecast.
- AthenaConnectorStateMachine – Lets you write SQL queries with the Amazon Athena connector to land information in Amazon S3. That is an non-compulsory course of to acquire historic information within the required format for Forecast through the use of Athena as a substitute of putting information manually in Amazon S3.
- StepFunctionWorkflowStateMachine – Coordinates calls out to the opposite 4 state machines and manages the general workflow.
Parameter Retailer, a functionality of Methods Supervisor, gives safe, hierarchical storage and programmatic retrieval of configuration information administration and secrets and techniques administration. Parameter Retailer is used to retailer parameters set within the workload stack in addition to different parameters utilized by the workflow.
Full the next steps to deploy the workload template:
- On the AWS CloudFormation console, select Stacks within the navigation pane.
- Select Create stack and select With new assets (normal).
- For Template supply, choose Amazon S3 URL.
- Enter the template URL:
https://amazon-forecast-samples.s3.us-west-2.amazonaws.com/ml_ops/forecast-mlops-solution-guidance.yaml. - Select Subsequent.
- For Stack title, enter a reputation.
- Settle for the default values or modify the parameters.
Remember to enter the S3 bucket title from the dependencies stack for S3 Bucket and a legitimate e-mail deal with for SNSEndpoint even in case you settle for the default parameter values.
The next desk describes every parameter.
| Parameter | Description | Extra Info |
DatasetGroupFrequencyRTS |
The frequency of knowledge assortment for the RTS dataset. | . |
DatasetGroupFrequencyTTS |
The frequency of knowledge assortment for the TTS dataset. | . |
DatasetGroupName |
A brief title for the dataset group, a self-contained workload. | CreateDatasetGroup |
DatasetIncludeItem |
Specify if you wish to present merchandise metadata for this use case. | . |
DatasetIncludeRTS |
Specify if you wish to present a associated time collection for this use case. | . |
ForecastForecastTypes |
When a CreateForecast job runs, this declares which quantiles to supply predictions for. It’s possible you’ll select as much as 5 values on this array. Edit this worth to incorporate values in accordance with want. | CreateForecast |
PredictorAttributeConfigs |
For the goal variable in TTS and every numeric area within the RTS datasets, a document have to be created for every time interval for every merchandise. This configuration helps decide how lacking data are stuffed in: with 0, NaN, or in any other case. We suggest submitting the gaps within the TTS with NaN as a substitute of 0. With 0, the mannequin would possibly study wrongly to bias forecasts towards 0. NaN is how the steerage is delivered. Seek the advice of together with your AWS Options Architect with any questions on this. | CreateAutoPredictor |
PredictorExplainPredictor |
Legitimate values are TRUE or FALSE. These decide if explainability is enabled in your predictor. This will help you perceive how values within the RTS and merchandise metadata affect the mannequin. | Explainability |
PredictorForecastDimensions |
It’s possible you’ll wish to forecast at a finer grain than merchandise. Right here, you possibly can specify dimensions akin to location, price heart, or no matter your wants are. This must agree with the size in your RTS and TTS. Notice that you probably have no dimension, the proper parameter is null, by itself and in all lowercase. null is a reserved phrase that lets the system know there is no such thing as a parameter for the dimension. | CreateAutoPredictor |
PredictorForecastFrequency |
Defines the time scale at which your mannequin and predictions can be generated, akin to every day, weekly, or month-to-month. The drop-down menu helps you select allowed values. This must agree together with your RTS time scale in case you’re utilizing RTS. | CreateAutoPredictor |
PredictorForecastHorizon |
The variety of time steps that the mannequin predicts. The forecast horizon can also be referred to as the prediction size. | CreateAutoPredictor |
PredictorForecastOptimizationMetric |
Defines the accuracy metric used to optimize the predictor. The drop-down menu will assist you choose weighted quantile loss balances for over- or under-forecasting. RMSE is worried with items, and WAPE/MAPE are involved with p.c errors. | CreateAutoPredictor |
PredictorForecastTypes |
When a CreateAutoPredictor job runs, this declares which quantiles are used to coach prediction factors. It’s possible you’ll select as much as 5 values on this array, permitting you to steadiness over- and under-forecasting. Edit this worth to incorporate values in accordance with want. |
CreateAutoPredictor |
S3Bucket |
The title of the S3 bucket the place enter information and output information are written for this workload. | . |
SNSEndpoint |
A legitimate e-mail deal with to obtain notifications when the predictor and Forecast jobs are full. | . |
SchemaITEM |
This defines the bodily order, column names, and information varieties in your merchandise metadata dataset. That is an non-compulsory file offered within the answer instance. | CreateDataset |
SchemaRTS |
This defines the bodily order, column names, and information varieties in your RTS dataset. The size should agree together with your TTS. The time-grain of this file governs the time-grain at which predictions may be made. That is an non-compulsory file offered within the answer instance. | CreateDataset |
SchemaTTS |
This defines the bodily order, column names, and information varieties in your TTS dataset, the one required dataset. The file should include a goal worth, timestamp, and merchandise at a minimal. | CreateDataset |
TimestampFormatRTS |
Defines the timestamp format offered within the RTS file. | CreateDatasetImportJob |
TimestampFormatTTS |
Defines the timestamp format offered within the TTS file. | CreateDatasetImportJob |
- Select Subsequent to just accept the default stack choices.
- Choose the examine field to acknowledge the stack creates IAM assets, then select Create stack to deploy the template.
You need to see the template deploy because the stack title you selected earlier. When the standing adjustments to CREATE_COMPLETE, it’s possible you’ll transfer to the info add step.
Add the info
Within the earlier part, you offered a stack title and an S3 bucket. This part describes learn how to deposit the publicly out there dataset Food Demand on this bucket. In the event you’re utilizing your individual dataset, seek advice from Datasets to arrange your dataset in a format the deployment is anticipating. The dataset must include at the least the goal time collection, and optionally, the associated time collection and the merchandise metadata:
- TTS is the time collection information that features the sphere that you simply wish to generate a forecast for; this area known as the goal area
- RTS is time collection information that doesn’t embrace the goal area, however features a associated area
- The merchandise information file isn’t time collection information, however contains metadata details about the gadgets within the TTS or RTS datasets
Full the next steps:
- In the event you’re utilizing the offered pattern dataset, obtain the dataset Food Demand to your laptop and unzip the file, which creates three information inside three directories (
rts,tts,merchandise). - On the Amazon S3 console, navigate to the bucket you created earlier.
- Select Create folder.
- Use the identical string as your workload stack title for the folder title.
- Select Add.
- Select the three dataset folders, then select Add.
When the add is full, it’s best to see one thing like the next screenshot. For this instance, our folder is aiml42.
Create a Forecast dataset group
Full the steps on this part to create a dataset group as a one-time occasion for every workload. Going ahead, it’s best to plan on working the import information, create predictor, and create forecast steps as acceptable, as a collection, in accordance with your schedule, which might be every day, weekly, or in any other case.
- On the Step Capabilities console, find the state machine containing
Create-Dataset-Group. - On the state machine element web page, select Begin execution.
- Select Begin execution once more to substantiate.
The state machine takes about 1 minute to run. When it’s full, the worth underneath Execution Standing ought to change from Operating to Succeeded 
Import information into Forecast
Observe the steps on this part to import the info set that you simply uploaded to your S3 bucket into your dataset group:
- On the Step Capabilities console, find the state machine containing
Import-Dataset. - On the state machine element web page, select Begin Execution.
- Select Begin execution once more to substantiate.
The period of time the state machine takes to run will depend on the dataset being processed.

- Whereas that is working, in your browser, open one other tab and navigate to the Forecast console.
- On the Forecast console, select View dataset teams and navigate to the dataset group with the title specified for
DataGroupNameout of your workload stack. - Select View datasets.
You need to see the info imports in progress.

When the state machine for Import-Dataset is full, you possibly can proceed to the following step to construct your time collection information mannequin.
Create AutoPredictor (prepare a time collection mannequin)
This part describes learn how to prepare an preliminary predictor with Forecast. It’s possible you’ll select to create a brand new predictor (your first, baseline predictor) or retrain a predictor throughout every manufacturing cycle, which might be every day, weekly, or in any other case. You may additionally elect to not create a predictor every cycle and depend on predictor monitoring to information you when to create one. The next determine visualizes the method of making a production-ready Forecast predictor.

To create a brand new predictor, full the next steps:
- On the Step Capabilities console, find the state machine containing
Create-Predictor. - On the state machine element web page, select Begin Execution.
- Select Begin execution once more to substantiate.
The quantity of runtime can depend upon the dataset being processed. This might take as much as an hour or extra to finish. - Whereas that is working, in your browser, open one other tab and navigate to the Forecast console.
- On the Forecast console, select View dataset teams and navigate to the dataset group with the title specified for
DataGroupNameout of your workload stack. - Select View predictors.
You need to see the predictor coaching in progress (Coaching standing reveals “Create in progress…”).

When the state machine for Create-Predictor is full, you possibly can consider its efficiency.
As a part of the state machine, the system creates a predictor and in addition runs a BacktestExport job that writes out time series-level predictor metrics to Amazon S3. These are information positioned in two S3 folders underneath the backtest-export folder:
- accuracy-metrics-values – Supplies item-level accuracy metric computations so you possibly can perceive the efficiency of a single time collection. This lets you examine the unfold moderately than specializing in the worldwide metrics alone.
- forecasted-values – Supplies step-level predictions for every time collection within the backtest window. This lets you examine the precise goal worth from a holdout check set to the anticipated quantile values. Reviewing this helps formulate concepts on learn how to present further information options in RTS or merchandise metadata to assist higher estimate future values, additional lowering loss. It’s possible you’ll obtain
backtest-exportinformation from Amazon S3 or question them in place with Athena.

With your individual information, you might want to carefully examine the predictor outcomes and make sure the metrics meet your anticipated outcomes through the use of the backtest export information. When glad, you possibly can start producing future-dated predictions as described within the subsequent part.
Generate a forecast (inference about future time horizons)
This part describes learn how to generate forecast information factors with Forecast. Going ahead, it’s best to harvest new information from the supply system, import the info into Forecast, after which generate forecast information factors. Optionally, you may additionally insert a brand new predictor creation after import and earlier than forecast. The next determine visualizes the method of making manufacturing time collection forecasts utilizing Forecast.

Full the next steps:
- On the Step Capabilities console, find the state machine containing
Create-Forecast. - On the state machine element web page, select Begin Execution.
- Select Begin execution once more to substantiate.
This state machine finishes in a short time as a result of the system isn’t configured to generate a forecast. It doesn’t know which predictor mannequin you’ve gotten authorised for inference.
Let’s configure the system to make use of your skilled predictor. - On the Forecast console, find the ARN in your predictor.
- Copy the ARN to make use of in a later step.

- In your browser, open one other tab and navigate to the Methods Supervisor console.
- On the Methods Supervisor console, select Parameter Retailer within the navigation pane.
- Find the parameter associated to your stack (
/forecast/<StackName>/Forecast/PredictorArn). - Enter the ARN you copied in your predictor.
That is the way you affiliate a skilled predictor with the inference operate of Forecast. - Find the parameter
/forecast/<StackName>/Forecast/Generateand edit the worth, changingFALSEwithTRUE.
Now you’re able to run a forecast job for this dataset group. - On the Step Capabilities console, run the
Create-Forecaststate machine.
This time, the job runs as anticipated. As a part of the state machine, the system creates a forecast and a ForecastExport job, which writes out time collection predictions to Amazon S3. These information are positioned within the forecast folder

Contained in the forecast folder, you can find predictions in your gadgets, positioned in lots of CSV or Parquet information, relying in your choice. The predictions for every time step and chosen time collection exist with all of your chosen quantile values per document. It’s possible you’ll obtain these information from Amazon S3, question them in place with Athena, or select one other technique to make use of the info.
This wraps up all the workflow. Now you can visualize your output utilizing any visualization device of your alternative, akin to Amazon QuickSight. Alternatively, information scientists can use pandas to generate their very own plots. In the event you select to make use of QuickSight, you possibly can connect your forecast results to QuickSight to carry out information transformations, create a number of information analyses, and create visualizations.
This course of gives a template to observe. You will have to adapt the pattern to your schema, set the forecast horizon, time decision, and so forth in accordance with your use case. Additionally, you will must set a recurring schedule the place information is harvested from the supply system, import the info, and produce forecasts. If desired, it’s possible you’ll insert a predictor activity between the import and forecast steps.
Retrain the predictor
We have now walked via the method of coaching a brand new predictor, however what about retraining a predictor? Retraining a predictor is one approach to cut back the fee and time concerned with coaching a predictor on the most recent out there information. Fairly than create a brand new predictor and prepare it on all the dataset, we will retrain the present predictor by offering solely the brand new incremental information made out there for the reason that predictor was final skilled. Let’s stroll via learn how to retrain a predictor utilizing the automation answer:
- On the Forecast console, select View dataset teams.
- Select the dataset group related to the predictor you wish to retrain.
- Select View predictors, then selected the predictor you wish to retrain.
- On the Settings tab, copy the predictor ARN.
We have to replace a parameter utilized by the workflow to establish the predictor to retrain. - On the Methods Supervisor console, select Parameter Retailer within the navigation pane.
- Find the parameter
/forecast/<STACKNAME>/Forecast/Predictor/ReferenceArn. - On the parameter element web page, select Edit.
- For Worth, enter the predictor ARN.
This identifies the proper predictor for the workflow to retrain. Subsequent, we have to replace a parameter utilized by the workflow to vary the coaching technique. - Find the parameter
/forecast/<STACKNAME>/Forecast/Predictor/Technique. - On the parameter element web page, select Edit.
- For Worth, enter
RETRAIN.
The workflow defaults to coaching a brand new predictor; nonetheless, we will modify that habits to retrain an current predictor or just reuse an current predictor with out retraining by setting this worth toNONE. It’s possible you’ll wish to forego coaching in case your information is comparatively steady otherwise you’re utilizing automated predictor monitoring to resolve when retraining is critical. - Add the incremental coaching information to the S3 bucket.
- On the Step Capabilities console, find the state machine
<STACKNAME>-Create-Predictor. - On the state machine element web page, select Begin execution to start the retraining.
When the retraining is full, the workflow will finish and you’ll obtain an SNS e-mail notification to the e-mail deal with offered within the workload template parameters.
Clear up
Once you’re performed with this answer, observe the steps on this part to delete associated assets.
Delete the S3 bucket
- On the Amazon S3 console, select Buckets within the navigation pane.
- Choose the bucket the place information was uploaded and select Empty to delete all information related to the answer, together with supply information.
- Enter
completely deleteto delete the bucket contents completely. - On the Buckets web page, choose the bucket and select Delete.
- Enter the title of the bucket to substantiate the deletion and select Delete bucket.
Delete Forecast assets
- On the Forecast console, select View dataset teams.
- Choose the dataset group title related to the answer, then select Delete.
- Enter
deleteto delete the dataset group and related predictors, predictor backtest export jobs, forecasts, and forecast export jobs. - Select Delete to substantiate.
Delete the CloudFormation stacks
- On the AWS CloudFormation console, select Stacks within the navigation pane.
- Choose the workload stack and select Delete.
- Select Delete stack to substantiate deletion of the stack and all related assets.
- When the deletion is full, choose the dependencies stack and select Delete.
- Select Delete to substantiate.
Conclusion
On this put up, we mentioned some alternative ways to get began utilizing Forecast. We walked via an automatic forecasting answer primarily based on AWS CloudFormation for a fast, repeatable answer deployment of a Forecast pipeline from information ingestion to inference, with little infrastructure information required. Lastly, we noticed how we will use Lambda to automate mannequin retraining, lowering price and coaching time.
There’s no higher time than the current to start out forecasting with Forecast. To begin constructing and deploying an automatic workflow, go to Amazon Forecast resources. Completely happy forecasting!
In regards to the Authors
 Aaron Fagan is a Principal Specialist Options Architect at AWS primarily based in New York. He focuses on serving to clients architect options in machine studying and cloud safety.
 Raju Patil is a Knowledge Scientist in AWS Skilled Companies. He builds and deploys AI/ML options to help AWS clients in overcoming their enterprise challenges. His AWS engagements have lined a variety of AI/ML use instances akin to laptop imaginative and prescient, time-series forecasting, and predictive analytics, and so forth., throughout quite a few industries, together with monetary companies, telecom, well being care, and extra. Previous to this, he has led Knowledge Science groups in Promoting Know-how, and made important contributions to quite a few analysis and improvement initiatives in laptop imaginative and prescient and robotics. Exterior of labor, he enjoys pictures, climbing, journey, and culinary explorations.