Construct Streamlit apps in Amazon SageMaker Studio
Growing internet interfaces to work together with a machine studying (ML) mannequin is a tedious process. With Streamlit, growing demo purposes on your ML resolution is straightforward. Streamlit is an open-source Python library that makes it straightforward to create and share internet apps for ML and knowledge science. As a knowledge scientist, it’s possible you’ll wish to showcase your findings for a dataset, or deploy a educated mannequin. Streamlit purposes are helpful for presenting progress on a venture to your group, gaining and sharing insights to your managers, and even getting suggestions from prospects.
With the built-in growth atmosphere (IDE) of Amazon SageMaker Studio with Jupyter Lab 3, we are able to construct, run, and serve Streamlit internet apps from inside that very same atmosphere for growth functions. This publish outlines find out how to construct and host Streamlit apps in Studio in a safe and reproducible method with none time-consuming front-end growth. For example, we use a customized Amazon Rekognition demo, which is able to annotate and label an uploaded picture. It will function a place to begin, and it may be generalized to demo any customized ML mannequin. The code for this weblog could be discovered on this GitHub repository.
Resolution overview
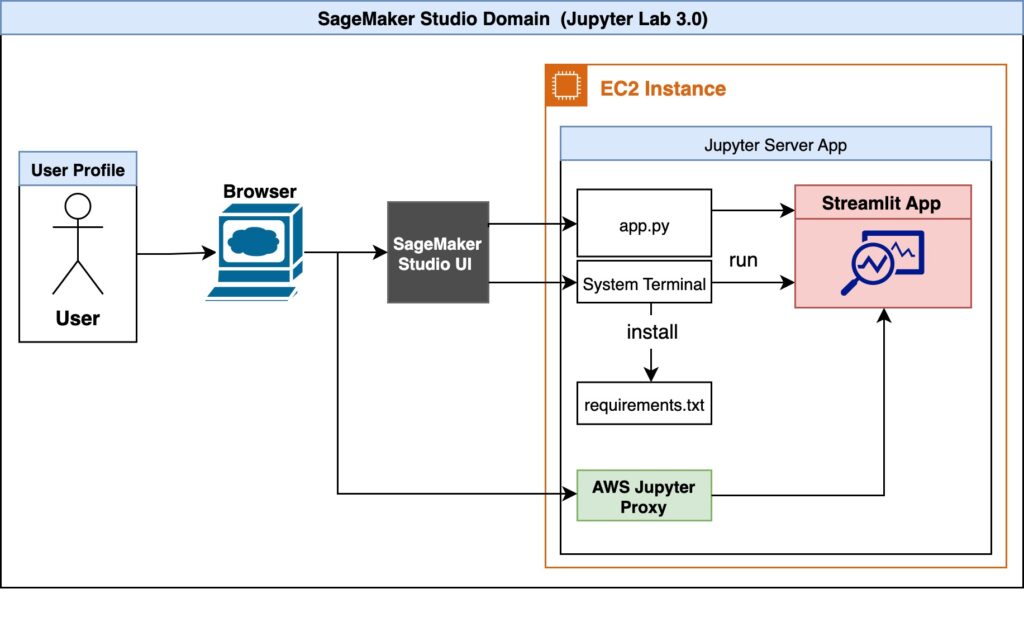
The next is the structure diagram of our resolution.

A person first accesses Studio by the browser. The Jupyter Server related to the person profile runs contained in the Studio Amazon Elastic Compute Cloud (Amazon EC2) occasion. Contained in the Studio EC2 occasion exists the instance code and dependencies record. The person can run the Streamlit app, app.py, within the system terminal. Studio runs the JupyterLab UI in a Jupyter Server, decoupled from pocket book kernels. The Jupyter Server comes with a proxy and permits us to entry our Streamlit app. As soon as the app is operating, the person can provoke a separate session by the AWS Jupyter Proxy by adjusting the URL.
From a safety side, the AWS Jupyter Proxy is prolonged by AWS authentication. So long as a person has entry to the AWS account, Studio area ID, and person profile, they’ll entry the hyperlink.
Create Studio utilizing JupyterLab 3.0
Studio with JupyterLab 3 have to be put in for this resolution to work. Older variations may not help options outlined on this publish. For extra data, seek advice from Amazon SageMaker Studio and SageMaker Notebook Instance now come with JupyterLab 3 notebooks to boost developer productivity. By default, Studio comes with JupyterLab 3. You must verify the model and alter it if operating an older model. For extra data, seek advice from JupyterLab Versioning.
You may arrange Studio utilizing the AWS Cloud Development Kit (AWS CDK); for extra data, seek advice from Set up Amazon SageMaker Studio with Jupyter Lab 3 using the AWS CDK. Alternatively, you need to use the SageMaker console to alter the area settings. Full the next steps:
- On the SageMaker console, select Domains within the navigation pane.
- Choose your area and select Edit.

- For Default Jupyter Lab model, be certain that the model is ready to Jupyter Lab 3.0.

(Optionally available) Create a Shared Area
We will use the SageMaker console or the AWS CLI so as to add help for shared areas to an current Area by following the steps within the docs or on this weblog. Making a shared house in AWS has the next advantages:
- Collaboration: A shared house permits a number of customers or groups to collaborate on a venture or set of assets, with out having to duplicate knowledge or infrastructure.
- Value financial savings: As an alternative of every person or group creating and managing their very own assets, a shared house could be cheaper, as assets could be pooled and shared throughout a number of customers.
- Simplified administration: With a shared house, directors can handle assets centrally, relatively than having to handle a number of situations of the identical assets for every person or group.
- Improved scalability: A shared house could be extra simply scaled up or down to fulfill altering calls for, as assets could be allotted dynamically to fulfill the wants of various customers or groups.
- Enhanced safety: By centralizing assets in a shared house, safety could be improved, as entry controls and monitoring could be utilized extra simply and constantly.
Set up dependencies and clone the instance on Studio
Subsequent, we launch Studio and open the system terminal. We use the SageMaker IDE to clone our instance and the system terminal to launch our app. The code for this weblog could be discovered on this GitHub repository. We begin with cloning the repository:

Subsequent, we open the System Terminal.

As soon as cloned, within the system terminal set up dependencies to run our instance code by operating the next command. It will first pip set up the dependences by operating pip set up --no-cache-dir -r necessities.txt. The no-cache-dir flag will disable the cache. Caching helps retailer the set up recordsdata (.whl) of the modules that you just set up by pip. It additionally shops the supply recordsdata (.tar.gz) to keep away from re-download once they haven’t expired. If there isn’t house on our exhausting drive or if we wish to maintain a Docker picture as small as attainable, we are able to use this flag so the command runs to completion with minimal reminiscence utilization. Subsequent the script will set up packages iproute and jq , which can be used within the following step.sh setup.sh
Run Streamlit Demo and Create Shareable Hyperlink
To confirm all dependencies are efficiently put in and to view the Amazon Rekognition demo, run the next command:
The port quantity internet hosting the app can be displayed.
Word that whereas growing, it is likely to be useful to routinely rerun the script when app.py is modified on disk. To do, so we are able to modify the runOnSave configuration option by including the --server.runOnSave true flag to our command:
The next screenshot reveals an instance of what must be displayed on the terminal.

From the above instance we see the port quantity, area ID, and studio URL we’re operating our app on. Lastly, we are able to see the URL we have to use to entry our streamlit app. This script is modifying the Studio URL, changing lab? with proxy/[PORT NUMBER]/ . The Rekognition Object Detection Demo can be displayed, as proven within the following screenshot.

Now that we’ve got the Streamlit app working, we are able to share this URL with anybody who has entry to this Studio area ID and person profile. To make sharing these demos simpler, we are able to verify the standing and record all operating streamlit apps by operating the next command: sh standing.sh
We will use lifecycle scripts or shared areas to increase this work. As an alternative of manually operating the shell scripts and putting in dependencies, use lifecycle scripts to streamline this course of. To develop and lengthen this app with a group and share dashboards with friends, use shared spaces. By creating shared areas in Studio, customers can collaborate within the shared house to develop a Streamlit app in actual time. All assets in a shared house are filtered and tagged, making it simpler to concentrate on ML tasks and handle prices. Seek advice from the next code to make your individual purposes in Studio.
Cleanup
As soon as we’re finished utilizing the app, we wish to unlock the listening ports. To get all of the processes operating streamlit and free them up to be used we are able to run our cleanup script: sh cleanup.sh
Conclusion
On this publish, we confirmed an end-to-end instance of internet hosting a Streamlit demo for an object detection process utilizing Amazon Rekognition. We detailed the motivations for constructing fast internet purposes, safety concerns, and setup required to run our personal Streamlit app in Studio. Lastly, we modified the URL sample in our internet browser to provoke a separate session by the AWS Jupyter Proxy.
This demo lets you add any picture and visualize the outputs from Amazon Rekognition. The outcomes are additionally processed, and you may obtain a CSV file with all of the bounding bins by the app. You may lengthen this work to annotate and label your individual dataset, or modify the code to showcase your customized mannequin!
Concerning the Authors
 Dipika Khullar is an ML Engineer within the Amazon ML Solutions Lab. She helps prospects combine ML options to resolve their enterprise issues. Most just lately, she has constructed coaching and inference pipelines for media prospects and predictive fashions for advertising.
 Marcelo Aberle is an ML Engineer within the AWS AI group. He’s main MLOps efforts on the Amazon ML Solutions Lab, serving to prospects design and implement scalable ML programs. His mission is to information prospects on their enterprise ML journey and speed up their ML path to manufacturing.
 Yash Shah is a Science Supervisor within the Amazon ML Solutions Lab. He and his group of utilized scientists and ML engineers work on a variety of ML use instances from healthcare, sports activities, automotive, and manufacturing.


