Computerized picture cropping with Amazon Rekognition
Digital publishers are repeatedly searching for methods to streamline and automate their media workflows with a view to generate and publish new content material as quickly as they’ll.
Many publishers have a big library of inventory photographs that they use for his or her articles. These photographs will be reused many instances for various tales, particularly when the writer has photographs of celebrities. Very often, a journalist could have to crop out a desired superstar from a picture to make use of for his or her upcoming story. It is a guide, repetitive job that needs to be automated. Generally, an creator could need to use a picture of a star, nevertheless it accommodates two individuals and the first superstar must be cropped from the picture. Different instances, superstar photographs would possibly have to be reformatted for publishing to quite a lot of platforms like cellular, social media, or digital information. Moreover, an creator may have to vary the picture facet ratio or put the superstar in crisp focus.
On this put up, we show methods to use Amazon Rekognition to carry out picture evaluation. Amazon Rekognition makes it straightforward so as to add this functionality to your functions with none machine studying (ML) experience and comes with varied APIs to fulfil use instances akin to object detection, content material moderation, face detection and evaluation, and textual content and superstar recognition, which we use on this instance.
The celebrity recognition feature in Amazon Rekognition robotically acknowledges tens of 1000’s of well-known personalities in photographs and movies utilizing ML. Superstar recognition can detect not simply the presence of the given superstar but additionally the situation inside the picture.
Overview of resolution
On this put up, we show how we are able to cross in a photograph, a star identify, and a facet ratio for the outputted picture to have the ability to generate a cropped picture of the given superstar capturing their face within the middle.
When working with the Amazon Rekognition celebrity detection API, many components are returned within the response. The next are some key response components:
- MatchConfidence – A match confidence rating that can be utilized to regulate API habits. We suggest making use of an appropriate threshold to this rating in your utility to decide on your most popular working level. For instance, by setting a threshold of 99%, you may eradicate false positives however could miss some potential matches.
- Name, Id, and Urls – The superstar identify, a singular Amazon Rekognition ID, and record of URLs such because the superstar’s IMDb or Wikipedia hyperlink for additional info.
- BoundingBox – Coordinates of the oblong bounding field location for every acknowledged superstar face.
- KnownGender – Identified gender identification for every acknowledged superstar.
- Emotions – Emotion expressed on the superstar’s face, for instance, glad, unhappy, or offended.
- Pose – Pose of the superstar face, utilizing three axes of roll, pitch, and yaw.
- Smile – Whether or not the superstar is smiling or not.
A part of the API response from Amazon Rekognition consists of the next code:
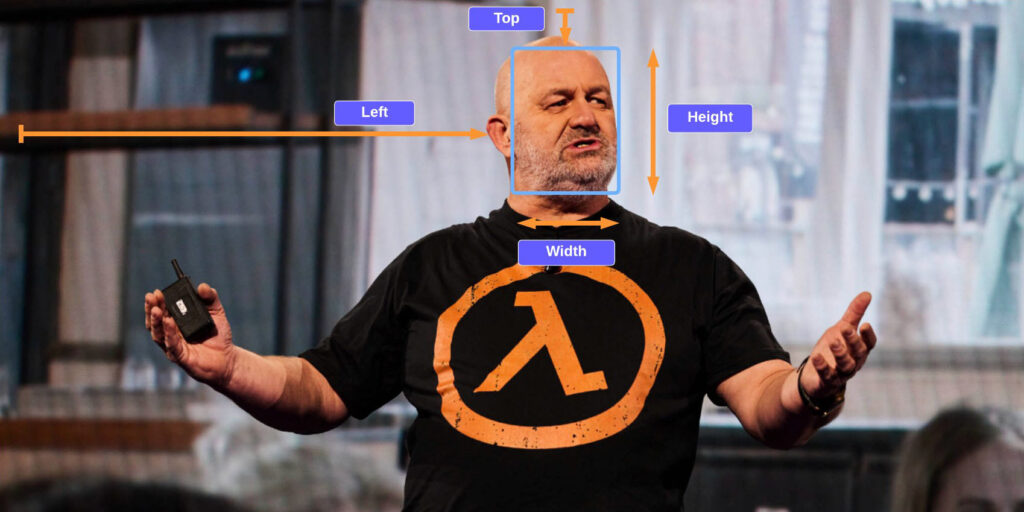
On this train, we show methods to use the bounding field ingredient to determine the situation of the face, as proven within the following instance picture. All the dimensions are represented as ratios of the general picture dimension, so the numbers within the response are between 0–1. For instance, within the pattern API response, the width of the bounding field is 0.1, which suggests the face width is 10% of the full width of the picture.

With this bounding field, we at the moment are in a position to make use of logic to be sure that the face stays inside the edges of the brand new picture we create. We will apply some padding round this bounding field to maintain the face within the middle.
Within the following sections, we present methods to create the next cropped picture output with Werner Vogels in crisp focus.
We launch an Amazon SageMaker pocket book, which gives a Python atmosphere the place you may run the code to cross a picture to Amazon Rekognition after which robotically modify the picture with the superstar in focus.

The code performs the next high-level steps:
- Make a request to the
recognize_celebritiesAPI with the given picture and superstar identify. - Filter the response for the bounding field info.
- Add some padding to the bounding field such that we seize among the background.
Conditions
For this walkthrough, it’s best to have the next stipulations:
Add the pattern picture
Add your pattern superstar picture to your S3 bucket.
Run the code
To run the code, we use a SageMaker pocket book, nonetheless any IDE would additionally work after putting in Python, pillow, and Boto3. We create a SageMaker pocket book in addition to the AWS Identity and Access Management (IAM) function with the required permissions. Full the next steps:
- Create the notebook and identify it
automatic-cropping-celebrity.
The default execution coverage, which was created when creating the SageMaker pocket book, has a easy coverage that offers the function permissions to work together with Amazon S3.
- Replace the
Useful resourceconstraint with the S3 bucket identify:
- Create one other coverage so as to add to the SageMaker pocket book IAM function to have the ability to name the RecognizeCelebrities API:

- On the SageMaker console, select Pocket book cases within the navigation pane.
- Find the
automatic-cropping-celebritypocket book and select Open Jupyter. - Select New and conda_python3 because the kernel on your pocket book.

For the next steps, copy the code blocks into your Jupyter pocket book and run them by selecting Run.
- First, we import helper features and libraries:
- Set variables
- Create a service shopper
- Operate to acknowledge the celebrities
- Operate to get the bounding field of the given superstar:
- Operate so as to add some padding to the bounding field, so we seize some background across the face
- Operate to avoid wasting the picture to the pocket book storage and to Amazon S3
- Use the Python
predominant()perform to mix the previous features to finish the workflow of saving a brand new cropped picture of our superstar:
Once you run this code block, you may see that we discovered Werner Vogels and created a brand new picture together with his face within the middle.

The picture might be saved to the pocket book and in addition uploaded to the S3 bucket.

You would embrace this resolution in a larger workflow; for instance, a publishing firm would possibly need to publish this functionality as an endpoint to reformat and resize photographs on the fly when publishing articles of celebrities to a number of platforms.
Cleansing up
To keep away from incurring future fees, delete the sources:
- On the SageMaker console, choose your pocket book and on the Actions menu, select Cease.
- After the pocket book is stopped, on the Actions menu, select Delete.
- On the IAM console, delete the SageMaker execution function you created.
- On the Amazon S3 console, delete the enter picture and any output information out of your S3 bucket.
Conclusion
On this put up, we confirmed how we are able to use Amazon Rekognition to automate an in any other case guide job of modifying photographs to help media workflows. That is significantly essential inside the publishing business the place pace issues in getting contemporary content material out shortly and to a number of platforms.
For extra details about working with media property, consult with Media intelligence just got smarter with Media2Cloud 3.0
In regards to the Writer

Mark Watkins is a Options Architect inside the Media and Leisure crew. He helps prospects creating AI/ML options which clear up their enterprise challenges utilizing AWS. He has been engaged on a number of AI/ML tasks associated to laptop imaginative and prescient, pure language processing, personalization, ML on the edge, and extra. Away from skilled life, he loves spending time together with his household and watching his two little ones rising up.


