Deploy pre-trained fashions on AWS Wavelength with 5G edge utilizing Amazon SageMaker JumpStart
[*]
With the appearance of high-speed 5G cellular networks, enterprises are extra simply positioned than ever with the chance to harness the convergence of telecommunications networks and the cloud. As probably the most outstanding use instances to this point, machine studying (ML) on the edge has allowed enterprises to deploy ML fashions nearer to their end-customers to scale back latency and enhance responsiveness of their purposes. For instance, smart venue solutions can use near-real-time pc imaginative and prescient for crowd analytics over 5G networks, all whereas minimizing funding in on-premises {hardware} networking tools. Retailers can ship extra frictionless experiences on the go along with pure language processing (NLP), real-time suggestion techniques, and fraud detection. Even ground and aerial robotics can use ML to unlock safer, extra autonomous operations.
To scale back the barrier to entry of ML on the edge, we needed to reveal an instance of deploying a pre-trained mannequin from Amazon SageMaker to AWS Wavelength, all in lower than 100 traces of code. On this put up, we reveal deploy a SageMaker mannequin to AWS Wavelength to scale back mannequin inference latency for 5G network-based purposes.
Resolution overview
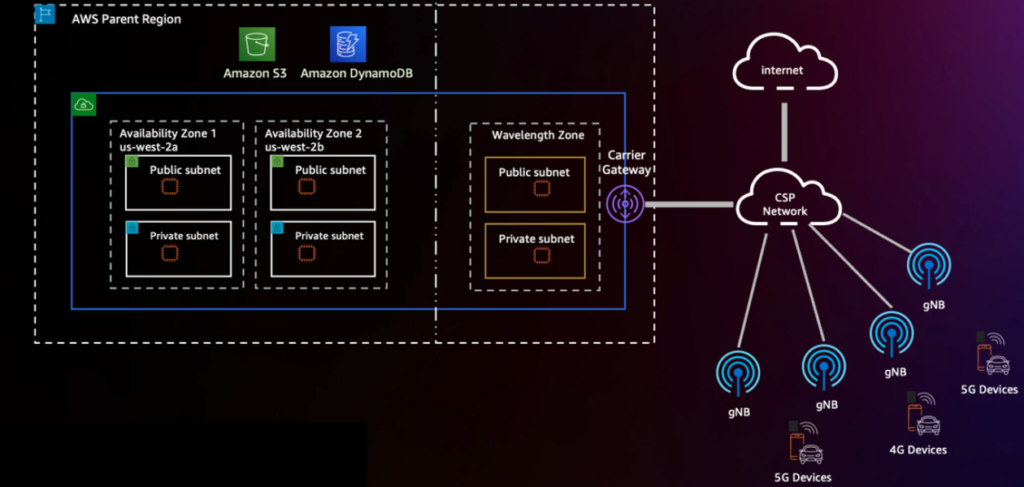
Throughout AWS’s quickly increasing world infrastructure, AWS Wavelength brings the ability of cloud compute and storage to the sting of 5G networks, unlocking extra performant cellular experiences. With AWS Wavelength, you may prolong your digital non-public cloud (VPC) to Wavelength Zones similar to the telecommunications provider’s community edge in 29 cities throughout the globe. The next diagram reveals an instance of this structure.

You may decide in to the Wavelength Zones inside a given Area through the AWS Management Console or the AWS Command Line Interface (AWS CLI). To be taught extra about deploying geo-distributed purposes on AWS Wavelength, seek advice from Deploy geo-distributed Amazon EKS clusters on AWS Wavelength.
Constructing on the basics mentioned on this put up, we glance to ML on the edge as a pattern workload with which to deploy to AWS Wavelength. As our pattern workload, we deploy a pre-trained mannequin from Amazon SageMaker JumpStart.
SageMaker is a completely managed ML service that permits builders to simply deploy ML fashions into their AWS environments. Though AWS presents plenty of choices for mannequin coaching—from AWS Marketplace fashions and SageMaker built-in algorithms—there are a selection of strategies to deploy open-source ML fashions.
JumpStart offers entry to tons of of built-in algorithms with pre-trained fashions that may be seamlessly deployed to SageMaker endpoints. From predictive upkeep and pc imaginative and prescient to autonomous driving and fraud detection, JumpStart helps a wide range of in style use instances with one-click deployment on the console.
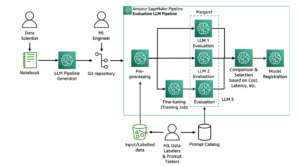
As a result of SageMaker just isn’t natively supported in Wavelength Zones, we reveal extract the mannequin artifacts from the Area and re-deploy to the sting. To take action, you utilize Amazon Elastic Kubernetes Service (Amazon EKS) clusters and node teams in Wavelength Zones, adopted by making a deployment manifest with the container picture generated by JumpStart. The next diagram illustrates this structure.

Stipulations
To make this as simple as doable, be certain that your AWS account has Wavelength Zones enabled. Notice that this integration is simply accessible in us-east-1 and us-west-2, and you can be utilizing us-east-1 during the demo.
To decide in to AWS Wavelength, full the next steps:
- On the Amazon VPC console, select Zones underneath Settings and select US East (Verizon) / us-east-1-wl1.
- Select Handle.
- Choose Opted in.
- Select Replace zones.
Create AWS Wavelength infrastructure
Earlier than we convert the native SageMaker mannequin inference endpoint to a Kubernetes deployment, you may create an EKS cluster in a Wavelength Zone. To take action, deploy an Amazon EKS cluster with an AWS Wavelength node group. To be taught extra, you may go to this guide on the AWS Containers Blog or Verizon’s 5GEdgeTutorials repository for one such instance.
Subsequent, utilizing an AWS Cloud9 surroundings or interactive growth surroundings (IDE) of alternative, obtain the requisite SageMaker packages and Docker Compose, a key dependency of JumpStart.
Create mannequin artifacts utilizing JumpStart
First, just remember to have an AWS Identity and Access Management (IAM) execution function for SageMaker. To be taught extra, go to SageMaker Roles.
- Utilizing this example, create a file referred to as train_model.py that makes use of the SageMaker Software program Growth Equipment (SDK) to retrieve a pre-built mannequin (substitute <your-sagemaker-execution-role> with the Amazon Useful resource Identify (ARN) of your SageMaker execution function). On this file, you deploy a mannequin regionally utilizing the
instance_typeattribute within themannequin.deploy()operate, which begins a Docker container inside your IDE utilizing all requisite mannequin artifacts you outlined:
- Subsequent, set
infer_model_idto the ID of the SageMaker mannequin that you just wish to use.
For a whole checklist, seek advice from Built-in Algorithms with pre-trained Model Table. In our instance, we use the Bidirectional Encoder Representations from Transformers (BERT) mannequin, generally used for pure language processing.
- Run the
train_model.pyscript to retrieve the JumpStart mannequin artifacts and deploy the pre-trained mannequin to your native machine:
Ought to this step succeed, your output could resemble the next:
Within the output, you will notice three artifacts so as: the bottom picture for TensorFlow inference, the inference script that serves the mannequin, and the artifacts containing the skilled mannequin. Though you could possibly create a customized Docker picture with these artifacts, one other method is to let SageMaker native mode create the Docker picture for you. Within the subsequent steps, we extract the container picture working regionally and deploy to Amazon Elastic Container Registry (Amazon ECR) in addition to push the mannequin artifact individually to Amazon Simple Storage Service (Amazon S3).
Convert native mode artifacts to distant Kubernetes deployment
Now that you’ve got confirmed that SageMaker is working regionally, let’s extract the deployment manifest from the working container. Full the next steps:
Determine the situation of the SageMaker native mode deployment manifest: To take action, search our root listing for any information named docker-compose.yaml.
docker_manifest=$( discover /tmp/tmp* -name "docker-compose.yaml" -printf '%T+ %pn' | kind | tail -n 1 | reduce -d' ' -f2-)
echo $docker_manifest
Determine the situation of the SageMaker native mode mannequin artifacts: Subsequent, discover the underlying quantity mounted to the native SageMaker inference container, which can be utilized in every EKS employee node after we add the artifact to Amazon s3.
model_local_volume = $(grep -A1 -w "volumes:" $docker_manifest | tail -n 1 | tr -d ' ' | awk -F: '{print $1}' | reduce -c 2-)
# Returns one thing like: /tmp/tmpcr4bu_a7</p>
Create native copy of working SageMaker inference container: Subsequent, we’ll discover the at present working container picture working our machine studying inference mannequin and make a duplicate of the container regionally. This can guarantee we’ve our personal copy of the container picture to tug from Amazon ECR.
# Discover container ID of working SageMaker Native container
mkdir sagemaker-container
container_id=$(docker ps --format "{{.ID}} {{.Picture}}" | grep "tensorflow" | awk '{print $1}')
# Retrieve the information of the container regionally
docker cp $my_container_id:/ sagemaker-container/
Earlier than appearing on the model_local_volume, which we’ll push to Amazon S3, push a duplicate of the working Docker picture, now within the sagemaker-container listing, to Amazon Elastic Container Registry. Be sure you substitute area, aws_account_id, docker_image_id and my-repository:tag or observe the Amazon ECR user guide. Additionally, you should definitely pay attention to the ultimate ECR Picture URL (aws_account_id.dkr.ecr.area.amazonaws.com/my-repository:tag), which we are going to use in our EKS deployment.
Now that we’ve an ECR picture similar to the inference endpoint, create a brand new Amazon S3 bucket and replica the SageMaker Native artifacts (model_local_volume) to this bucket. In parallel, create an Identification Entry Administration (IAM) that gives Amazon EC2 situations entry to learn objects inside the bucket. Be sure you substitute <unique-bucket-name> with a globally distinctive identify to your Amazon S3 bucket.
Subsequent, to make sure that every EC2 occasion pulls a duplicate of the mannequin artifact on launch, edit the person knowledge to your EKS employee nodes. In your person knowledge script, be certain that every node retrieves the mannequin artifacts utilizing the the S3 API at launch. Be sure you substitute <unique-bucket-name> with a globally distinctive identify to your Amazon S3 bucket. On condition that the node’s person knowledge may even embrace the EKS bootstrap script, the entire person knowledge could look one thing like this.
Now, you may examine the present docker manifest it and translate it to Kubernetes-friendly manifest information utilizing Kompose, a well known conversion device. Notice: in case you get a model compatibility error, change the model attribute in line 27 of docker-compose.yml to “2”.
After working Kompose, you’ll see 4 new information: a Deployment object, Service object, PersistentVolumeClaim object, and NetworkPolicy object. You now have every part it’s worthwhile to start your foray into Kubernetes on the edge!
Deploy SageMaker mannequin artifacts
Be sure you have kubectl and aws-iam-authenticator downloaded to your AWS Cloud9 IDE. If not, observe the set up guides:
Now, full the next steps:
Modify the service/algo-1-ow3nv object to change the service kind from ClusterIP to NodePort. In our instance, we’ve chosen port 30,007 as our NodePort:
Subsequent, you will need to enable the NodePort within the safety group to your node. To take action, retrieve the safety groupID and allow-list the NodePort:
Subsequent, modify the algo-1-ow3nv-deployment.yaml manifest to mount the /tmp/mannequin hostPath listing to the container. Substitute <your-ecr-image> with the ECR picture you created earlier:
With the manifest information you created from Kompose, use kubectl to use the configs to your cluster:
Connect with the 5G edge mannequin
To connect with your mannequin, full the next steps:
On the Amazon EC2 console, retrieve the provider IP of the EKS employee node or use the AWS CLI to question the provider IP deal with straight:
Now, with the provider IP deal with extracted, you may connect with the mannequin straight utilizing the NodePort. Create a file referred to as invoke.py to invoke the BERT mannequin straight by offering a text-based enter that can be run in opposition to a sentiment-analyzer to find out whether or not the tone was constructive or unfavourable:
Your output ought to resemble the next:
Clear up
To destroy all utility assets created, delete the AWS Wavelength employee nodes, the EKS management aircraft, and all of the assets created inside the VPC. Moreover, delete the ECR repo used to host the container picture, the S3 buckets used to host the SageMaker mannequin artifacts and the sagemaker-demo-app-s3 IAM coverage.
Conclusion
On this put up, we demonstrated a novel method to deploying SageMaker fashions to the community edge utilizing Amazon EKS and AWS Wavelength. To study Amazon EKS greatest practices on AWS Wavelength, seek advice from Deploy geo-distributed Amazon EKS clusters on AWS Wavelength. Moreover, to be taught extra about Jumpstart, go to the Amazon SageMaker JumpStart Developer Guide or the JumpStart Available Model Table.
In regards to the Authors
 Robert Belson is a Developer Advocate within the AWS Worldwide Telecom Enterprise Unit, specializing in AWS Edge Computing. He focuses on working with the developer group and huge enterprise prospects to unravel their enterprise challenges utilizing automation, hybrid networking and the sting cloud.
 Mohammed Al-Mehdar is a Senior Options Architect within the Worldwide Telecom Enterprise Unit at AWS. His principal focus is to assist allow prospects to construct and deploy Telco and Enterprise IT workloads on AWS. Previous to becoming a member of AWS, Mohammed has been working within the Telco trade for over 13 years and brings a wealth of expertise within the areas of LTE Packet Core, 5G, IMS and WebRTC. Mohammed holds a bachelor’s diploma in Telecommunications Engineering from Concordia College.
 Evan Kravitz is a software program engineer at Amazon Net Companies, engaged on SageMaker JumpStart. He enjoys cooking and happening runs in New York Metropolis.
 Justin St. Arnauld is an Affiliate Director – Resolution Architects at Verizon for the Public Sector with over 15 years of expertise within the IT trade. He’s a passionate advocate for the ability of edge computing and 5G networks and is an professional in growing revolutionary expertise options that leverage these applied sciences. Justin is especially enthusiastic concerning the capabilities supplied by Amazon Net Companies (AWS) in delivering cutting-edge options for his purchasers. In his free time, Justin enjoys preserving up-to-date with the newest expertise tendencies and sharing his data and insights with others within the trade.
[*]