GitHub Actions For Machine Studying Freshmen

Picture by Writer
GitHub Actions is a robust characteristic of the GitHub platform that enables for automating software program growth workflows, comparable to testing, constructing, and deploying code. This not solely streamlines the event course of but in addition makes it extra dependable and environment friendly.
On this tutorial, we’ll discover how one can use GitHub Actions for a newbie Machine Studying (ML) venture. From organising our ML venture on GitHub to making a GitHub Actions workflow that automates your ML duties, we’ll cowl all the things you might want to know.
GitHub Actions is a robust instrument that gives a steady integration and steady supply (CI/CD) pipeline for all GitHub repositories without spending a dime. It automates your entire software program growth workflow, from creating and testing to deploying code, all inside the GitHub platform. You should utilize it to enhance your growth and deployment effectivity.
GitHub Actions key options
We are going to now study key elements of workflow.
Workflows
Workflows are automated processes that you just outline in your GitHub repository. They’re composed of a number of jobs and may be triggered by GitHub occasions comparable to a push, pull request, challenge creation, or by workflows. Workflows are outlined in a YML file inside the .github/workflows listing of your repository. You possibly can edit it and rerun the workflow proper from the GitHub repository.
Jobs and Steps
Inside a workflow, jobs outline a set of steps that execute on the identical runner. Every step in a job can run instructions or actions, that are reusable items of code that may carry out a particular process, comparable to formatting the code or coaching the mannequin.
Occasions
Workflows may be triggered by numerous GitHub occasions, comparable to push, pull requests, forks, stars, releases, and extra. You may as well schedule workflows to run at particular occasions utilizing cron syntax.
Runners
Runners are the digital environments/machines the place workflows are executed. GitHub gives hosted runners with Linux, Home windows, and macOS environments, or you’ll be able to host your personal runner for extra management over the surroundings.
Actions
Actions are reusable items of code that you should utilize as steps inside your jobs. You possibly can create your personal actions or use actions shared by the GitHub group within the GitHub Market.
GitHub Actions makes it easy for builders to automate their construct, take a look at, and deployment workflows instantly inside GitHub, serving to to enhance productiveness and streamline the event course of.
On this venture, we’ll use two Actions:
- actions/checkout@v3: for trying out your repository in order that workflow can entry the file and information.
- iterative/setup-cml@v2: for displaying the mannequin metrics and confusion matrix below the commit as a message.
We are going to work on a easy machine studying venture utilizing the Bank Churn dataset from Kaggle to coach and consider a Random Forest Classifier.
Setting Up
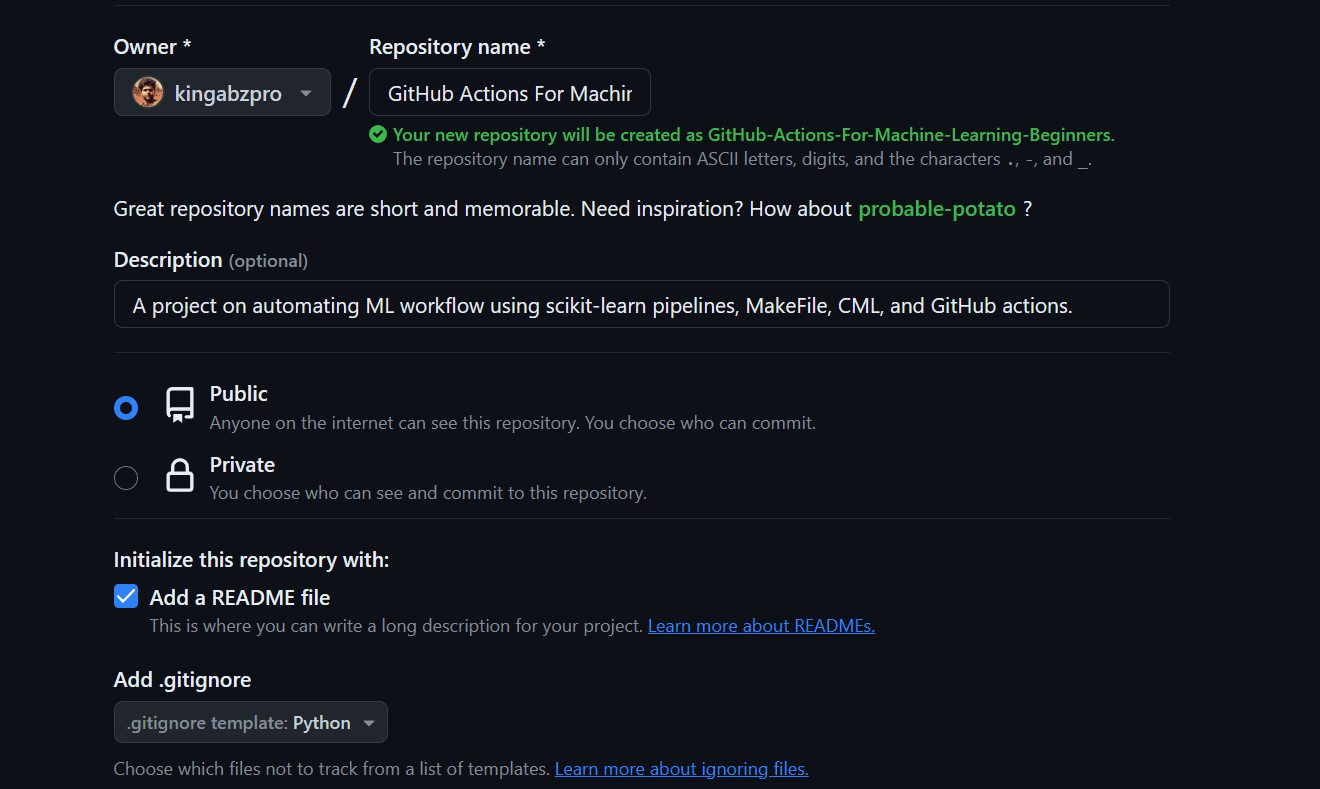
- We are going to create the GitHub repository by offering the title, and outline, checking the readme file, and license.
- Go to the venture director and clone the repository.
- Change the listing to the repository folder.
- Launch the code editor. In our case, it’s VSCode.
$ git clone https://github.com/kingabzpro/GitHub-Actions-For-Machine-Studying-Freshmen.git

$ cd .GitHub-Actions-For-Machine-Studying-Freshmen

$ code .
- Please create a `necessities.txt` file and add all the mandatory packages which are required to run the workflow efficiently.
pandas
scikit-learn
numpy
matplotlib
skops
black
- Obtain the data from Kaggle utilizing the hyperlink and extract it in the primary folder.
- The dataset is large, so we have now to put in GitLFS into our repository and observe the prepare CSV file.
$ git lfs set up
$ git lfs observe prepare.csv
Coaching and Evaluating Code
On this part, we’ll write the code that can prepare, consider, and save the mannequin pipelines. The code is from my earlier tutorial, Streamline Your Machine Learning Workflow with Scikit-learn Pipelines. If you wish to understand how the scikit-learn pipeline works, then you must learn it.
- Create a `prepare.py` file and duplicate and paste the next code.
- The code makes use of ColumnTransformer and Pipeline for preprocessing the information and the Pipeline for characteristic choice and mannequin coaching.
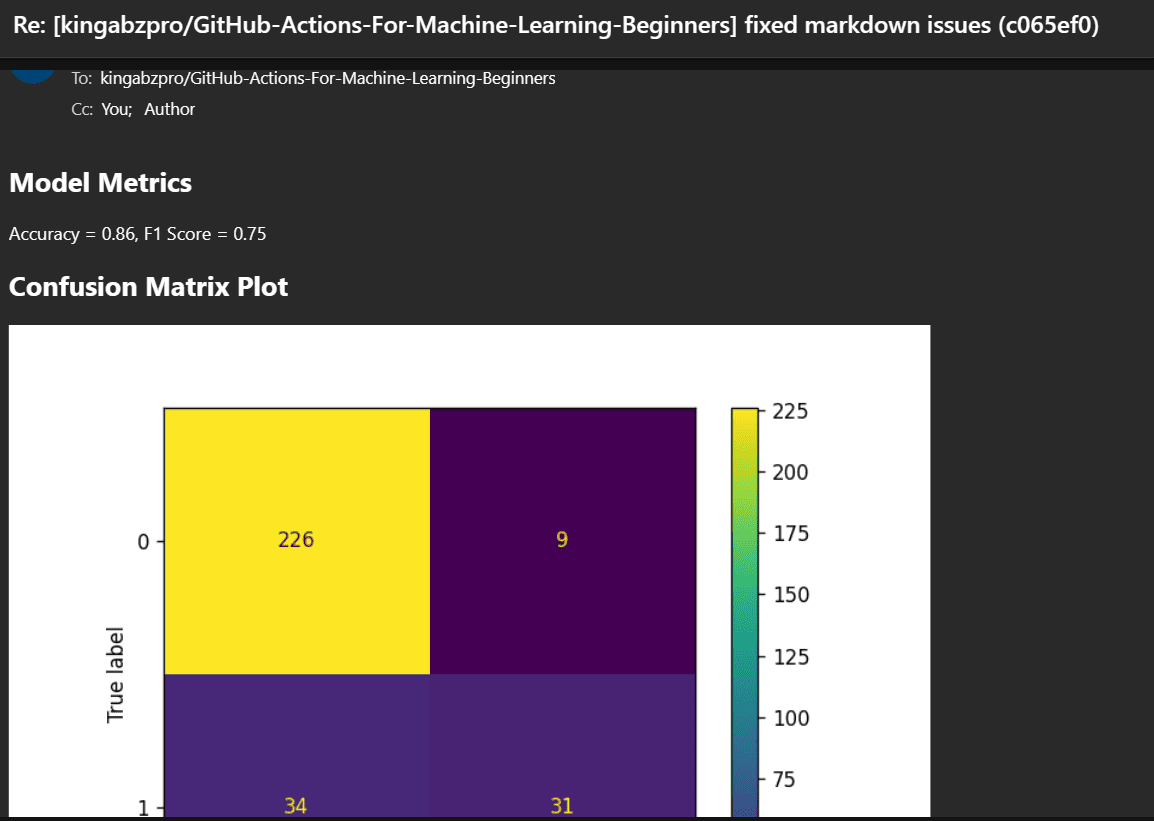
- After evaluating the mannequin efficiency, each metrics and the confusion matrix are saved in the primary folder. These metrics shall be used later by the CML motion.
- In the long run, the scikit-learn last pipeline is saved for mannequin inference.
import pandas as pd
from sklearn.compose import ColumnTransformer
from sklearn.ensemble import RandomForestClassifier
from sklearn.model_selection import train_test_split
from sklearn.feature_selection import SelectKBest, chi2
from sklearn.impute import SimpleImputer
from sklearn.pipeline import Pipeline
from sklearn.preprocessing import MinMaxScaler, OrdinalEncoder
from sklearn.metrics import accuracy_score, f1_score
import matplotlib.pyplot as plt
from sklearn.metrics import ConfusionMatrixDisplay, confusion_matrix
import skops.io as sio
# loading the information
bank_df = pd.read_csv("prepare.csv", index_col="id", nrows=1000)
bank_df = bank_df.drop(["CustomerId", "Surname"], axis=1)
bank_df = bank_df.pattern(frac=1)
# Splitting information into coaching and testing units
X = bank_df.drop(["Exited"], axis=1)
y = bank_df.Exited
X_train, X_test, y_train, y_test = train_test_split(
X, y, test_size=0.3, random_state=125
)
# Determine numerical and categorical columns
cat_col = [1, 2]
num_col = [0, 3, 4, 5, 6, 7, 8, 9]
# Transformers for numerical information
numerical_transformer = Pipeline(
steps=[("imputer", SimpleImputer(strategy="mean")), ("scaler", MinMaxScaler())]
)
# Transformers for categorical information
categorical_transformer = Pipeline(
steps=[
("imputer", SimpleImputer(strategy="most_frequent")),
("encoder", OrdinalEncoder()),
]
)
# Mix pipelines utilizing ColumnTransformer
preproc_pipe = ColumnTransformer(
transformers=[
("num", numerical_transformer, num_col),
("cat", categorical_transformer, cat_col),
],
the rest="passthrough",
)
# Choosing the right options
KBest = SelectKBest(chi2, okay="all")
# Random Forest Classifier
mannequin = RandomForestClassifier(n_estimators=100, random_state=125)
# KBest and mannequin pipeline
train_pipe = Pipeline(
steps=[
("KBest", KBest),
("RFmodel", model),
]
)
# Combining the preprocessing and coaching pipelines
complete_pipe = Pipeline(
steps=[
("preprocessor", preproc_pipe),
("train", train_pipe),
]
)
# working the whole pipeline
complete_pipe.match(X_train, y_train)
## Mannequin Analysis
predictions = complete_pipe.predict(X_test)
accuracy = accuracy_score(y_test, predictions)
f1 = f1_score(y_test, predictions, common="macro")
print("Accuracy:", str(spherical(accuracy, 2) * 100) + "%", "F1:", spherical(f1, 2))
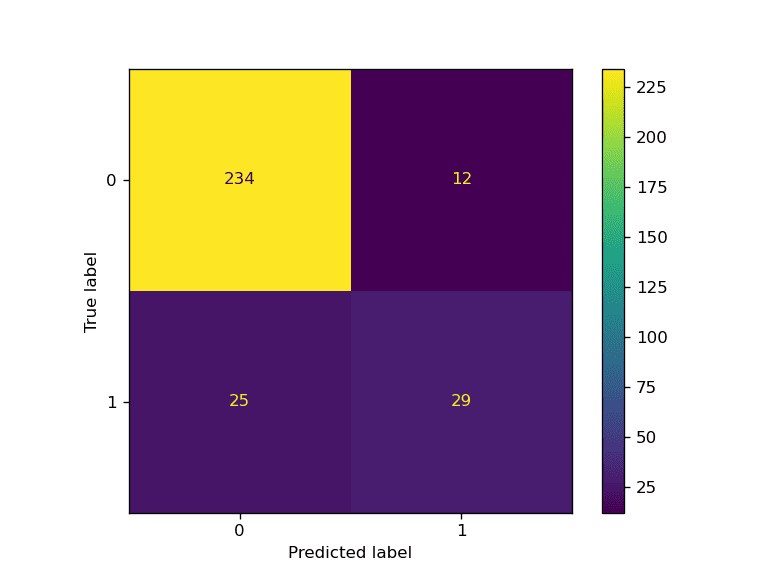
## Confusion Matrix Plot
predictions = complete_pipe.predict(X_test)
cm = confusion_matrix(y_test, predictions, labels=complete_pipe.classes_)
disp = ConfusionMatrixDisplay(confusion_matrix=cm, display_labels=complete_pipe.classes_)
disp.plot()
plt.savefig("model_results.png", dpi=120)
## Write metrics to file
with open("metrics.txt", "w") as outfile:
outfile.write(f"nAccuracy = {spherical(accuracy, 2)}, F1 Rating = {spherical(f1, 2)}nn")
# saving the pipeline
sio.dump(complete_pipe, "bank_pipeline.skops")
We bought a superb end result.
$ python prepare.py
Accuracy: 88.0% F1: 0.77
You possibly can study extra in regards to the interior workings of the code talked about above by studying “Streamline Your Machine Learning Workflow with Scikit-learn Pipelines“
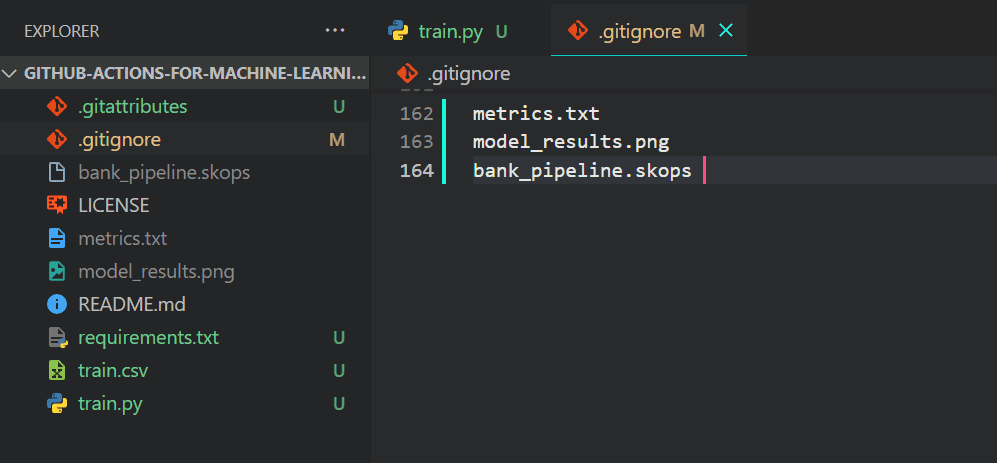
We do not need Git to push output information as they’re at all times generated on the finish of the code so we shall be including the to .gitignore file.
Simply kind `.gitignore` within the terminal to launch the file.
Add the next file names.
metrics.txt
model_results.png
bank_pipeline.skops
That is the way it ought to appear to be in your VSCode.
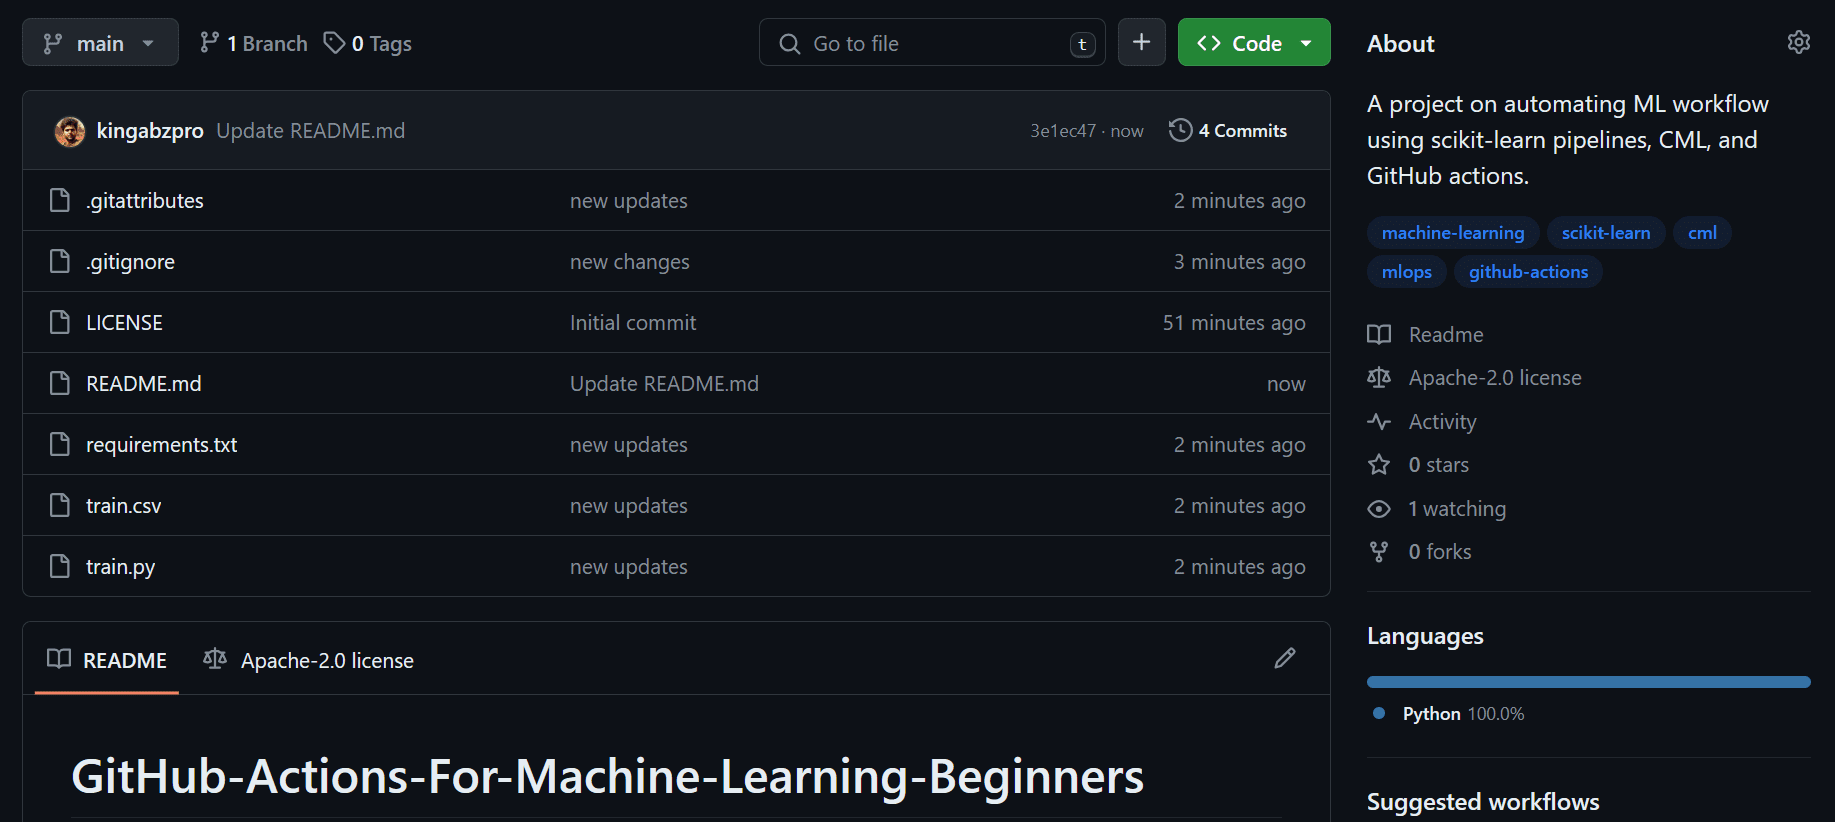
We are going to now stage the adjustments, create a commit, and push the adjustments to the GitHub fundamental department.
git add .
git commit -m "new adjustments"
git push origin fundamental
That is how your GitHub repository ought to appear to be.
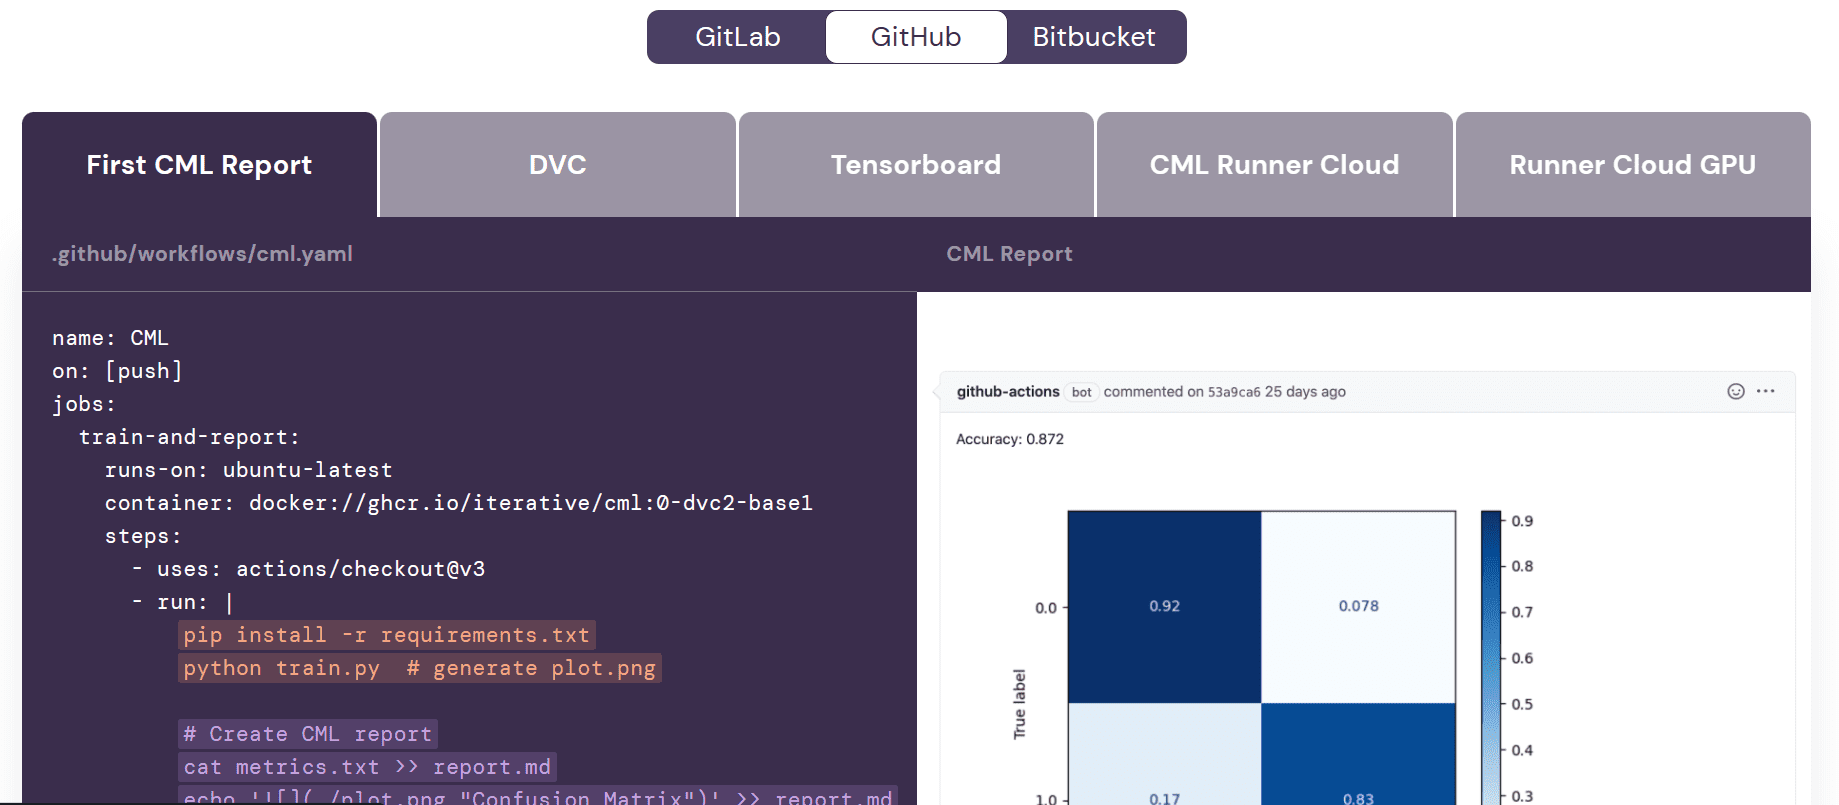
CML
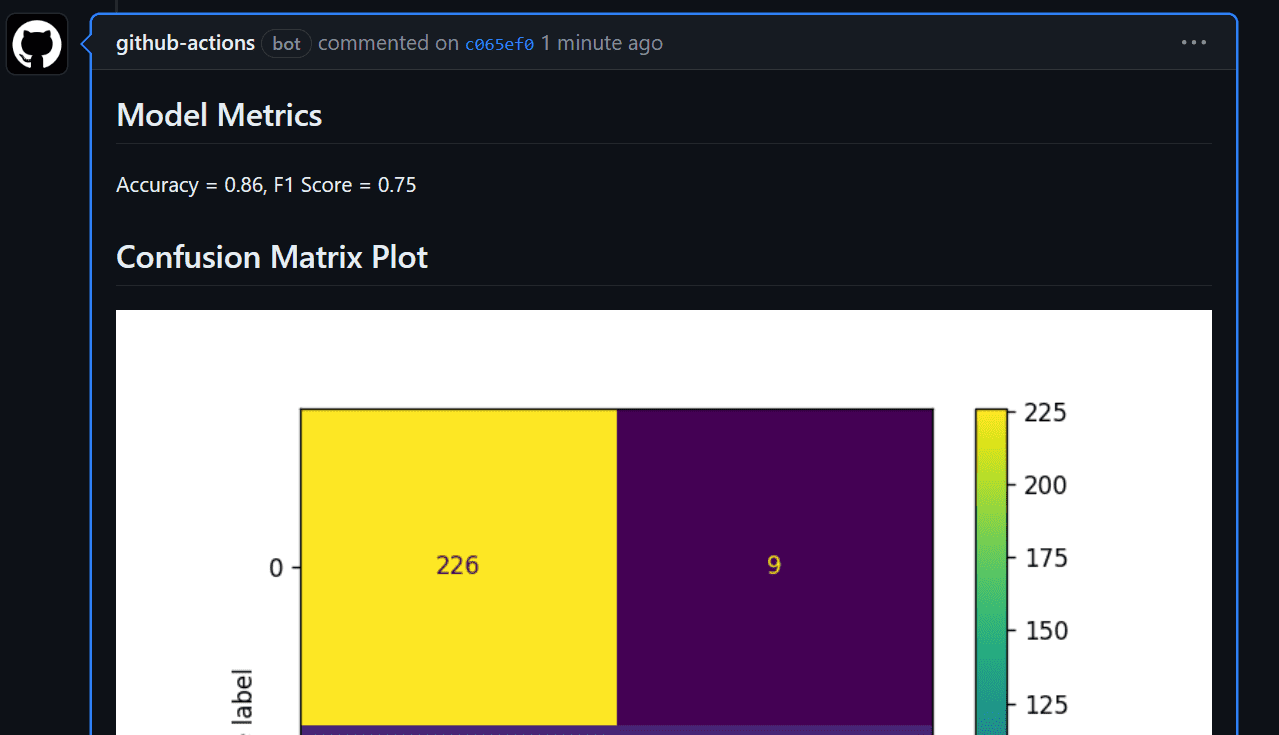
Earlier than we start engaged on the workflow, it is necessary to grasp the aim of Continuous Machine Learning (CML) actions. CML capabilities are used within the workflow to automate the method of producing a mannequin analysis report. What does this imply? Properly, once we push adjustments to GitHub, a report shall be routinely generated below the commit. This report will embrace efficiency metrics and a confusion matrix, and we can even obtain an e-mail with all this info.
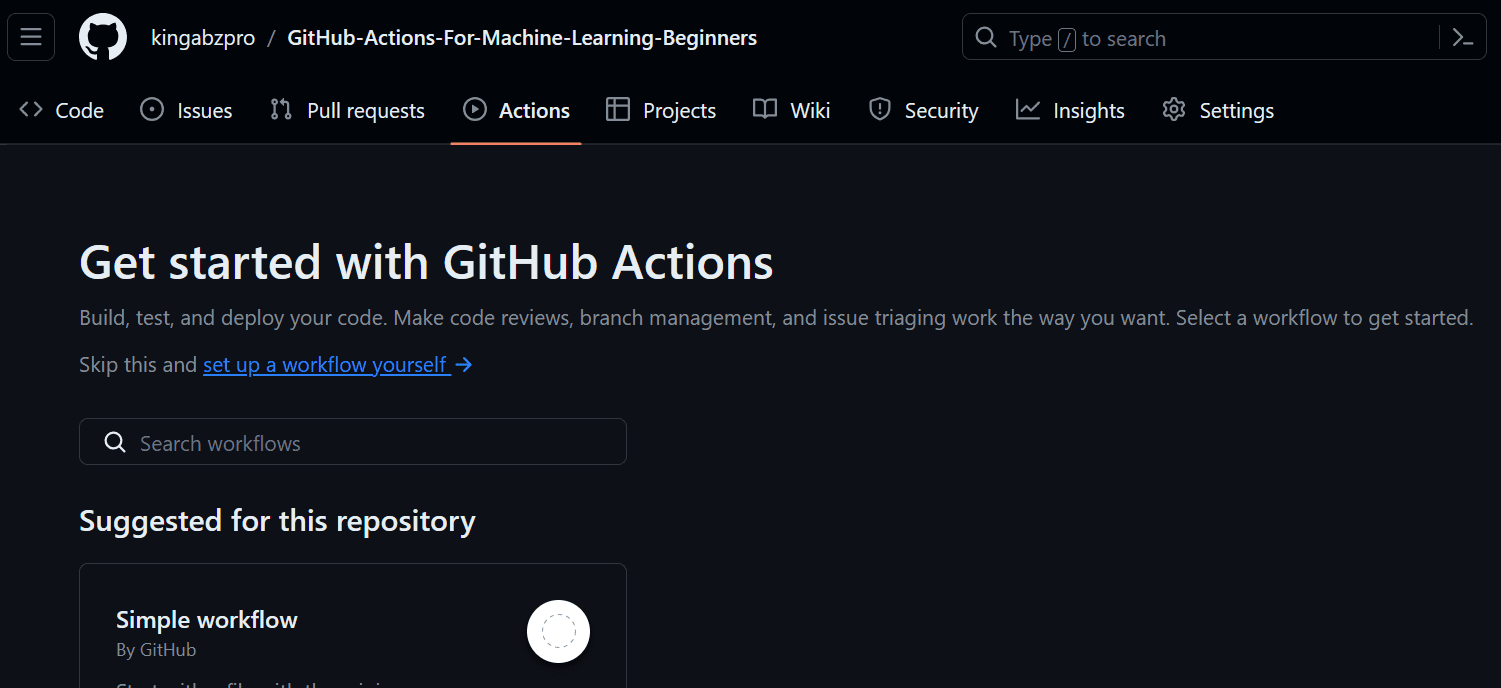
GitHub Actions
It is time for the primary half. We are going to develop a machine studying workflow for coaching and evaluating our mannequin. This workflow shall be activated each time we push our code to the primary department or when somebody submits a pull request to the primary department.
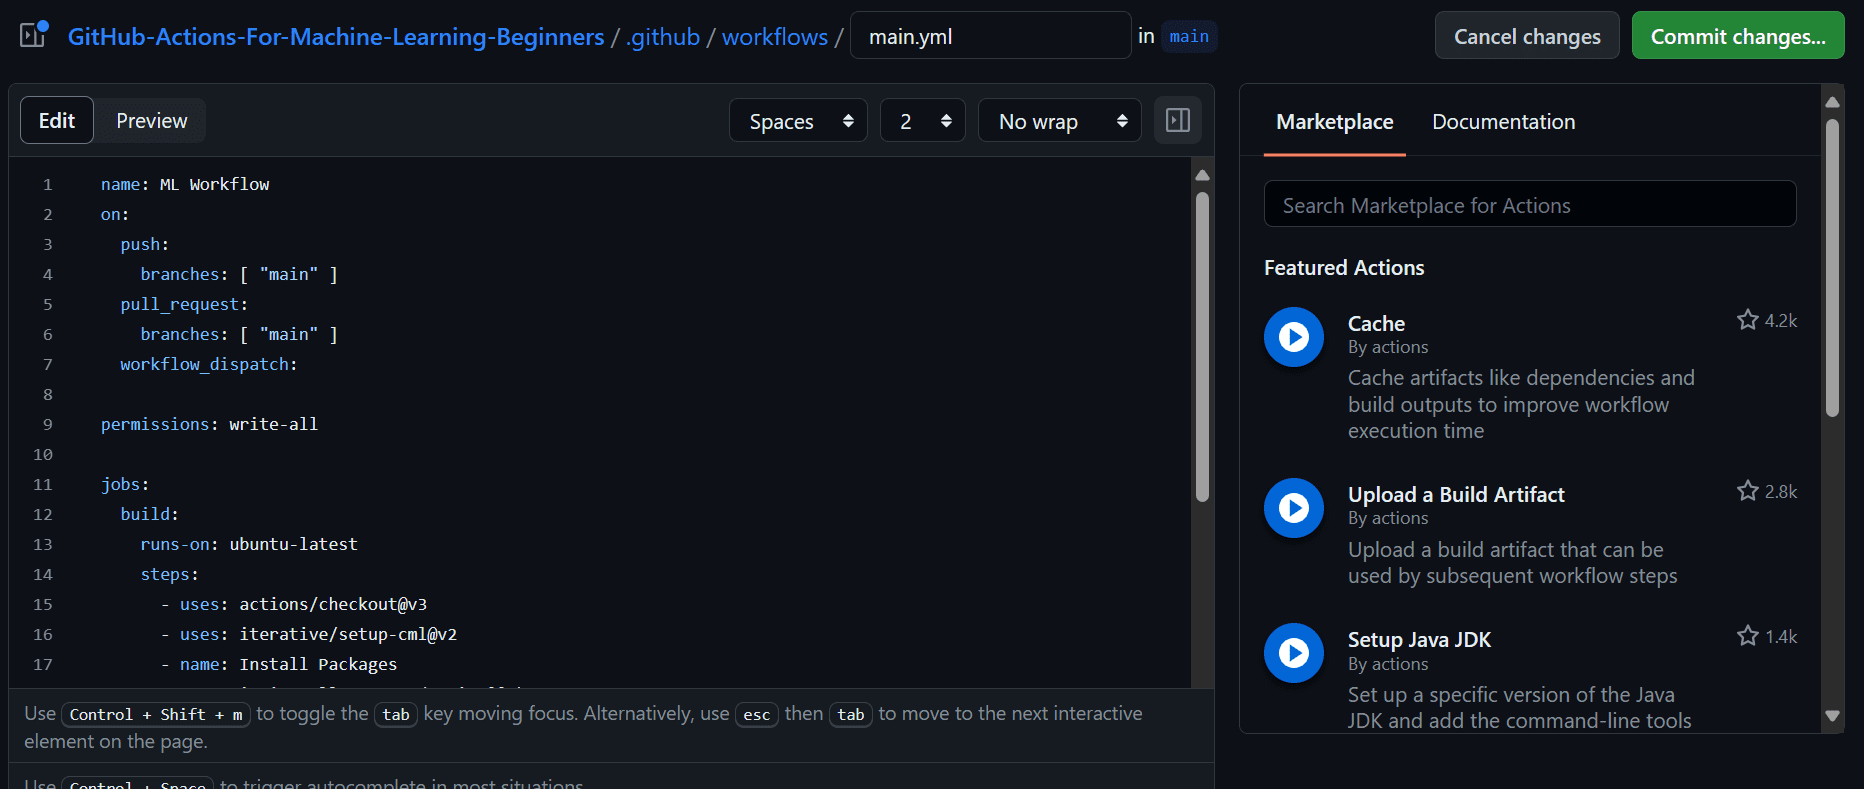
To create our first workflow, navigate to the “Actions” tab on the repository and click on on the blue textual content “arrange a workflow your self.” It’ll create a YML file within the .github/workflows listing and supply us with the interactive code editor for including the code.
Add the next code to the workflow file. On this code, we’re:
- Naming our workflow.
- Setting the triggers on push and pull request utilizing `on` keyworks.
- Offering the actions with written permission in order that the CML motion can create the message below the commit.
- Use Ubuntu Linux runner.
- Use `actions/checkout@v3` motion to entry all of the repository information, together with the dataset.
- Utilizing `iterative/setup-cml@v2` motion to put in the CML package deal.
- Create the run for putting in the entire Python packages.
- Create the run for formatting the Python information.
- Create the run for coaching and evaluating the mannequin.
- Create the run with GITHUB_TOKEN for shifting the mannequin metrics and confusion matrix plot to report.md file. Then, use the CML command to create the report below the commit remark.
title: ML Workflow
on:
push:
branches: [ "main" ]
pull_request:
branches: [ "main" ]
workflow_dispatch:
permissions: write-all
jobs:
construct:
runs-on: ubuntu-latest
steps:
- makes use of: actions/checkout@v3
with:
lfs: true
- makes use of: iterative/setup-cml@v2
- title: Set up Packages
run: pip set up --upgrade pip && pip set up -r necessities.txt
- title: Format
run: black *.py
- title: Practice
run: python prepare.py
- title: Analysis
env:
REPO_TOKEN: ${{ secrets and techniques.GITHUB_TOKEN }}
run: |
echo "## Mannequin Metrics" > report.md
cat metrics.txt >> report.md
echo '## Confusion Matrix Plot' >> report.md
echo '' >> report.md
cml remark create report.md
That is the way it ought to look in your GitHub workflow.
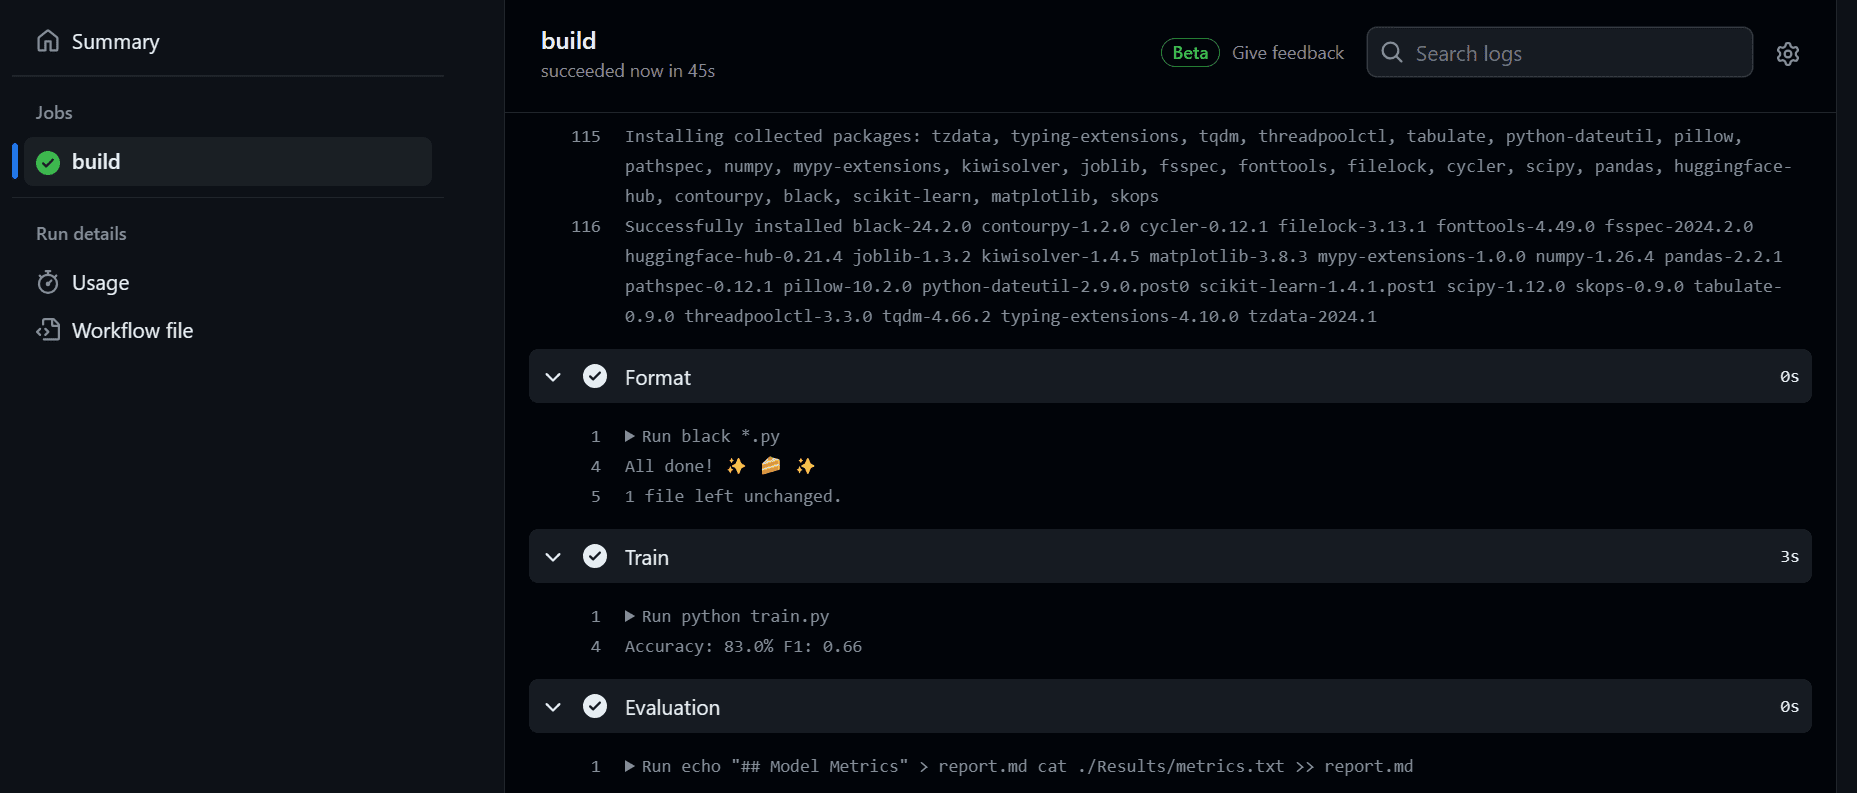
After committing the adjustments. The workflow will begin executing the command sequentially.
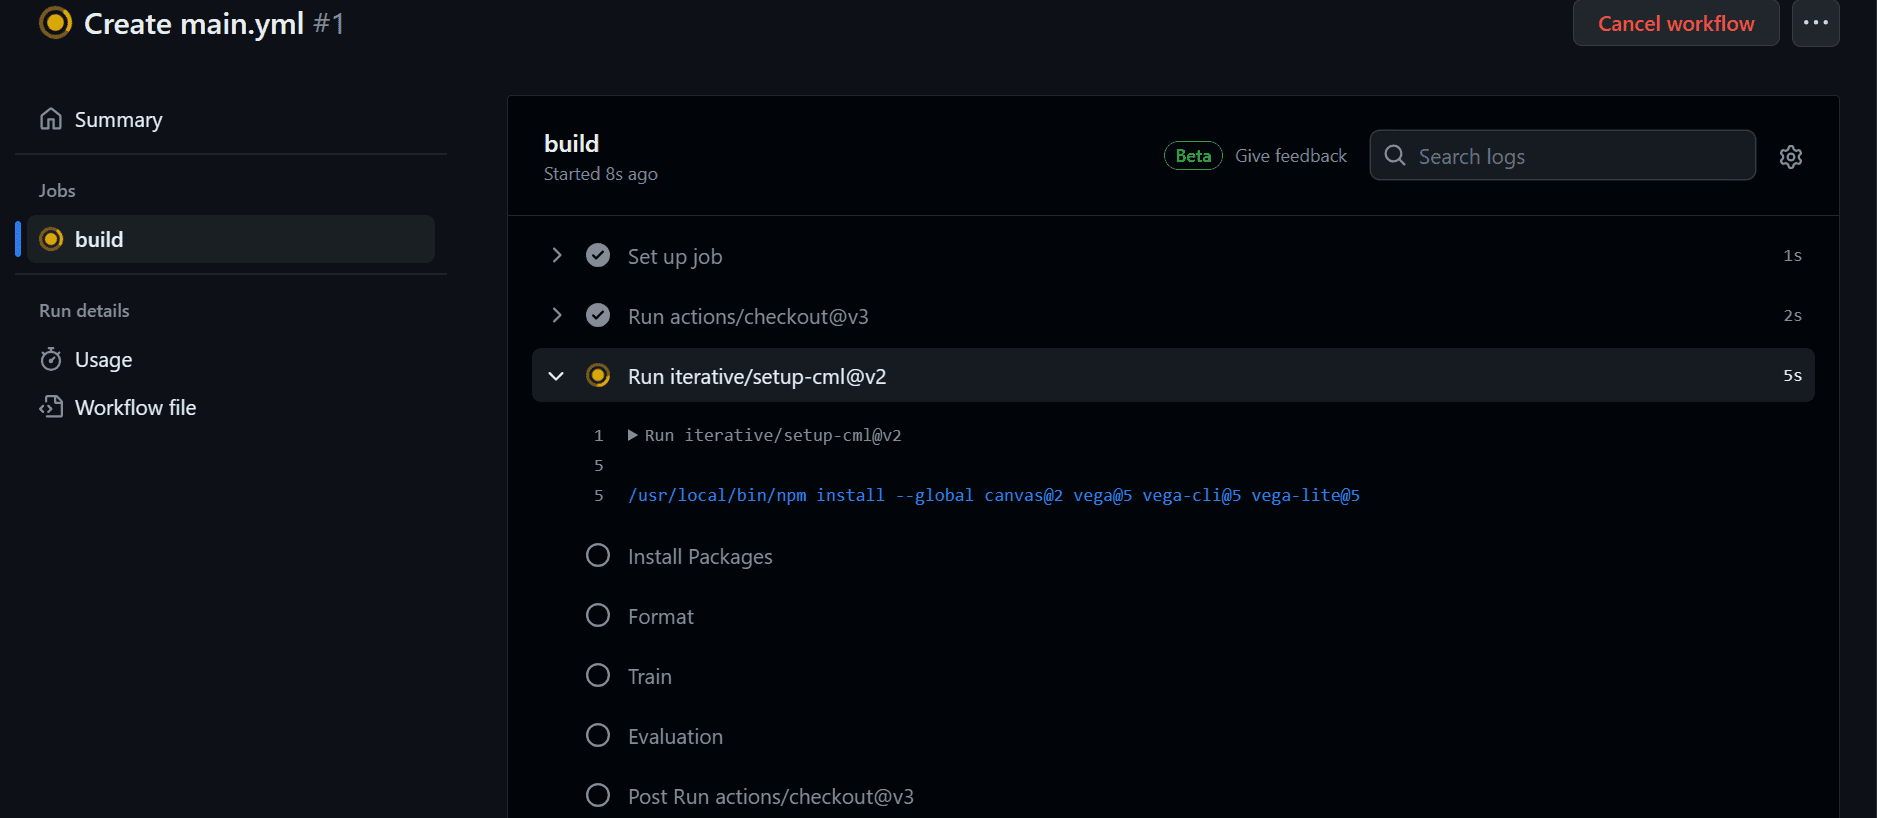
After finishing the workflow, we are able to view the logs by clicking on the latest workflow within the “Actions” tab, opening the construct, and reviewing every process’s logs.
We will now view the mannequin analysis below the commit messages part. We will entry it by clicking on the commit hyperlink: fixed location in workflow · kingabzpro/GitHub-Actions-For-Machine-Learning-Beginners@44c74fa
Additionally, you will obtain an e-mail from GitHub
The code supply is on the market on my GitHub repository: kingabzpro/GitHub-Actions-For-Machine-Learning-Beginners. You possibly can clone it and take a look at it your self.
Machine studying operation (MLOps) is an enormous discipline that requires data of assorted instruments and platforms to efficiently construct and deploy fashions in manufacturing. To get began with MLOps, it is suggested to comply with a complete tutorial, “A Beginner’s Guide to CI/CD for Machine Learning“. It’ll offer you a strong basis to successfully implement MLOps strategies.
On this tutorial, we lined what GitHub Actions are and the way they can be utilized to automate your machine studying workflow. We additionally realized about CML Actions and how one can write scripts in YML format to run jobs efficiently. When you’re nonetheless confused about the place to start out, I recommend looking at The Only Free Course You Need To Become a MLOps Engineer.
Abid Ali Awan (@1abidaliawan) is a licensed information scientist skilled who loves constructing machine studying fashions. At the moment, he’s specializing in content material creation and writing technical blogs on machine studying and information science applied sciences. Abid holds a Grasp’s diploma in expertise administration and a bachelor’s diploma in telecommunication engineering. His imaginative and prescient is to construct an AI product utilizing a graph neural community for college students fighting psychological sickness.