Construct a centralized monitoring and reporting resolution for Amazon SageMaker utilizing Amazon CloudWatch
Amazon SageMaker is a totally managed machine studying (ML) platform that gives a complete set of companies that serve end-to-end ML workloads. As recommended by AWS as a best practice, clients have used separate accounts to simplify coverage administration for customers and isolate sources by workloads and account. Nonetheless, when extra customers and groups are utilizing the ML platform within the cloud, monitoring the massive ML workloads in a scaling multi-account atmosphere turns into more difficult. For higher observability, clients are in search of options to observe the cross-account useful resource utilization and monitor actions, akin to job launch and working standing, which is crucial for his or her ML governance and administration necessities.
SageMaker companies, akin to Processing, Coaching, and Internet hosting, acquire metrics and logs from the working cases and push them to customers’ Amazon CloudWatch accounts. To view the small print of those jobs in numerous accounts, you could log in to every account, discover the corresponding jobs, and look into the standing. There is no such thing as a single pane of glass that may simply present this cross-account and multi-job info. Moreover, the cloud admin staff wants to supply people entry to completely different SageMaker workload accounts, which provides extra administration overhead for the cloud platform staff.
On this publish, we current a cross-account observability dashboard that gives a centralized view for monitoring SageMaker consumer actions and sources throughout a number of accounts. It permits the end-users and cloud administration staff to effectively monitor what ML workloads are working, view the standing of those workloads, and hint again completely different account actions at sure factors of time. With this dashboard, you don’t have to navigate from the SageMaker console and click on into every job to seek out the small print of the job logs. As a substitute, you possibly can simply view the working jobs and job standing, troubleshoot job points, and arrange alerts when points are recognized in shared accounts, akin to job failure, underutilized sources, and extra. You can even management entry to this centralized monitoring dashboard or share the dashboard with related authorities for auditing and administration necessities.
Overview of resolution
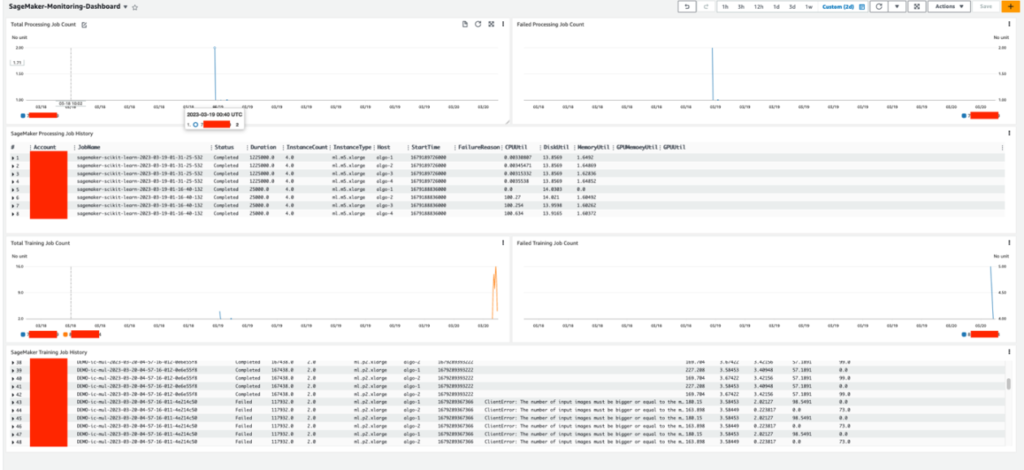
This resolution is designed to allow centralized monitoring of SageMaker jobs and actions throughout a multi-account atmosphere. The answer is designed to don’t have any dependency on AWS Organizations, however may be adopted simply in an Organizations or AWS Control Tower atmosphere. This resolution will help the operation staff have a high-level view of all SageMaker workloads unfold throughout a number of workload accounts from a single pane of glass. It additionally has an choice to allow CloudWatch cross-account observability throughout SageMaker workload accounts to supply entry to monitoring telemetries akin to metrics, logs, and traces from the centralized monitoring account. An instance dashboard is proven within the following screenshot.

The next diagram reveals the structure of this centralized dashboard resolution.

SageMaker has native integration with the Amazon EventBridge, which displays standing change occasions in SageMaker. EventBridge lets you automate SageMaker and reply robotically to occasions akin to a coaching job standing change or endpoint standing change. Occasions from SageMaker are delivered to EventBridge in near-real time. For extra details about SageMaker occasions monitored by EventBridge, seek advice from Automating Amazon SageMaker with Amazon EventBridge. Along with the SageMaker native occasions, AWS CloudTrail publishes occasions once you make API calls, which additionally streams to EventBridge in order that this may be utilized by many downstream automation or monitoring use circumstances. In our resolution, we use EventBridge guidelines within the workload accounts to stream SageMaker service occasions and API occasions to the monitoring account’s occasion bus for centralized monitoring.
Within the centralized monitoring account, the occasions are captured by an EventBridge rule and additional processed into completely different targets:
- A CloudWatch log group, to make use of for the next:
- Auditing and archive functions. For extra info, seek advice from the Amazon CloudWatch Logs User Guide.
- Analyzing log information with CloudWatch Log Insights queries. CloudWatch Logs Insights lets you interactively search and analyze your log information in CloudWatch Logs. You may carry out queries that can assist you extra effectively and successfully reply to operational points. If a difficulty happens, you need to use CloudWatch Logs Insights to establish potential causes and validate deployed fixes.
- Help for the CloudWatch Metrics Insights question widget for high-level operations within the CloudWatch dashboard, including CloudWatch Insights Question to dashboards, and exporting question outcomes.
- An AWS Lambda perform to finish the next duties:
- Carry out customized logic to enhance SageMaker service occasions. One instance is performing a metric question on the SageMaker job host’s utilization metrics when a job completion occasion is obtained.
- Convert occasion info into metrics in sure log codecs as ingested as EMF logs. For extra info, seek advice from Embedding metrics within logs.
The instance on this publish is supported by the native CloudWatch cross-account observability function to attain cross-account metrics, logs, and hint entry. As proven on the backside of the structure diagram, it integrates with this function to allow cross-account metrics and logs. To allow this, essential permissions and sources must be created in each the monitoring accounts and supply workload accounts.
You should utilize this resolution for both AWS accounts managed by Organizations or standalone accounts. The next sections clarify the steps for every state of affairs. Be aware that inside every state of affairs, steps are carried out in numerous AWS accounts. To your comfort, the account sort to carry out the step is highlighted at first every step.
Conditions
Earlier than beginning this process, clone our supply code from the GitHub repo in your native atmosphere or AWS Cloud9. Moreover, you want the next:

Deploy the answer in an Organizations atmosphere
If the monitoring account and all SageMaker workload accounts are all in the identical group, the required infrastructure within the supply workload accounts is created robotically by way of an AWS CloudFormation StackSet from the group’s administration account. Due to this fact, no guide infrastructure deployment into the supply workload accounts is required. When a brand new account is created or an current account is moved right into a goal organizational unit (OU), the supply workload infrastructure stack might be robotically deployed and included within the scope of centralized monitoring.
Arrange monitoring account sources
We have to acquire the next AWS account info to arrange the monitoring account sources, which we use because the inputs for the setup script afterward.
| Enter | Description | Instance |
| House Area | The Area the place the workloads run. | ap-southeast-2 |
| Monitoring account AWS CLI profile identify | Yow will discover the profile identify from ~/.aws/config. That is non-obligatory. If not supplied, it makes use of the default AWS credentials from the chain. |
. |
| SageMaker workload OU path | The OU path that has the SageMaker workload accounts. Hold the / on the finish of the trail. |
o-1a2b3c4d5e/r-saaa/ou-saaa-1a2b3c4d/ |
To retrieve the OU path, you possibly can go to the Organizations console, and below AWS accounts, discover the data to assemble the OU path. For the next instance, the corresponding OU path is o-ye3wn3kyh6/r-taql/ou-taql-wu7296by/.

After you retrieve this info, run the next command to deploy the required sources on the monitoring account:
You may get the next outputs from the deployment. Hold a observe of the outputs to make use of within the subsequent step when deploying the administration account stack.

Arrange administration account sources
We have to acquire the next AWS account info to arrange the administration account sources, which we use because the inputs for the setup script afterward.
| Enter | Description | Instance |
| House Area | The Area the place the workloads run. This must be the identical because the monitoring stack. | ap-southeast-2 |
| Administration account AWS CLI profile identify | Yow will discover the profile identify from ~/.aws/config. That is non-obligatory. If not supplied, it makes use of the default AWS credentials from the chain. |
. |
| SageMaker workload OU ID | Right here we use simply the OU ID, not the trail. | ou-saaa-1a2b3c4d |
| Monitoring account ID | The account ID the place the monitoring stack is deployed to. | . |
| Monitoring account function identify | The output for MonitoringAccountRoleName from the earlier step. |
. |
| Monitoring account occasion bus ARN | The output for MonitoringAccountEventbusARN from the earlier step. |
. |
| Monitoring account sink identifier | The output from MonitoringAccountSinkIdentifier from the earlier step. |
. |
You may deploy the administration account sources by working the next command:
Deploy the answer in a non-Organizations atmosphere
In case your atmosphere doesn’t use Organizations, the monitoring account infrastructure stack is deployed in the same method however with a couple of adjustments. Nonetheless, the workload infrastructure stack must be deployed manually into every workload account. Due to this fact, this technique is appropriate for an atmosphere with a restricted variety of accounts. For a big atmosphere, it’s really useful to think about using Organizations.
Arrange monitoring account sources
We have to acquire the next AWS account info to arrange the monitoring account sources, which we use because the inputs for the setup script afterward.
| Enter | Description | Instance |
| House Area | The Area the place the workloads run. | ap-southeast-2 |
| SageMaker workload account record | An inventory of accounts that run the SageMaker workload and stream occasions to the monitoring account, separated by commas. | 111111111111,222222222222 |
| Monitoring account AWS CLI profile identify | Yow will discover the profile identify from ~/.aws/config. That is non-obligatory. If not supplied, it makes use of the default AWS credentials from the chain. |
. |
We are able to deploy the monitoring account sources by working the next command after you acquire the mandatory info:
We get the next outputs when the deployment is full. Hold a observe of the outputs to make use of within the subsequent step when deploying the administration account stack.
Arrange workload account monitoring infrastructure
We have to acquire the next AWS account info to arrange the workload account monitoring infrastructure, which we use because the inputs for the setup script afterward.
| Enter | Description | Instance |
| House Area | The Area the place the workloads run. This must be the identical because the monitoring stack. | ap-southeast-2 |
| Monitoring account ID | The account ID the place the monitoring stack is deployed to. | . |
| Monitoring account function identify | The output for MonitoringAccountRoleName from the earlier step. |
. |
| Monitoring account occasion bus ARN | The output for MonitoringAccountEventbusARN from the earlier step. |
. |
| Monitoring account sink identifier | The output from MonitoringAccountSinkIdentifier from the earlier step. |
. |
| Workload account AWS CLI profile identify | Yow will discover the profile identify from ~/.aws/config. That is non-obligatory. If not supplied, it makes use of the default AWS credentials from the chain. |
. |
We are able to deploy the monitoring account sources by working the next command:
Visualize ML duties on the CloudWatch dashboard
To test if the answer works, we have to run a number of SageMaker processing jobs and SageMaker coaching jobs on the workload accounts that we used within the earlier sections. The CloudWatch dashboard is customizable primarily based by yourself situations. Our pattern dashboard consists of widgets for visualizing SageMaker Processing jobs and SageMaker Coaching jobs. All jobs for monitoring workload accounts are displayed on this dashboard. In every sort of job, we present three widgets, that are the entire variety of jobs, the variety of failing jobs, and the small print of every job. In our instance, we’ve got two workload accounts. By means of this dashboard, we are able to simply discover that one workload account has each processing jobs and coaching jobs, and one other workload account solely has coaching jobs. As with the features we use in CloudWatch, we are able to set the refresh interval, specify the graph sort, and zoom in or out, or we are able to run actions akin to obtain logs in a CSV file.
Customise your dashboard
The answer supplied within the GitHub repo consists of each SageMaker Coaching job and SageMaker Processing job monitoring. If you wish to add extra dashboards to observe different SageMaker jobs, akin to batch remodel jobs, you possibly can observe the directions on this part to customise your dashboard. By modifying the index.py file, you possibly can customise the fields what you wish to show on the dashboard. You may entry all particulars which are captured by CloudWatch by EventBridge. Within the Lambda perform, you possibly can select the mandatory fields that you simply wish to show on the dashboard. See the next code:
To customise the dashboard or widgets, you possibly can modify the supply code within the monitoring-account-infra-stack.ts file. Be aware that the sphere names you employ on this file must be the identical as these (the keys of job_detail) outlined within the Lambda file:
After you modify the dashboard, you could redeploy this resolution from scratch. You may run the Jupyter pocket book supplied within the GitHub repo to rerun the SageMaker pipeline, which can launch the SageMaker Processing jobs once more. When the roles are completed, you possibly can go to the CloudWatch console, and below Dashboards within the navigation pane, select Customized Dashboards. Yow will discover the dashboard named SageMaker-Monitoring-Dashboard.
Clear up
In the event you not want this practice dashboard, you possibly can clear up the sources. To delete all of the sources created, use the code on this part. The cleanup is barely completely different for an Organizations atmosphere vs. a non-Organizations atmosphere.
For an Organizations atmosphere, use the next code:
For a non-Organizations atmosphere, use the next code:
Alternatively, you possibly can log in to the monitoring account, workload account, and administration account to delete the stacks from the CloudFormation console.
Conclusion
On this publish, we mentioned the implementation of a centralized monitoring and reporting resolution for SageMaker utilizing CloudWatch. By following the step-by-step directions outlined on this publish, you possibly can create a multi-account monitoring dashboard that shows key metrics and consolidates logs associated to their numerous SageMaker jobs from completely different accounts in actual time. With this centralized monitoring dashboard, you possibly can have higher visibility into the actions of SageMaker jobs throughout a number of accounts, troubleshoot points extra rapidly, and make knowledgeable choices primarily based on real-time information. General, the implementation of a centralized monitoring and reporting resolution utilizing CloudWatch provides an environment friendly manner for organizations to handle their cloud-based ML infrastructure and useful resource utilization.
Please check out the answer and ship us the suggestions, both in the AWS forum for Amazon SageMaker, or by your typical AWS contacts.
To be taught extra in regards to the cross-account observability function, please seek advice from the weblog Amazon CloudWatch Cross-Account Observability
In regards to the Authors
 Jie Dong is an AWS Cloud Architect primarily based in Sydney, Australia. Jie is obsessed with automation, and likes to develop options to assist buyer enhance productiveness. Occasion-driven system and serverless framework are his experience. In his personal time, Jie likes to work on constructing good dwelling and discover new good dwelling devices.
 Melanie Li, PhD, is a Senior AI/ML Specialist TAM at AWS primarily based in Sydney, Australia. She helps enterprise clients construct options utilizing state-of-the-art AI/ML instruments on AWS and gives steering on architecting and implementing ML options with finest practices. In her spare time, she likes to discover nature and spend time with household and buddies.
 Gordon Wang, is a Senior AI/ML Specialist TAM at AWS. He helps strategic clients with AI/ML finest practices cross many industries. He’s obsessed with laptop imaginative and prescient, NLP, Generative AI and MLOps. In his spare time, he loves working and mountain climbing.