A Sensible Information to Deploying Machine Studying Fashions

Picture by Creator
A Sensible Information to Deploying Machine Studying Fashions
As a knowledge scientist, you most likely know find out how to construct machine studying fashions. Nevertheless it’s solely if you deploy the mannequin that you simply get a helpful machine studying answer. And when you’re seeking to be taught extra about deploying machine studying fashions, this information is for you.
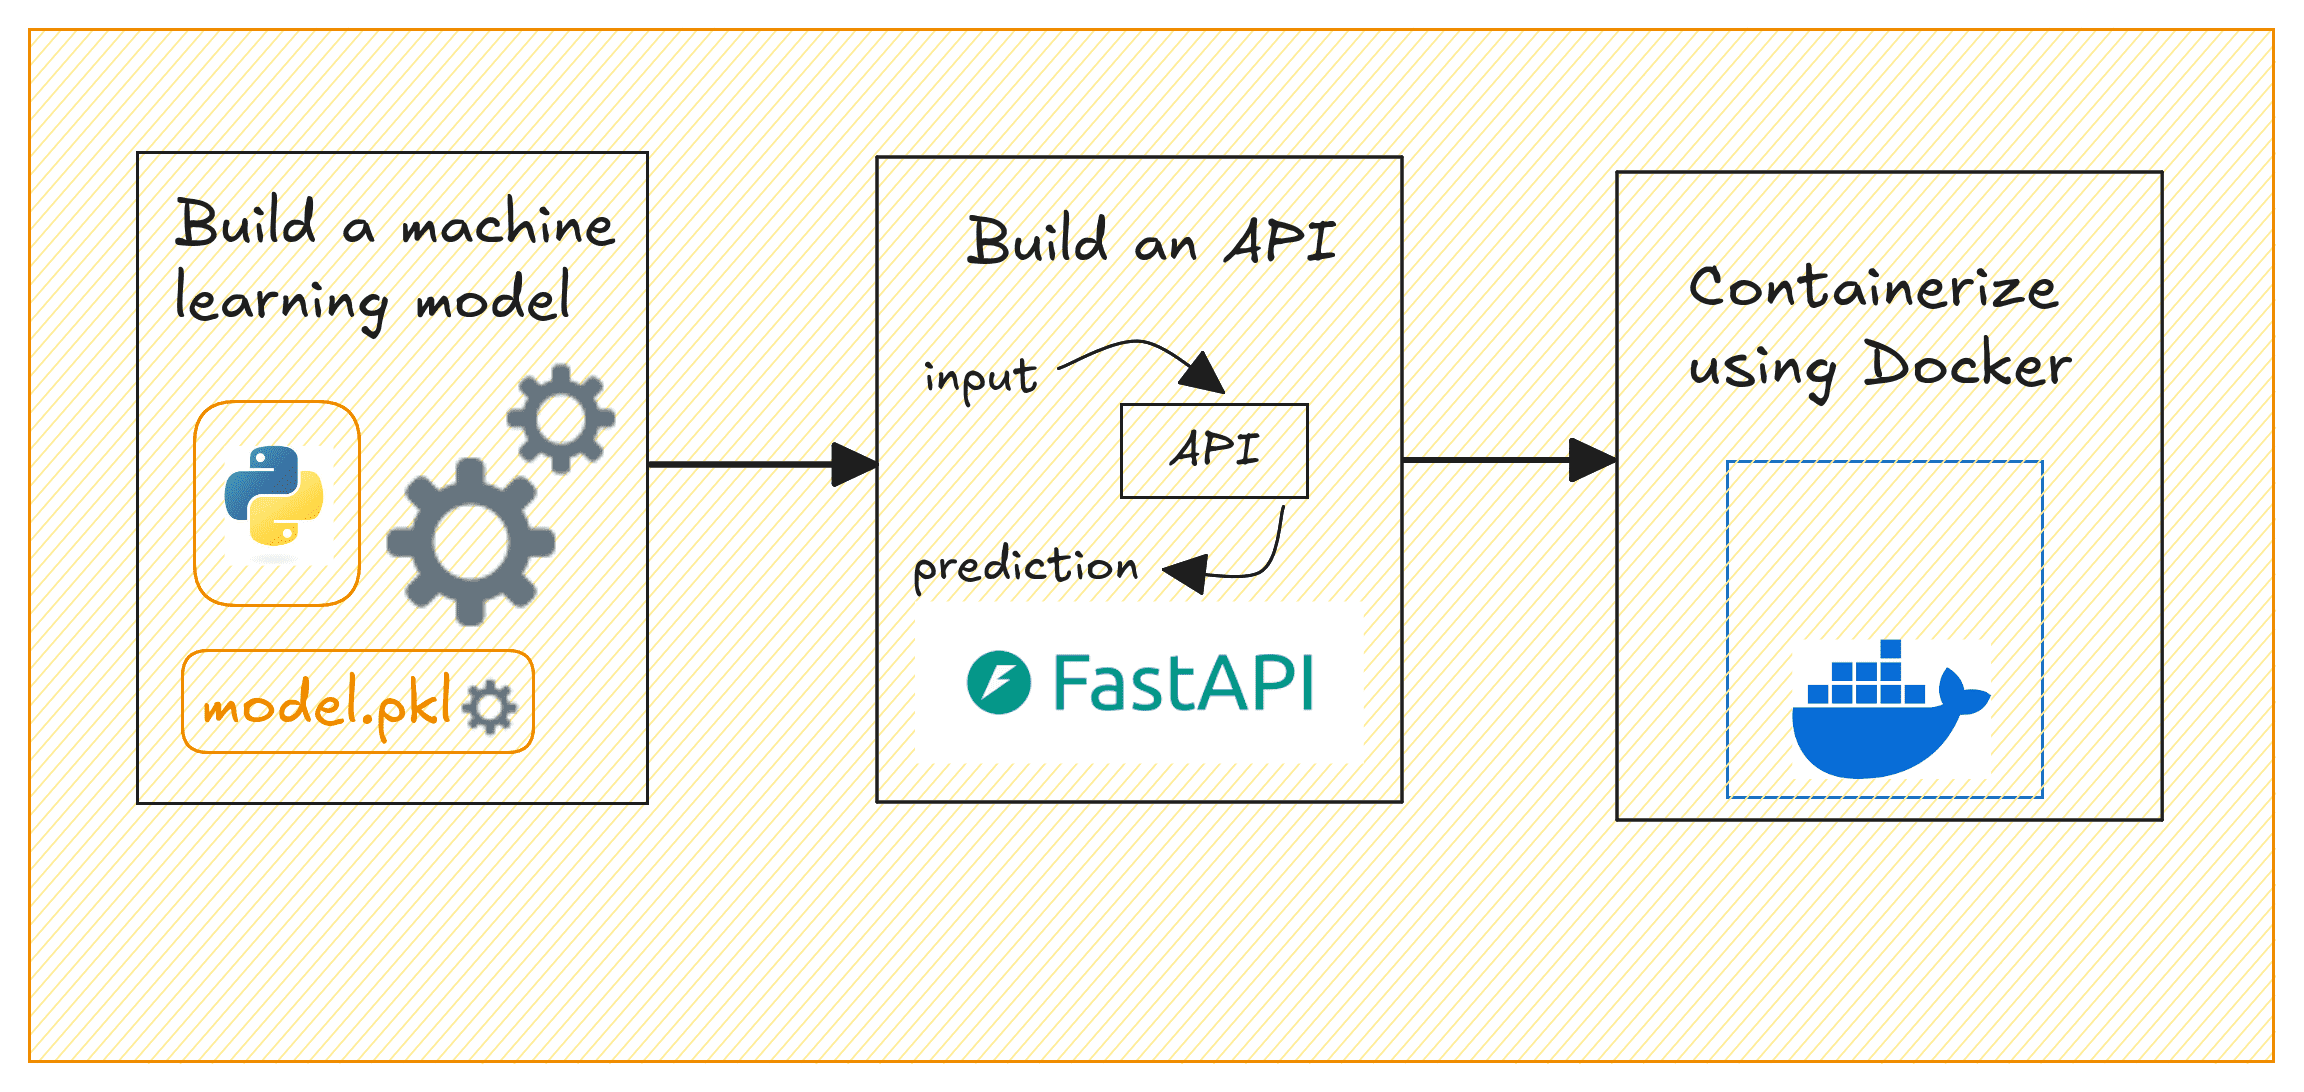
The steps concerned in constructing and deploying ML fashions can usually be summed up like so: constructing the mannequin, creating an API to serve mannequin predictions, containerizing the API, and deploying to the cloud.
This information focuses on the next:
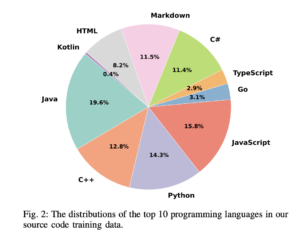
- Constructing a machine studying mannequin with Scikit-learn
- Making a REST API to serve predictions from the mannequin utilizing FastAPI
- Containerizing the API utilizing Docker
Deploying ML Fashions | Picture by Creator
We’ll construct a easy regression mannequin on the California housing dataset to foretell home costs. By the tip, you’ll have a containerized software that serves home value predictions based mostly on chosen enter options.
Setting Up the Undertaking Surroundings
Earlier than you begin, be sure to have the next put in:
- A latest model of Python (Python 3.11 or later ideally)
- Docker for containerization; Get Docker on your working system
⚙️ To comply with alongside comfortably, it’s useful to have a fundamental understanding of constructing machine studying fashions and dealing with APIs.
Getting Began
Right here’s the (beneficial) construction for the venture’s listing:
|
venture–dir/ │ ├── app/ │ ├── __init__.py # Empty file │ └── major.py # FastAPI code for prediction API │ ├── mannequin/ │ └── linear_regression_model.pkl # Saved skilled mannequin (after operating model_training.py) │ ├── model_training.py # Script to coach and save the mannequin ├── necessities.txt # Dependencies for the venture └── Dockerfile # Docker configuration |
We’ll want just a few Python libraries to get going. Let’s set up all of them subsequent.
In your venture setting, create and activate a digital setting:
|
$ python3 –m venv v1 $ supply v1/bin/activate |
For the venture we’ll be engaged on, we’d like pandas and scikit-learn to construct the machine studying mannequin. And FastAPI and Uvicorn to construct the API to serve the mannequin’s predictions.
So let’s set up these required packages utilizing pip:
|
$ pip3 set up pandas scikit–be taught fastapi uvicorn |
Yow will discover all of the code for this tutorial on GitHub.
Constructing a Machine Studying Mannequin
Now, we’ll practice a linear regression mannequin utilizing the California Housing dataset which is constructed into scikit-learn. This mannequin will predict home costs based mostly on the chosen options. Within the venture listing, create a file referred to as model_training.py:
|
1 2 3 4 5 6 7 8 9 10 11 12 13 14 15 16 17 18 19 20 21 22 23 24 25 26 27 28 29 30 31 32 33 |
# model_training.py import pandas as pd from sklearn.datasets import fetch_california_housing from sklearn.model_selection import train_test_split from sklearn.linear_model import LinearRegression import pickle import os
# Load the dataset knowledge = fetch_california_housing(as_frame=True) df = knowledge[‘data’] goal = knowledge[‘target’]
# Choose just a few options selected_features = [‘MedInc’, ‘AveRooms’, ‘AveOccup’] X = df[selected_features] y = goal
# Practice-test break up X_train, X_test, y_train, y_test = train_test_split(X, y, test_size=0.2, random_state=42)
# Practice the Linear Regression mannequin mannequin = LinearRegression() mannequin.match(X_train, y_train)
# Create a ‘mannequin’ folder to save lots of the skilled mannequin os.makedirs(‘mannequin’, exist_ok=True)
# Save the skilled mannequin utilizing pickle with open(‘mannequin/linear_regression_model.pkl’, ‘wb’) as f: pickle.dump(mannequin, f)
print(“Mannequin skilled and saved efficiently.”) |
This script hundreds the California housing dataset, selects three options (MedInc, AveRooms, AveOccup), trains a linear regression mannequin, and saves it within the mannequin/ folder as linear_regression_model.pkl.
Notice: To maintain issues easy, we’ve solely used a small subset of options. However you’ll be able to strive including extra.
Run the script to coach the mannequin and put it aside:
|
$ python3 model_training.py |
You’ll get the next message and may have the ability to discover the .pkl file within the mannequin/ listing:
|
Mannequin skilled and saved efficiently. |
Creating the FastAPI App
We’ll now create an API that serves predictions utilizing FastAPI.
Contained in the app/ folder, create two recordsdata: __init__.py (empty) and major.py. We do that as a result of we’d wish to containerize the FastAPI app using Docker subsequent.
In major.py, write the next code:
|
1 2 3 4 5 6 7 8 9 10 11 12 13 14 15 16 17 18 19 20 21 22 23 24 25 26 27 28 29 30 |
# app/major.py from fastapi import FastAPI from pydantic import BaseModel import pickle import os
# Outline the enter knowledge schema utilizing Pydantic class InputData(BaseModel): MedInc: float AveRooms: float AveOccup: float
# Initialize FastAPI app app = FastAPI(title=“Home Worth Prediction API”)
# Load the mannequin throughout startup model_path = os.path.be a part of(“mannequin”, “linear_regression_model.pkl”) with open(model_path, ‘rb’) as f: mannequin = pickle.load(f)
@app.submit(“/predict”) def predict(knowledge: InputData): # Put together the information for prediction input_features = [[data.MedInc, data.AveRooms, data.AveOccup]]
# Make prediction utilizing the loaded mannequin prediction = mannequin.predict(input_features)
# Return the prediction outcome return {“predicted_house_price”: prediction[0]} |
This FastAPI software exposes a /predict endpoint that takes three options (MedInc, AveRooms, AveOccup). It makes use of the skilled mannequin to foretell home costs, and returns the anticipated value.
Containerizing the App with Docker
Now let’s containerize our FastAPI software. Within the venture’s root listing, create a Dockerfile and a necessities.txt file.
Creating the Dockerfile
Let’s create a Dockerfile:
|
1 2 3 4 5 6 7 8 9 10 11 12 13 14 15 16 17 18 19 20 21 22 23 |
# Use Python 3.11 as the bottom picture FROM python:3.11–slim
# Set the working listing contained in the container WORKDIR /code
# Copy the necessities file COPY ./necessities.txt /code/necessities.txt
# Set up the Python dependencies RUN pip set up —no–cache–dir —improve –r /code/necessities.txt
# Copy the app folder into the container COPY ./app /code/app
# Copy the mannequin listing (with the saved mannequin file) into the container COPY ./mannequin /code/mannequin
# Expose port 80 for FastAPI EXPOSE 80
# Command to run the FastAPI app with Uvicorn CMD [“uvicorn”, “app.main:app”, “–host”, “0.0.0.0”, “–port”, “80”] |
This creates a light-weight container for a FastAPI software utilizing Python 3.11 (slim model) as the bottom picture. It units the working listing to /code, copies the necessities.txt file into the container, and installs the required Python dependencies with out caching.
The FastAPI app and mannequin recordsdata are then copied into the container. Port 80 is uncovered for the applying, and Uvicorn is used to run the FastAPI app. This makes the API accessible at port 80. This setup is environment friendly for deploying a FastAPI app in a containerized setting.
Creating the necessities.txt File
Create a necessities.txt file itemizing all dependencies:
|
fastapi uvicorn scikit–be taught pandas |
Constructing the Docker Picture
Now that we’ve got the Dockerfile, necessities.txt, and the FastAPI app prepared, let’s construct a Docker picture and run the container.
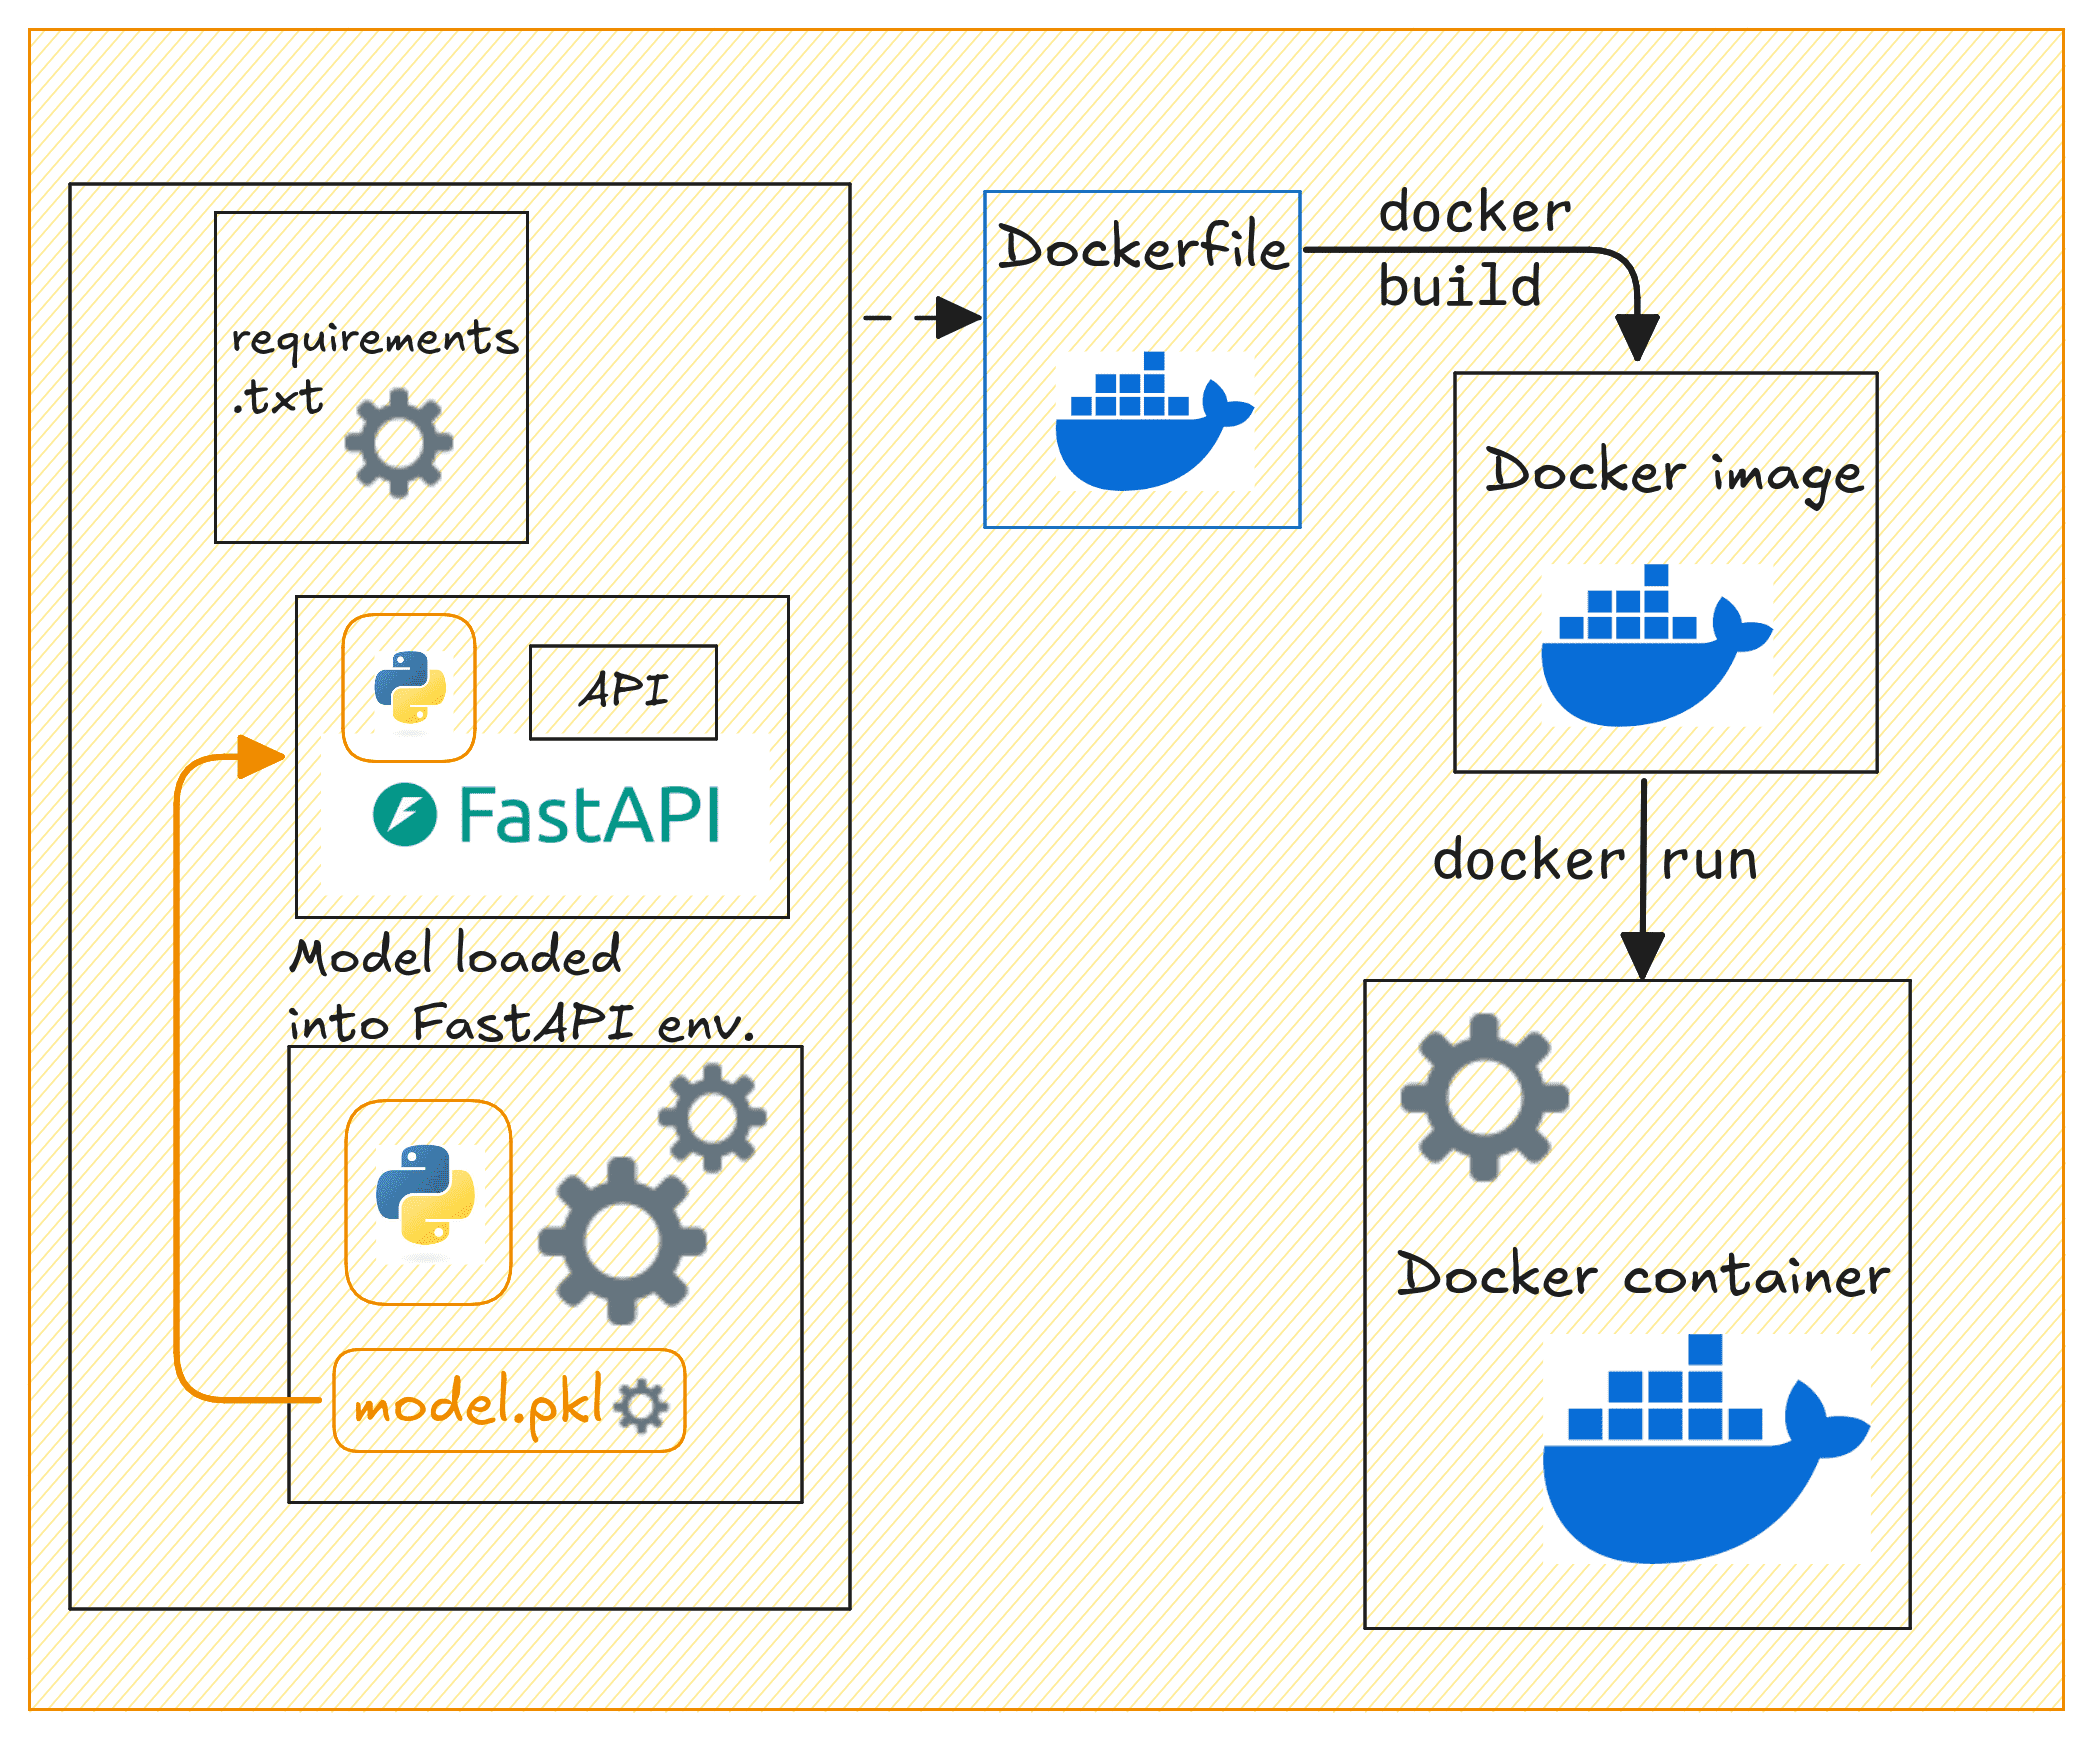
Dockerizing the API | Picture by Creator
Construct the Docker picture by operating the next docker construct command:
|
$ docker construct –t home–value–prediction–api . |
Subsequent run the Docker container:
|
$ docker run –d –p 80:80 home–value–prediction–api |
Your API ought to now be operating and accessible at http://127.0.0.1:80.
You need to use curl or Postman to check the /predict endpoint by sending a POST request. Right here’s an instance request:
|
curl –X ‘POST’ ‘http://127.0.0.1:80/predict’ –H ‘Content material-Sort: software/json’ –d ‘{ “MedInc”: 3.5, “AveRooms”: 5.0, “AveOccup”: 2.0 }’ |
This could return a response with the anticipated home value, like this:
|
{ “predicted_house_price”: 2.3248705765077062 } |
Tagging and Pushing the Docker Picture to Docker Hub
After constructing the Docker picture, operating the container, and testing it. Now you can push it to Docker Hub for simpler sharing and deploying to cloud platforms.
First, login to Docker Hub:
You’ll be prompted to enter the credentials.
Tag the Docker picture:
|
$ docker tag home–value–prediction–api your_username/home–value–prediction–api:v1 |
Exchange your_username together with your Docker Hub username.
Notice: It additionally is smart so as to add variations to your mannequin recordsdata. While you replace the mannequin, you’ll be able to rebuild the picture with a brand new tag, and push the up to date picture to Docker Hub.
Push the picture to Docker Hub:
|
$ docker push your_username/home–value–prediction–api:v1 |
Different builders can now pull and run the picture like so:
|
$ docker pull your_username/home–value–prediction–api:v1 $ docker run –d –p 80:80 your_username/home–value–prediction–api:v1 |
Anybody with entry to your Docker Hub repository can now pull the picture and run the container.
Wrap-up and Subsequent Steps
Right here’s a fast overview of what we did on this tutorial:
- Practice a machine studying mannequin utilizing scikit-learn
- Construct a FastAPI software to serve predictions
- Containerize the applying with Docker
We additionally checked out pushing the Docker picture to Docker Hub for simpler distribution. The following logical step is to deploy this containerized software to the cloud.
And for this, you need to use providers like AWS ECS, GCP, or Azure to deploy the API in a manufacturing setting. Tell us when you’d like a tutorial on deploying machine studying fashions to the cloud.
Joyful deploying!