Implementing tenant isolation utilizing Brokers for Amazon Bedrock in a multi-tenant surroundings
The variety of generative artificial intelligence (AI) options is rising inside software program choices, particularly after market-leading foundational fashions (FMs) grew to become consumable by way of an API utilizing Amazon Bedrock. Amazon Bedrock is a totally managed service that provides a selection of high-performing basis fashions from main AI firms like AI21 Labs, Anthropic, Cohere, Meta, Stability AI, and Amazon by way of a single API, together with a broad set of capabilities it’s essential construct generative AI functions with safety, privateness, and accountable AI.
Agents for Amazon Bedrock allows software program builders to finish actions and duties based mostly on person enter and group information. A typical problem in multi-tenant choices, equivalent to software program as a service (SaaS) merchandise, is tenant isolation. Tenant isolation makes certain every tenant can entry solely their very own assets—even when all tenants run on shared infrastructure.
You possibly can isolate tenants in an utility utilizing totally different multi-tenant structure patterns. In some instances, isolation might be achieved by having total stacks of assets devoted to at least one tenant (silo mannequin) with coarse-grained insurance policies to stop cross-tenant entry. In different situations, you might need pooled assets (equivalent to one database desk containing rows from totally different tenants) that require fine-grained insurance policies to manage entry. Oftentimes, Amazon Web Services (AWS) prospects design their functions utilizing a mixture of each fashions to steadiness the fashions’ tradeoffs.
Isolating tenants in a pooled mannequin is achieved through the use of tenant context info in several utility elements. The tenant context might be injected by an authoritative supply, such because the id supplier (IdP) throughout the authentication of a person. Integrity of the tenant context should be preserved all through the system to stop malicious customers from appearing on behalf of a tenant that they shouldn’t have entry to, leading to doubtlessly delicate information being disclosed or modified.
FMs act on unstructured information and reply in a probabilistic style. These properties make FMs unfit to deal with tenant context securely. For instance, FMs are vulnerable to prompt injection, which can be utilized by malicious actors to alter the tenant context. As a substitute, tenant context needs to be securely handed between deterministic elements of an utility, which might in flip devour FM capabilities, giving the FM solely info that’s already scoped right down to the particular tenant.
On this weblog submit, you’ll learn to implement tenant isolation utilizing Amazon Bedrock brokers inside a multi-tenant surroundings. We’ll reveal this utilizing a pattern multi-tenant e-commerce utility that gives a service for varied tenants to create on-line shops. This utility makes use of Amazon Bedrock brokers to develop an AI assistant or chatbot able to offering tenant-specific info, equivalent to return insurance policies and user-specific info like order counts and standing updates. This structure showcases how you should utilize pooled Amazon Bedrock brokers and implement tenant isolation at each the tenant degree for return coverage info and the person degree for user-related information, offering a safe and customized expertise for every tenant and their customers.
Structure overview

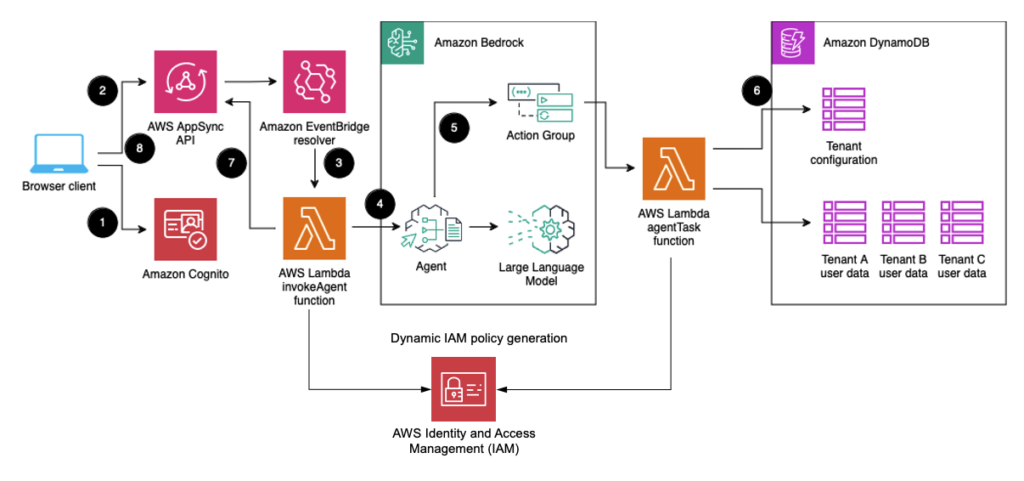
Determine 1: Structure of the pattern AI assistant utility
Let’s discover the totally different elements this resolution is utilizing.
- A tenant person indicators in to an id supplier equivalent to Amazon Cognito. They get a JSON Internet Token (JWT), which they use for API requests. The JWT accommodates claims such because the person ID (or topic,
sub), which identifies the tenant person, and thetenantId, which defines which tenant the person belongs to. - The tenant person inputs their query into the consumer utility. The consumer utility sends the query to a GraphQL API endpoint supplied by AWS AppSync, within the type of a GraphQL mutation. You possibly can study extra about this sample within the weblog submit Build a Real-time, WebSockets API for Amazon Bedrock. The consumer utility authenticates to AWS AppSync utilizing the JWT from Amazon Cognito. The person is allowed utilizing the Cognito User Pools integration.
- The GraphQL mutation invokes utilizing the EventBridge resolver. The occasion triggers an AWS Lambda function utilizing an EventBridge rule.
- The Lambda operate calls the Amazon Bedrock InvokeAgent API. This operate makes use of a tenant isolation coverage to scope the permissions and generates tenant particular scoped credentials. Extra about this may be learn within the weblog Building a Multi-Tenant SaaS Solution Using AWS Serverless Services. Then, it sends the tenant ID, person ID and tenant particular scoped credentials to this API utilizing the
sessionAttributesparameter from the agent’ssessionState. - The Amazon Bedrock agent determines what it must do to fulfill the person request through the use of the reasoning capabilities of the related giant language mannequin (LLM). Quite a lot of LLMs can be utilized, and for this resolution we used Anthropic Claude 3 Sonnet. It passes the
sessionAttributesobject to an action group decided to assist with the request, thereby securely forwarding tenant and person ID for additional processing steps. - This Lambda operate makes use of the supplied tenant particular scoped credentials and tenant ID to fetch info from Amazon DynamoDB. Tenant configuration information is saved in a single, shared desk, whereas person information is cut up in a single desk per tenant. After the proper information is fetched, it’s returned to the agent. The agent interacts with the LLM for the second time to formulate a natural-language reply to the person based mostly on the supplied information.
- The agent’s response is printed as one other GraphQL mutation by way of AWS AppSync.
- The consumer listens to the response utilizing a GraphQL subscription. It renders the response to the person after it’s obtained from the server.
Word that every part on this pattern structure might be modified to suit into your pre-existing structure and data within the group. For instance, you would possibly select to make use of a WebSocket implementation by way of Amazon API Gateway as a substitute of utilizing GraphQL or implement a synchronous request and response sample. Whichever expertise stack you select to make use of, confirm that you just securely move tenant and person context between its totally different layers. Don’t depend on probabilistic elements of your stack, equivalent to an LLM, to precisely transmit safety info.
How tenant and person information is remoted
This part describes how person and tenant information is remoted when a request is processed all through the system. Every step is mentioned in additional element following the diagram. For every immediate within the UI, the frontend sends the immediate as a mutation request to the AWS AppSync API and listens for the response by way of a subscription, as defined in step 8 of Determine 1 proven above. The subscription is required to obtain the reply from the immediate, because the agent is invoked asynchronously. Each the request and response are authenticated utilizing Amazon Cognito, and the request’s context, together with person and tenant ID, is made accessible to downstream elements.

Determine 2: Person and tenant information isolation
- For every immediate created within the pattern UI, a novel ID(
answerId) is generated. TheanswerIdis required to correlate the enter immediate with the reply from the agent. It makes use of the Cognito person ID (saved within the sub area within the JWT and accessible asuserIdwithin the AWS Amplify SDK) as a prefix to allow fine-grained permissions. That is defined in additional depth in step 3. TheanswerIdis generated within theweb page.tsxfile:
- The frontend makes use of the AWS Amplify SDK, which takes care of authenticating the GraqhQL request. That is carried out for the immediate request (a GraphQL mutation request) and for the response (a GraphQL subscription which listens to a solution to the immediate). The authentication mode is ready within the tsx file. Amplify makes use of the Amazon Cognito person pool it has been configured with. Additionally, the beforehand generated answerId is used as a novel identifier for the request.
- The frontend sends the GraphQL mutation request and the response is obtained by the subscription. To correlate the mutation request and response within the subscription, the
answerId, generated in Step1, is used. By operating the code under in a resolver hooked up to a subscription, person isolation is enforced. Customers can’t subscribe to arbitrary mutations and obtain their response. The code verifies that that theuserIdwithin the mutation request matches theuserIdwithin the response obtained by the subscription. Thectxvariable is populated by AWS AppSync with the request’s payload and metadata such because the person id.
Word that the authorization is checked in opposition to the cryptographically signed JWT from the Amazon Cognito person pool. Therefore, even when a malicious person may tamper with the token domestically to alter the userId, the authorization verify would nonetheless fail.
- The
userIdandtenantId(from the AWS AppSync context) is handed on to Amazon EventBridge and to AWS Lambda, which invokes the Agent. The Lambda operate will get the person info from the occasion object in fileinvokeAgent/index.py:
The Lambda operate assumes the under IAM position that has permissions scoped right down to a particular tenant and generates tenant particular scoped credentials. This position solely grants entry to DynamoDB gadgets which has the given tenant ID because the main key.
- This id info and tenant particular scoped credentials are handed to the agent by way of
sessionAttributeswithin the Amazon Bedrock InvokeAgent API name as proven under.
- The
sessionAttributesare used throughout the agent process to grant the agent entry to solely the database tables and rows for the particular tenant person. The duty creates a DynamoDB consumer utilizing the tenant-scoped credentials. Utilizing the scoped consumer, it appears up the proper order desk title within the tenant configuration and queries the order desk for information:
When modifying / debugging this operate, just be sure you don’t log any credentials or the entire occasion object.
Walkthrough
On this part, you’ll arrange the pattern AI assistant described within the earlier sections in your individual AWS account.
Stipulations
For this walkthrough, it’s best to have the next stipulations:
Allow giant language mannequin
An agent wants a big language mannequin (LLM) to cause about the easiest way to fulfil a person request and formulate natural-language solutions. Observe the Amazon Bedrock model access documentation to allow Anthropic Claude 3 Sonnet mannequin entry within the us-east-1 (N. Virginia) Area. After enabling the LLM, you will notice the next display with a standing of Entry granted:

Determine 3: You will have now enabled Anthropic Claude 3 Sonnet in Amazon Bedrock in your AWS account.
Deploy pattern utility
We ready many of the pattern utility’s infrastructure as an AWS Cloud Development Kit (AWS CDK) undertaking.
In case you have by no means used the CDK within the present account and Area (us-east-1), you need to bootstrap the surroundings utilizing the next command:
Utilizing your native command line interface, problem the next instructions to clone the undertaking repository and deploy the CDK undertaking to your AWS account:
This takes about 3 minutes, after which it’s best to see output just like the next:
 MultiTenantAiAssistantStack
 Deployment time: 132.24s
Outputs:
MultiTenantAiAssistantStack.appClientId = ...
MultiTenantAiAssistantStack.graphqlEndpoint = https://...
MultiTenantAiAssistantStack.tenant1Password = Preliminary-...
MultiTenantAiAssistantStack.tenant2Password = Preliminary-...
MultiTenantAiAssistantStack.tenant3Password = Preliminary-...
MultiTenantAiAssistantStack.userPoolId = us-east-1_...
Stack ARN:
arn:aws:cloudformation:us-east-1:...:stack/MultiTenantAiAssistantStack/...
Deployment time: 132.24s
Outputs:
MultiTenantAiAssistantStack.appClientId = ...
MultiTenantAiAssistantStack.graphqlEndpoint = https://...
MultiTenantAiAssistantStack.tenant1Password = Preliminary-...
MultiTenantAiAssistantStack.tenant2Password = Preliminary-...
MultiTenantAiAssistantStack.tenant3Password = Preliminary-...
MultiTenantAiAssistantStack.userPoolId = us-east-1_...
Stack ARN:
arn:aws:cloudformation:us-east-1:...:stack/MultiTenantAiAssistantStack/...
Along with the AWS assets proven in Figure1, this AWS CDK stack provisions three customers, every for a separate tenant, into your AWS account. Word down the passwords for the three customers from the CDK output, labelled MultiTenantAiAssistantStack.tenantXPassword. You will want them within the subsequent part. For those who come again to this walkthrough later, you’ll be able to retrieve these values from the file cdk/cdk-output.json generated by the CDK. Word that these are solely preliminary passwords and have to be modified on first sign-in of every person.
You will have now efficiently deployed the stack referred to as MultiTenantAiAssistantStack.
Begin the frontend and register
Now that the backend is deployed and configured, you can begin the frontend in your native machine, which is in-built JavaScript utilizing React. The frontend robotically pulls info from the AWS CDK output, so that you don’t must configure it manually.
- Problem the next instructions to put in dependencies and begin the native webserver:
Open the frontend utility by visiting localhost:3000 in your browser. You need to see a sign-in web page:
Determine 4: Signal-in display
- For Username, enter
tenant1-user. For Password, enter the password you will have beforehand retrieved from CDK output. - Set a brand new password for the person.
- On the web page Account restoration requires verified contact info, select Skip.
You’re now signed in and might begin interacting with the agent.
Work together with the agent
You will have accomplished the setup of the structure proven in Determine 1 in your individual surroundings. You can begin exploring the net utility by your self or observe the steps recommended under.
- Beneath Enter your Immediate, enter the next query logged in as
tenant1-user:What's your return coverage?
You need to obtain a response that you would be able to return gadgets for 10 days. Tenant 2 has a return coverage of 20 days, tenant 3 of 30 days. - Beneath Enter your Immediate, enter the next query:
Which orders did I place?
You need to obtain a response that you haven’t positioned any orders but.

Determine 5: Pattern utility screenshot
You will have now verified the performance of the applying. You too can attempt to entry information from one other person, and you’ll not get a solution because of the scoped IAM coverage. For instance, you’ll be able to modify the agent and hardcode a tenant ID (equivalent to tenant2). Within the UI, register because the tenant1 person and you will notice that with the generated tenant1 scoped credentials you will be unable to entry tenant2 assets and you’re going to get an AccessDeniedException. You too can see the error within the CloudWatch Logs for the AgentTask Lambda operate:
[ERROR] ClientError: An error occurred (AccessDeniedException) when calling the Question operation: Person: *****/agentTaskLambda isn't licensed to carry out: dynamodb:Question on useful resource: TABLE as a result of no identity-based coverage permits the dynamodb:Question motion
Add check information
To simplify the method of including orders to your database, we’ve written a bash script that inserts entries into the order tables.
- In your CLI, from the repository root folder, problem this command so as to add an order for tenant1-user:
./manage-orders.sh tenant1-user add - Return to the net utility and problem the next immediate:
Which orders did I place?
The agent ought to now reply with the order that you just created. - Problem the next command to delete the orders for
tenant1-user:./manage-orders.sh tenant1-user clear
Repeat steps 1 by way of 3 with a number of orders. You possibly can create a brand new person in Amazon Cognito and register to see that no information from different customers might be accessed. The implementation is detailed in Determine 2.
Clear up
To keep away from incurring future fees, delete the assets created throughout this walkthrough. From the cdk folder of the repository, run the next command:
cdk destroy
Conclusion
Enabling safe multi-tenant capabilities in AI assistants is essential for sustaining information privateness and stopping unauthorized entry. By following the method outlined on this weblog submit, you’ll be able to create an AI assistant that isolates tenants whereas utilizing the ability of enormous language fashions.
The important thing factors to recollect are:
- When constructing multi-tenant SaaS functions, all the time implement tenant isolation (leverage IAM the place ever doable).
- Securely move tenant and person context between deterministic elements of your utility, with out counting on an AI mannequin to deal with this delicate info.
- Use Brokers for Amazon Bedrock to assist construct an AI assistant that may securely move alongside tenant context.
- Implement isolation at totally different layers of your utility to confirm that customers can solely entry information and assets related to their respective tenant and person context.
By following these ideas, you’ll be able to construct AI-powered functions that present a personalised expertise to customers whereas sustaining strict isolation and safety. As AI capabilities proceed to advance, it’s important to design architectures that use these applied sciences responsibly and securely.
Keep in mind, the pattern utility demonstrated on this weblog submit is only one approach to method multi-tenant AI assistants. Relying in your particular necessities, you would possibly must adapt the structure or use totally different AWS companies.
To proceed studying about generative AI patterns on AWS, go to the AWS Machine Learning Blog. To discover SaaS on AWS, begin by visiting our SaaS landing page. In case you have any questions, you can begin a brand new thread on AWS re:Post or attain out to AWS Support.
In regards to the authors
 Ulrich Hinze is a Options Architect at AWS. He companions with software program firms to architect and implement cloud-based options on AWS. Earlier than becoming a member of AWS, he labored for AWS prospects and companions in software program engineering, consulting, and structure roles for 8+ years.
 Florian Mair is a Senior Options Architect and information streaming skilled at AWS. He’s a technologist that helps prospects in Europe succeed and innovate by fixing enterprise challenges utilizing AWS Cloud companies. Moreover working as a Options Architect, Florian is a passionate mountaineer and has climbed a few of the highest mountains throughout Europe.