Tremendous tune a generative AI software for Amazon Bedrock utilizing Amazon SageMaker Pipeline decorators
Constructing a deployment pipeline for generative artificial intelligence (AI) purposes at scale is a formidable problem due to the complexities and distinctive necessities of those techniques. Generative AI fashions are continuously evolving, with new variations and updates launched regularly. This makes managing and deploying these updates throughout a large-scale deployment pipeline whereas offering consistency and minimizing downtime a major enterprise. Generative AI purposes require steady ingestion, preprocessing, and formatting of huge quantities of knowledge from varied sources. Establishing sturdy knowledge pipelines that may deal with this workload reliably and effectively at scale is a substantial problem. Monitoring the efficiency, bias, and moral implications of generative AI fashions in manufacturing environments is an important job.
Reaching this at scale necessitates important investments in sources, experience, and cross-functional collaboration between a number of personas akin to knowledge scientists or machine studying (ML) builders who deal with growing ML fashions and machine studying operations (MLOps) engineers who deal with the distinctive points of AI/ML initiatives and assist enhance supply time, cut back defects, and make knowledge science extra productive. On this publish, we present you convert Python code that fine-tunes a generative AI mannequin in Amazon Bedrock from native recordsdata to a reusable workflow utilizing Amazon SageMaker Pipelines decorators. You should utilize Amazon SageMaker Model Building Pipelines to collaborate between a number of AI/ML groups.
SageMaker Pipelines
You should utilize SageMaker Pipelines to outline and orchestrate the assorted steps concerned within the ML lifecycle, akin to knowledge preprocessing, mannequin coaching, analysis, and deployment. This streamlines the method and offers consistency throughout totally different levels of the pipeline. SageMaker Pipelines can deal with mannequin versioning and lineage monitoring. It routinely retains observe of mannequin artifacts, hyperparameters, and metadata, serving to you to breed and audit mannequin variations.
The SageMaker Pipelines decorator characteristic helps convert native ML code written as a Python program into a number of pipeline steps. As a result of Amazon Bedrock may be accessed as an API, builders who don’t know Amazon SageMaker can implement an Amazon Bedrock software or fine-tune Amazon Bedrock by writing an everyday Python program.
You possibly can write your ML operate as you’d for any ML challenge. After being examined regionally or as a coaching job, an information scientist or practitioner who’s an knowledgeable on SageMaker can convert the operate to a SageMaker pipeline step by including a @step decorator.
Resolution overview
SageMaker Mannequin Constructing Pipelines is a instrument for constructing ML pipelines that takes benefit of direct SageMaker integration. Due to this integration, you may create a pipeline for orchestration utilizing a instrument that handles a lot of the step creation and administration for you.
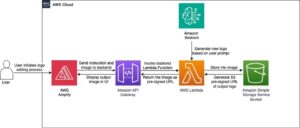
As you progress from pilot and check phases to deploying generative AI fashions at scale, you’ll need to use DevOps practices to ML workloads. SageMaker Pipelines is built-in with SageMaker, so that you don’t have to work together with every other AWS providers. You additionally don’t have to handle any sources as a result of SageMaker Pipelines is a totally managed service, which implies that it creates and manages sources for you. Amazon SageMaker Studio presents an surroundings to handle the end-to-end SageMaker Pipelines expertise. The answer on this publish reveals how one can take Python code that was written to preprocess, fine-tune, and check a big language mannequin (LLM) utilizing Amazon Bedrock APIs and convert it right into a SageMaker pipeline to enhance ML operational effectivity.
The answer has three foremost steps:
- Write Python code to preprocess, prepare, and check an LLM in Amazon Bedrock.
- Add
@stepembellished capabilities to transform the Python code to a SageMaker pipeline. - Create and run the SageMaker pipeline.
The next diagram illustrates the answer workflow.

Stipulations
For those who simply need to view the pocket book code, you may view the notebook on GitHub.
For those who’re new to AWS, you first have to create and set up an AWS account. Then you’ll set up SageMaker Studio in your AWS account. Create a JupyterLab area inside SageMaker Studio to run the JupyterLab application.
If you’re within the SageMaker Studio JupyterLab area, full the next steps:
- On the File menu, select New and Terminal to open a brand new terminal.
- Within the terminal, enter the next code:
- You will note the folder caller
amazon-sagemaker-exampleswithin the SageMaker Studio File Explorer pane. - Open the folder
amazon-sagemaker-examples/sagemaker-pipelines/step-decorator/bedrock-examples. - Open the pocket book
fine_tune_bedrock_step_decorator.ipynb.
This pocket book incorporates all of the code for this publish, and you may run it from starting to finish.
Clarification of the pocket book code
The pocket book makes use of the default Amazon Simple Storage Service (Amazon S3) bucket for the consumer. The default S3 bucket follows the naming sample s3://sagemaker-{Area}-{your-account-id}. If it doesn’t exist already, it will likely be routinely created.
It makes use of the SageMaker Studio default AWS Identity and Access Management (IAM) function for the consumer. In case your SageMaker Studio consumer function doesn’t have administrator entry, it is advisable to add the mandatory permissions to the function.
For extra data, check with the next:
It creates a SageMaker session and will get the default S3 bucket and IAM function:
Use Python to preprocess, prepare, and check an LLM in Amazon Bedrock
To start, we have to obtain knowledge and put together an LLM in Amazon Bedrock. We use Python to do that.
Load knowledge
We use the CNN/DailyMail dataset from Hugging Face to fine-tune the mannequin. The CNN/DailyMail dataset is an English-language dataset containing over 300,000 distinctive information articles as written by journalists at CNN and the Each day Mail. The uncooked dataset contains the articles and their summaries for coaching, validation, and check. Earlier than we are able to use the dataset, it have to be formatted to incorporate the immediate. See the next code:
Cut up knowledge
Cut up the dataset into coaching, validation, and testing. For this publish, we prohibit the scale of every row to three,000 phrases and choose 100 rows for coaching, 10 for validation, and 5 for testing. You possibly can observe the pocket book in GitHub for extra particulars.
Add knowledge to Amazon S3
Subsequent, we convert the information to JSONL format and add the coaching, validation, and check recordsdata to Amazon S3:
Practice the mannequin
Now that the coaching knowledge is uploaded in Amazon S3, it’s time to fine-tune an Amazon Bedrock model utilizing the CNN/DailyMail dataset. We fine-tune the Amazon Titan Text Lite mannequin offered by Amazon Bedrock for a summarization use case. We define the hyperparameters for fine-tuning and launch the coaching job:
Create Provisioned Throughput
Throughput refers back to the quantity and charge of inputs and outputs {that a} mannequin processes and returns. You should purchase Provisioned Throughput to provision devoted sources as an alternative of on-demand throughput, which may have efficiency fluctuations. For personalized fashions, you will need to buy Provisioned Throughput to have the ability to use it. See Provisioned Throughput for Amazon Bedrock for extra data.
Take a look at the mannequin
Now it’s time to invoke and check the mannequin. We use the Amazon Bedrock runtime immediate from the check dataset together with the ID of the Provisioned Throughput that was arrange within the earlier step and inference parameters akin to maxTokenCount, stopSequence, temperature, and prime:
Enhance capabilities with @step that converts Python capabilities right into a SageMaker pipeline steps
The @step decorator is a characteristic that converts your native ML code into a number of pipeline steps. You possibly can write your ML operate as you’d for any ML challenge after which create a pipeline by changing Python capabilities into pipeline steps utilizing the @step decorator, creating dependencies between these capabilities to create a pipeline graph or directed acyclic graph (DAG), and passing the leaf nodes of that graph as an inventory of steps to the pipeline. To create a step utilizing the @step decorator, annotate the operate with @step. When this operate is invoked, it receives the DelayedReturn output of the earlier pipeline step as enter. An occasion holds the details about all of the earlier steps outlined within the operate that type the SageMaker pipeline DAG.
Within the pocket book, we already added the @step decorator in the beginning of every operate definition within the cell the place the operate was outlined, as proven within the following code. The operate’s code will come from the fine-tuning Python program that we’re making an attempt to transform right here right into a SageMaker pipeline.
Create and run the SageMaker pipeline
To deliver all of it collectively, we join the outlined pipeline @step capabilities right into a multi-step pipeline. Then we submit and run the pipeline:
After the pipeline has run, you may listing the steps of the pipeline to retrieve all the dataset of outcomes:
You can track the lineage of a SageMaker ML pipeline in SageMaker Studio. Lineage tracking in SageMaker Studio is centered around a DAG. The DAG represents the steps in a pipeline. From the DAG, you can track the lineage from any step to any other step. The following diagram displays the steps of the Amazon Bedrock fine-tuning pipeline. For more information, refer to View a Pipeline Execution.

By choosing a step on the Select step dropdown menu, you can focus on a specific part of the graph. You can view detailed logs of each step of the pipeline in Amazon CloudWatch Logs.

Clean up
To clean up and avoid incurring charges, follow the detailed cleanup instructions in the GitHub repo to delete the following:
- The Amazon Bedrock Provisioned Throughput
- The customer model
- The Sagemaker pipeline
- The Amazon S3 object storing the fine-tuned dataset
Conclusion
MLOps focuses on streamlining, automating, and monitoring ML models throughout their lifecycle. Building a robust MLOps pipeline demands cross-functional collaboration. Data scientists, ML engineers, IT staff, and DevOps teams must work together to operationalize models from research to deployment and maintenance. SageMaker Pipelines allows you to create and manage ML workflows while offering storage and reuse capabilities for workflow steps.
In this post, we walked you through an example that uses SageMaker step decorators to convert a Python program for creating a custom Amazon Bedrock model into a SageMaker pipeline. With SageMaker Pipelines, you get the benefits of an automated workflow that can be configured to run on a schedule based on the requirements for retraining the model. You can also use SageMaker Pipelines to add useful features such as lineage tracking and the ability to manage and visualize your entire workflow from within the SageMaker Studio environment.
AWS provides managed ML solutions such as Amazon Bedrock and SageMaker to help you deploy and serve existing off-the-shelf foundation models or create and run your own custom models.
See the following resources for more information about the topics discussed in this post:
About the Authors
 Neel Sendas is a Principal Technical Account Manager at Amazon Web Services. Neel works with enterprise customers to design, deploy, and scale cloud applications to achieve their business goals. He has worked on various ML use cases, ranging from anomaly detection to predictive product quality for manufacturing and logistics optimization. When he isn’t helping customers, he dabbles in golf and salsa dancing.
 Ashish Rawat is a Senior AI/ML Specialist Solutions Architect at Amazon Web Services, based in Atlanta, Georgia. Ashish has extensive experience in Enterprise IT architecture and software development including AI/ML and generative AI. He is instrumental in guiding customers to solve complex business challenges and create competitive advantage using AWS AI/ML services.