Creating an Assistant with OpenAI Assistant API and Streamlit | by Shuyang Xiang | Jun, 2024
A step-by-step information

OpenAI has lately launched new options that showcase an agent-like structure, such because the Assistant API. Based on OpenAI:
The Assistants API lets you construct AI assistants inside your personal functions. An Assistant has directions and may leverage fashions, instruments, and recordsdata to answer person queries. The Assistants API at the moment helps three sorts of instruments: Code Interpreter, File Search, and Perform calling.
Whereas these developments are promising, they nonetheless lag behind LangChain. LangChain allows the creation of agent-like methods powered by LLMs with better flexibility in processing pure language enter and executing context-based actions.
Nevertheless, that is solely the start.
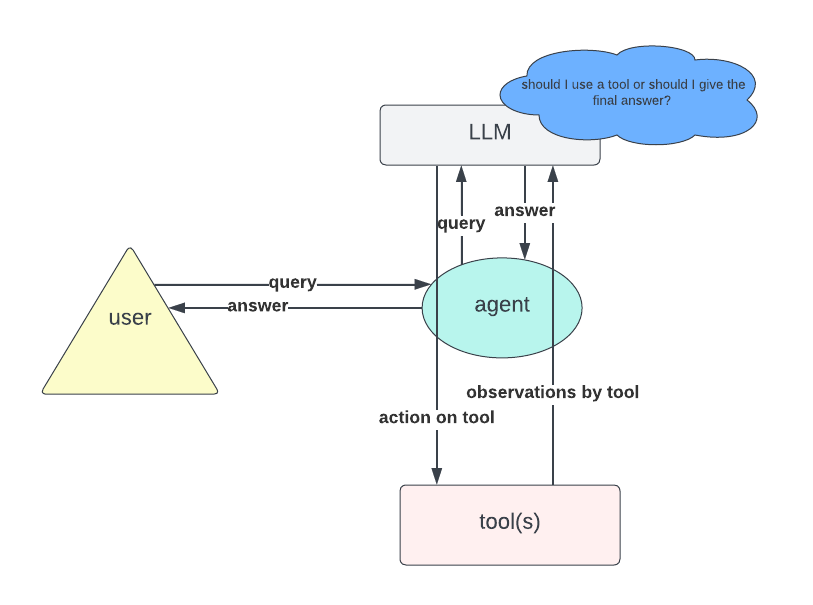
At a excessive stage, interplay with the Assistant API may be envisioned as a loop:
- Given a person enter, an LLM is named to find out whether or not to offer a response or take particular actions.
- If the LLM’s determination suffices to reply the question, the loop ends.
- If an motion results in a brand new remark, this remark is included within the immediate, and the LLM is named once more.
- The loop then restarts.

Sadly, regardless of the introduced benefits, I discovered the documentation for the API to be poorly achieved, particularly concerning interactions with customized operate calls and constructing apps utilizing frameworks like Streamlit.
On this weblog put up, I’ll information you thru constructing an AI assistant utilizing the OpenAI Assistant API with customized operate calls, paired with a Streamlit interface, to assist these all for successfully utilizing the Assistant API.
On this weblog put up, I’ll reveal a easy instance: an AI assistant able to calculating tax primarily based on a given income. Langchain customers can simply come into thoughts implementing this by creating an agent with a “tax computation” software.
This software would come with the mandatory computation steps and a well-designed immediate to make sure the LLM is aware of when to name the software each time a query includes income or tax.
Nevertheless, this course of is just not precisely the identical with the OpenAI Assistant API. Whereas the code interpreter and file search instruments can be utilized straight in an easy method in keeping with OpenAI’s documentation, customized instruments require a barely totally different method.
assistant = shopper.beta.assistants.create(
identify="Information visualizer",
description="You might be nice at creating lovely knowledge visualizations. You analyze knowledge current in .csv recordsdata, perceive developments, and give you knowledge visualizations related to these developments. You additionally share a quick textual content abstract of the developments noticed.",
mannequin="gpt-4o",
instruments=[{"type": "code_interpreter"}],
)
Let’s break it down step-by-step. We goal to:
- Outline a operate that computes tax primarily based on given income.
- Develop a software utilizing this operate.
- Create an assistant that may entry this software and name it each time tax computation is required.
Please be aware that the tax computation software described within the following paragraph is designed as a toy instance to reveal the best way to use the API mentioned within the put up. It shouldn’t be used for precise tax calculations.
Take into account the next piecewise operate, which returns the tax worth for a given income. Be aware that the enter is ready as a string for easier parsing:
def calculate_tax(income: str):
attempt:
income = float(income)
besides ValueError:
elevate ValueError("The income ought to be a string illustration of a quantity.")if income <= 10000:
tax = 0
elif income <= 30000:
tax = 0.10 * (income - 10000)
elif income <= 70000:
tax = 2000 + 0.20 * (income - 30000)
elif income <= 150000:
tax = 10000 + 0.30 * (income - 70000)
else:
tax = 34000 + 0.40 * (income - 150000)
return tax
Subsequent, we outline the assistant:
function_tools = [
{
"type": "function",
"function": {
"name": "calculate_tax",
"description": "Get the tax for given revenue in euro",
"parameters": {
"type": "object",
"properties": {
"revenue": {
"type": "string",
"description": "Annual revenue in euro"
}
},
"required": ["revenue"]
}
}
}
]
# Outline the assistant
assistant = shopper.beta.assistants.create(
identify="Assistant",
directions="",
instruments=function_tools,
mannequin="gpt-4o",
)
Now, the important level:
How does the assistant use the operate when “calculate_tax” is named? This half is poorly documented within the OpenAI assistant, and lots of customers may get confused the primary time utilizing it. To deal with this, we have to outline an EventHandler to handle totally different occasions within the response stream, particularly the best way to deal with the occasion when the “calculate_tax” software is named.
    def handle_requires_action(self, knowledge, run_id):
tool_outputs = []for software in knowledge.required_action.submit_tool_outputs.tool_calls:
if software.operate.identify == "calculate_tax":
attempt:
# Extract income from software parameters
income = ast.literal_eval(software.operate.arguments)["revenue"]
# Name your calculate_tax operate to get the tax
tax_result = calculate_tax(income)
# Append software output within the required format
tool_outputs.append({"tool_call_id": software.id, "output": f"{tax_result}"})
besides ValueError as e:
# Deal with any errors when calculating tax
tool_outputs.append({"tool_call_id": software.id, "error": str(e)})
# Submit all tool_outputs on the identical time
self.submit_tool_outputs(tool_outputs)
The code above works as follows: For every software name that requires motion:
- Test if the operate identify is “calculate_tax”.
- Extract the income worth from the software parameters.
- Name the
calculate_taxoperate with the income to compute the tax. (That is the place the true interplay occurs.) - After processing all software calls, submit the collected outcomes.
Now you can work together with the assistant following these normal steps documented by OpenAI (for that motive, I can’t present many particulars on this part):
- Create a thread: This represents a dialog between a person and the assistant.
- Add person messages: These can embrace each textual content and recordsdata, that are added to the thread.
- Create a run: Make the most of the mannequin and instruments related to the assistant to generate a response. This response is then added again to the thread.
The code snippet under demonstrates the best way to run the assistant in my particular use case: The code units up a streaming interplay with an assistant utilizing particular parameters, together with a thread ID and an assistant ID. An EventHandler occasion manages occasions in the course of the stream. The stream.until_done() methodology retains the stream lively till all interactions are full. The with assertion ensures that the stream is correctly closed afterward.
  with shopper.beta.threads.runs.stream(thread_id=st.session_state.thread_id,
assistant_id=assistant.id,
event_handler=EventHandler(),
temperature=0) as stream:
stream.until_done()
Whereas my put up may finish right here, I’ve seen quite a few inquiries on the Streamlit discussion board (like this one) the place customers wrestle to get streaming to work on the interface, despite the fact that it features completely within the terminal. This prompted me to delve deeper.
To efficiently combine streaming into your app, you’ll want to increase the performance of the EventHandler class talked about earlier, particularly specializing in dealing with textual content creation, textual content deltas, and textual content completion. Listed below are the three key steps required to show textual content within the Streamlit interface whereas managing chat historical past:
- Dealing with Textual content Creation (
on_text_created): Initiates and shows a brand new textual content field for every response from the assistant, updating the UI to mirror the standing of previous actions. - Dealing with Textual content Delta (
on_text_delta): Dynamically updates the present textual content field because the assistant generates textual content, enabling incremental adjustments with out refreshing the complete UI. - Dealing with Textual content Completion (
on_text_done): Finalizes every interplay section by including a brand new empty textual content field, making ready for the subsequent interplay. Moreover, it information accomplished dialog segments inchat_history.
As an example, take into account the next code snippet for managing textual content deltas:
def on_text_delta(self, delta: TextDelta, snapshot: Textual content):
"""
Handler for when a textual content delta is created
"""
# Clear the most recent textual content field
st.session_state.text_boxes[-1].empty()# If there's new textual content, append it to the most recent aspect within the assistant textual content listing
if delta.worth:
st.session_state.assistant_text[-1] += delta.worth
# Re-display the up to date assistant textual content within the newest textual content field
st.session_state.text_boxes[-1].data("".be a part of(st.session_state["assistant_text"][-1]))
This code accomplishes three predominant duties:
- Clearing the Newest Textual content Field: Empties the content material of the latest textual content field (
st.session_state.text_boxes[-1]) to arrange it for brand spanking new enter. - Appending Delta Worth to Assistant Textual content: If new textual content (
delta.worth) is current, it appends this to the continuing assistant textual content saved inst.session_state.assistant_text[-1]. - Re-displaying Up to date Assistant Textual content: Updates the content material of the most recent textual content field to mirror the mixed content material of all assistant textual content amassed to date (
st.session_state["assistant_text"][-1]).
This weblog put up demonstrated the best way to use the OpenAI Assistant API and Streamlit to construct an AI assistant able to calculating tax.
I did this easy mission to focus on the capabilities of the Assistant API, regardless of its less-than-clear documentation. My aim was to make clear ambiguities and supply some steering for these all for utilizing the Assistant API. I hope this put up has been useful and encourages you to discover additional potentialities with this highly effective software.
Attributable to area constraints, I’ve tried to keep away from together with pointless code snippets. Nevertheless, if wanted, please go to my Github repository to view the whole implementation.