Steady Diffusion Venture: Reviving Previous Pictures
Pictures has been round for greater than a century. There are numerous outdated photographs round, and possibly your loved ones has some, too. Restricted by the digital camera and movie of the time, you could have photographs of low decision, blurry, or with folds or scratches. Restoring these outdated photographs and making them like new ones taken with at the moment’s digital camera is a difficult process, however even you are able to do that with photograph enhancing software program reminiscent of Photoshop.
On this publish, you will notice how you should utilize Steady Diffusion to repair outdated photographs and convey a brand new life to them. After ending this publish, you’ll study:
- How you can clear up defects in scanned photograph
- How you can colorize a black and white photograph
Kick-start your undertaking with my ebook Mastering Digital Art with Stable Diffusion. It offers self-study tutorials with working code.
Let’s get began.

Steady Diffusion Venture: Reviving Previous Pictures
Photograph by Antonio Scant. Some rights reserved.
Overview
This tutorial is in three elements; they’re
- Venture Thought
- Superresolution
- Reconstruction
Venture Thought
Let’s take into account an old photo from the New York Public Library:
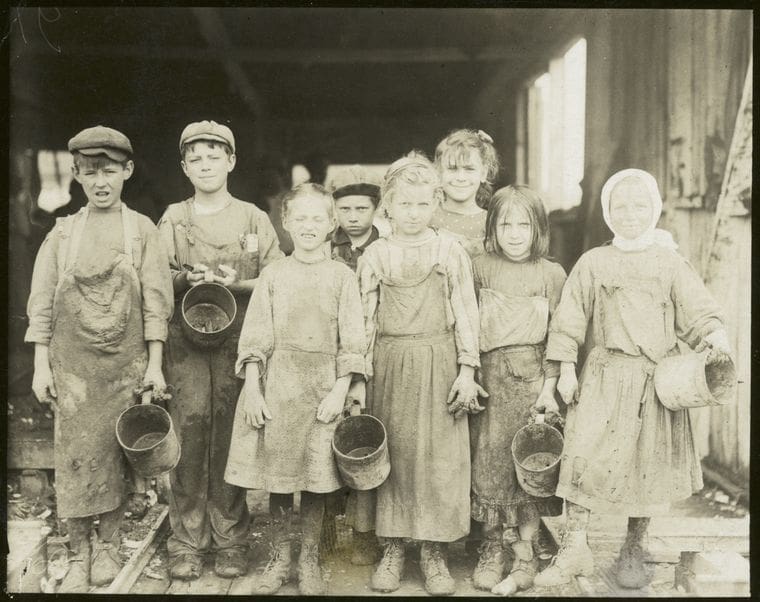
Photograph of “Younger oyster shuckers”. From NYPL Digital Collections.
If you happen to obtain it, you’ll discover that the photograph is at a low decision. It has a bit of noise from movie grain (not too apparent). And the photograph is in black and white. The aim of this undertaking is to make this right into a excessive decision colour photograph depicting the identical individuals.
Superresolution
The unique image has a low decision. Scaling up the decision known as super-resolution, and a number of machine studying fashions have been developed for it.
Step one in processing an outdated photograph is to carry out superresolution. Normally, the outdated photograph is in a low decision, however that isn’t the rationale. Even when the decision is excessive (e.g., since you scan the outdated photograph in excessive decision), you should still wish to downsample the photograph and run superresolution for its aspect impact of eradicating noise and movie grains.
On the Steady Diffusion Internet UI, you possibly can add the photograph to the “Additional” tab. This tab lets you do many issues however none is said to the diffusion course of. Fairly, it’s to use a picture to numerous present machine studying fashions. Right here, you allow “Upscale” and set “Scale by” for an inexpensive issue. For this specific photograph, you possibly can set the issue to 2. Then you must choose an upscaler, reminiscent of “R-ESRGAN 4x+”.
The following factor you are able to do on the Additional tab is CodeFormer. It’s a mannequin for fixing faces. Allow it and set the burden. A low weight provides CodeFormer extra freedom to vary the face, whereas a excessive weight tends to protect the unique facial expressions. The optimum weight ought to rely on the standard of the unique photograph. If there are extra scratches or marks on the faces, you need a decrease weight to permit for simpler reconstruction.
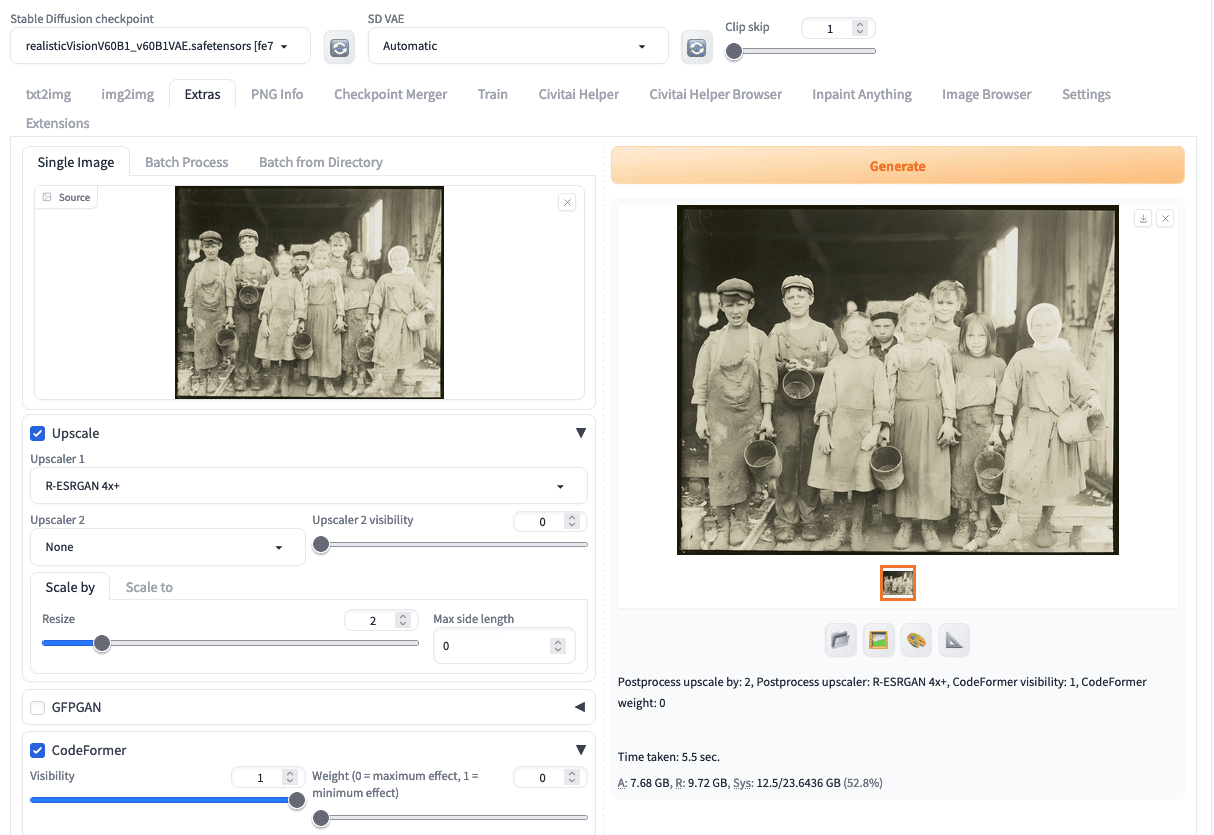
Superresolution is step one in processing an outdated photograph.
It’s best to obtain the upscaled output for the subsequent step.
Reconstruction
To reconstruct an outdated photograph, you’ll use txt2img. You shouldn’t use img2img as a result of offering the outdated photograph as a place to begin is imposing an excessive amount of affect on the output, and you can’t see the correction that you’re anticipating.
However first, you must use img2img tab, add the upscaled output, and click on on the paper clip icon for the “CLIP interrogator”. This may auto-fill the constructive immediate based mostly on the uploaded picture. You’ll assemble your immediate on the txt2img tab based mostly on the CLIP interrogator’s end result.
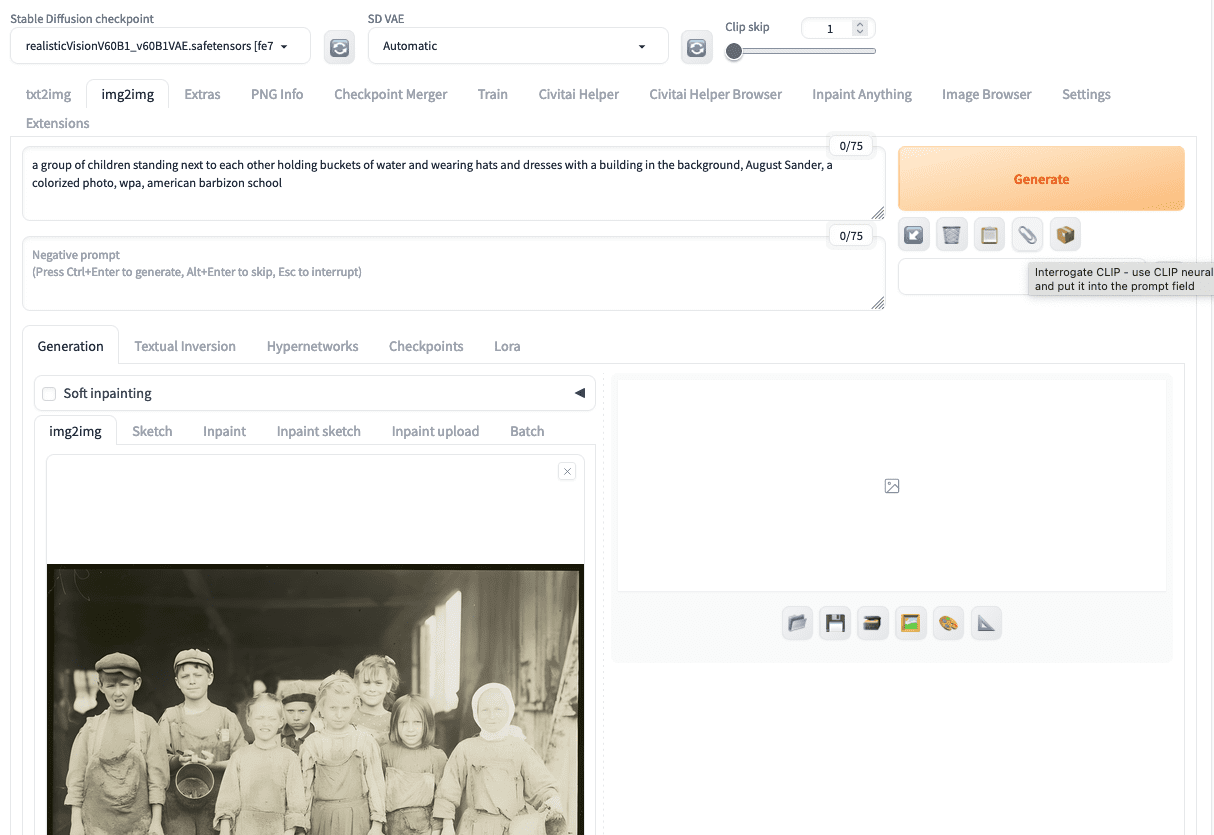
You need to use CLIP interrogator from the img2img tab
Now proceed to txt2img tab. Let’s use a SD1.5 mannequin for photorealistic era, reminiscent of Life like Imaginative and prescient v6. Set the constructive immediate, reminiscent of
a gaggle of kids standing subsequent to one another holding buckets of water and sporting hats and attire with a constructing within the background, August Sander, a colorized photograph, wpa, american barbizon faculty, very best quality, 8k uncooked photograph, detailed face
The previous couple of key phrases are added to manage the type within the output. You need to use a boilerplate destructive immediate, reminiscent of
drawing, portray, crayon, sketch, graphite, impressionist, noisy, blur, gentle, deformed, ugly, lowres, dangerous anatomy, dangerous fingers, cropped, worst high quality, low high quality, regular high quality, jpeg artifacts, signature, watermark, monochrome, greyscale, outdated photograph
The important thing for outdated photograph reconstruction is to make use of ControlNet. You want two ControlNet items for one of the best end result.
First add the upscaled picture to first ControlNet unit and set the kind to be Canny. Bear in mind to allow this unit and test “Pixel Excellent”. This helps the ControlNet preprocessor to make use of the optimum decision. Set the primary unit’s management weight to 0.8.
Then allow the second ControlNet unit. Add the identical picture, activate Pixel Excellent, and choose the management kind to be “Recolor”. This can be a ControlNet mannequin to paint a black and white photograph. It’s best to use “recolor_luminance” mannequin as preprocessor. Set the second unit’s management weight to 0.2. Optionally, you possibly can modify the Gamma correction if you should fine-tune the output’s brightness.
Bear in mind to set the output measurement in txt2img to a facet ratio much like the unique and across the native decision of your Steady Diffusion mannequin. On this instance, we use 760×600 pixels. Click on generate, you will notice the next:
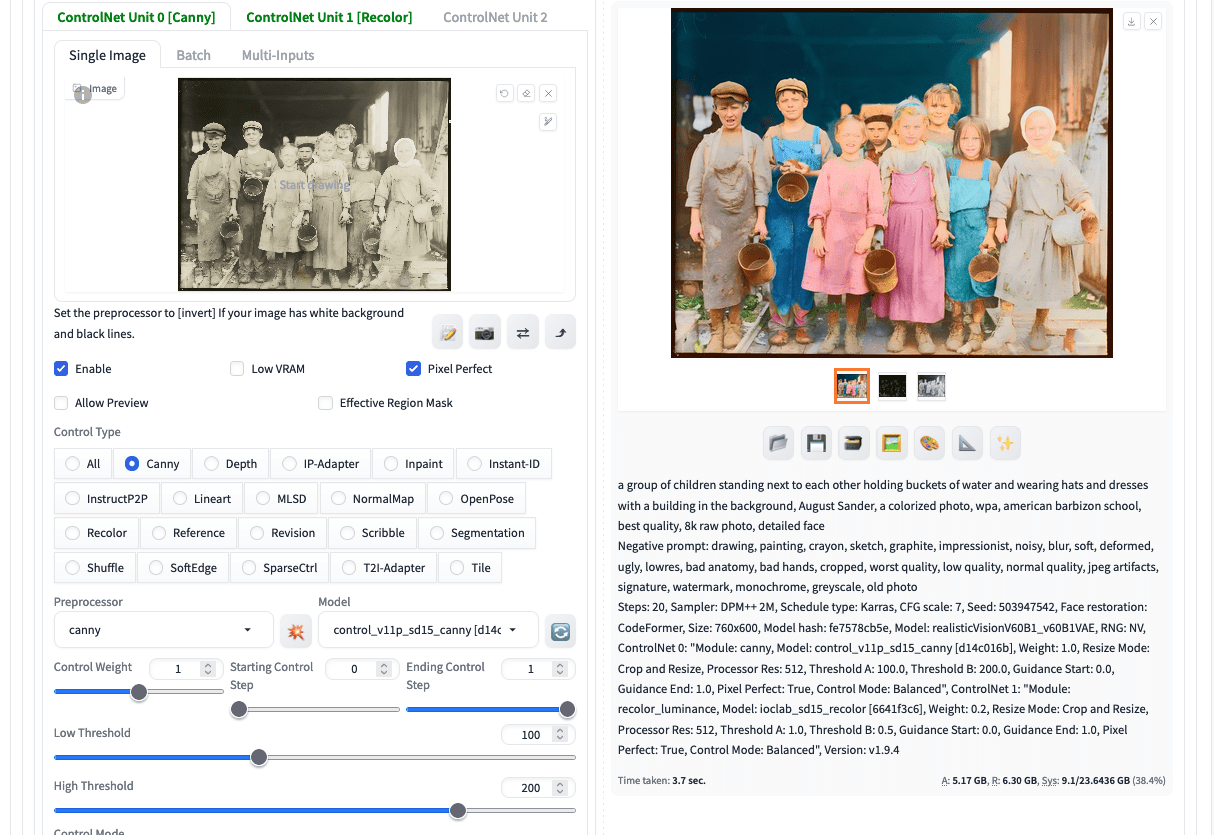
An outdated photograph colorized utilizing Steady Diffusion
You’ll be able to obtain the end result. Let’s see what you get:
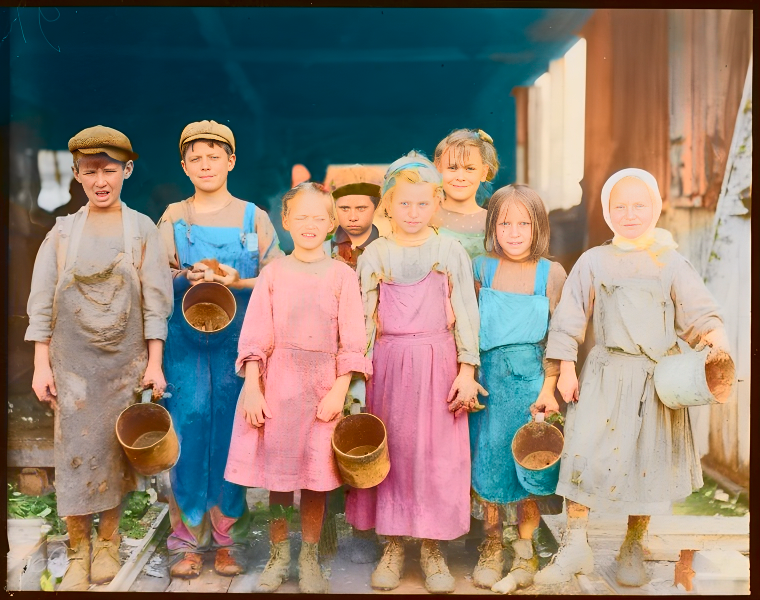
The reconstructed outdated photograph.
This photograph is a bit overexposed however you possibly can see an outdated photograph revived. All the main points are preserved: All individual’s facial features are saved, the stains on the garments they wore, and so forth.
However how does it work? That is asking Steady Diffusion to redraw the photograph. Therefore, you want a immediate to information the diffusion technique of the draw. However to manage exactly the form and individuals, you used the Canny kind ControlNet to stipulate the drawing and ask the diffusion course of to suit into the define. Nevertheless, this define isn’t good as a result of the Canny edge detection algorithm doesn’t convert an image right into a line drawing. To decrease the distortion, you employ the second ControlNet unit to recolor the enter photograph based mostly on brightness. All the unique colours have been ignored (and there have been none), and colours have been stuffed based mostly on a machine studying mannequin. Nevertheless, you don’t want these defects within the photograph. Therefore, you set the next weight for Canny and a a lot decrease weight for Recolor.
If you happen to click on the generate button once more, you may even see individuals sporting garments of various colours. It’s because the mannequin isn’t assured about what colour they need to be sporting. It’s possible you’ll wish to describe their colour within the immediate to manage that. You may also attempt to flip off one of many ControlNet items and observe the end result. The most effective end result ought to solely be obtained when each are working collectively.
Word a couple of photograph with faces: In case your authentic photograph is in dangerous form that the individuals’s faces should not very recognizable, you wish to activate ADetailer to reconstruct the faces. However do this solely when essential! In any other case you might discover your photograph are depicting solely totally different individual.
Within the above, the output was set to decision 760×600. However you might have considered trying the next decision than the Steady Diffusion mannequin can assist. You need to use the “Hires. repair” function in txt2img to run an upscaler after the picture is generated. The choices are similar to that in Additional tab. However keep in mind to set the denoising power within the upscaler to a low worth (reminiscent of 0.2) as a result of you don’t want to impose further distortion.
Additional Readings
This part offers extra assets on the subject if you wish to go deeper.
Abstract
On this publish, you cleaned up an outdated photograph. You eliminated the defects and coloured a black-and-white photograph, bringing the photograph to the trendy day. Within the course of, you used textual prompts to drive the diffusion course of to generate photos on the coarse degree. Then you definately use ControlNet to high quality tune the output. You managed the ambiance at a rough degree and preserved the element on the high quality degree. Steady Diffusion is to fill the hole and rebuilt the photograph.
Get Began on Mastering Digital Artwork with Steady Diffusion!
Discover ways to make Steady Diffusion give you the results you want
…by studying some key parts within the picture era course of
Uncover how in my new E-book:
Mastering Digital Art with Stable Diffusion
This ebook provides self-study tutorials full with all of the working code in Python, guiding you from a novice to an skilled in picture era. It teaches you the way to arrange Steady Diffusion, fine-tune fashions, automate workflows, modify key parameters, and way more…all that can assist you create gorgeous digital artwork.