Speed up your generative AI distributed coaching workloads with the NVIDIA NeMo Framework on Amazon EKS
In in the present day’s quickly evolving panorama of synthetic intelligence (AI), coaching massive language fashions (LLMs) poses vital challenges. These fashions usually require huge computational sources and complex infrastructure to deal with the huge quantities of knowledge and sophisticated algorithms concerned. And not using a structured framework, the method can develop into prohibitively time-consuming, pricey, and sophisticated. Enterprises wrestle with managing distributed coaching workloads, environment friendly useful resource utilization, and mannequin accuracy and efficiency. That is the place the NVIDIA NeMo Framework comes into play. On this put up, we current a step-by-step information to run distributed coaching workloads on an Amazon Elastic Kubernetes Service (Amazon EKS) cluster.
NVIDIA NeMo Framework
NVIDIA NeMo is an end-to-end cloud-centered framework for coaching and deploying generative AI fashions with billions and trillions of parameters at scale. The NVIDIA NeMo Framework offers a complete set of instruments, scripts, and recipes to assist every stage of the LLM journey, from knowledge preparation to coaching and deployment. It presents a wide range of customization methods and is optimized for at-scale inference of fashions for each language and picture functions, utilizing multi-GPU and multi-node configurations. NVIDIA NeMo simplifies generative AI mannequin growth, making it cheaper and environment friendly for enterprises. By offering end-to-end pipelines, superior parallelism methods, memory-saving methods, and distributed checkpointing, NVIDIA NeMo makes certain AI mannequin coaching is streamlined, scalable, and high-performing.
The next are advantages of utilizing NVIDIA NeMo for distributed coaching:
- Finish-to-end pipelines for various levels reminiscent of knowledge preparation, coaching, and extra, which permits for a plug-and-play strategy on your customized knowledge
- Parallelism methods, together with the next:
- Knowledge parallelism
- Tensor parallelism
- Pipeline parallelism
- Sequence parallelism
- Skilled parallelism
- Context parallelism
- Reminiscence saving methods, together with the next:
- Selective activation recompute
- CPU offloading (activation, weights)
- Consideration, together with Flash Consideration (FA 1/2, FA-cuDNN), Grouped Question Consideration, Multi-Question Consideration, and Sliding Window Consideration
- Distributed optimizers, together with Torch FSDP, Distributed Optimizer (zero-1)
- Knowledge loaders for various architectures
- Distributed checkpointing
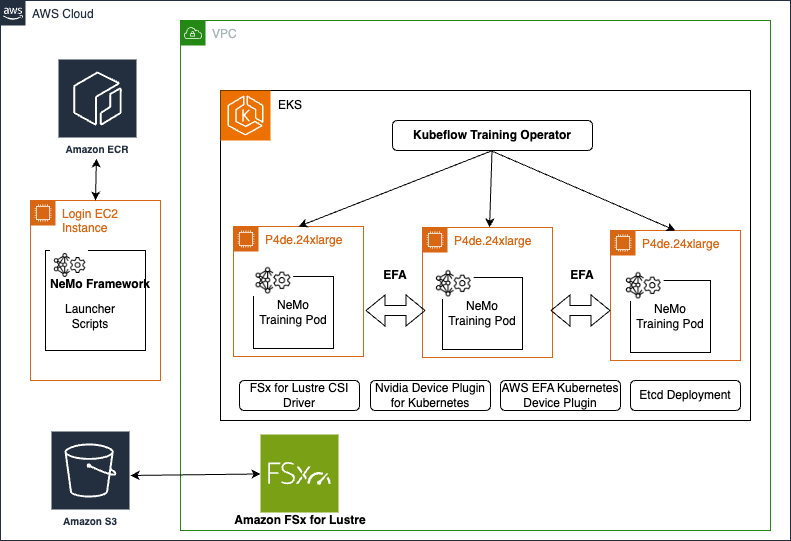
Answer overview
You possibly can deploy and handle NVIDIA NeMo utilizing both Slurm or Kubernetes orchestration platforms. Amazon EKS is a managed Kubernetes service that makes it easy to run Kubernetes clusters on AWS. It manages the supply and scalability of the Kubernetes management airplane, and it offers compute node auto scaling and lifecycle administration assist that can assist you run extremely out there container functions.
Amazon EKS is a perfect platform for operating distributed coaching workloads attributable to its sturdy integrations with AWS companies and efficiency options. It seamlessly integrates with Amazon FSx for Lustre, a high-throughput file system, enabling quick knowledge entry and administration utilizing persistent quantity claims with the FSx CSI driver. Amazon EKS additionally integrates with Amazon CloudWatch for complete logging and monitoring, offering insights into cluster efficiency and useful resource utilization. It helps Amazon Simple Storage Service (Amazon S3) for scalable and sturdy knowledge storage and administration, offering accessibility for big datasets. Enhanced community efficiency is achieved with Elastic Fabric Adapter (EFA), which presents low-latency, high-throughput connectivity between nodes. These options collectively make Amazon EKS a robust and environment friendly selection for optimizing AI and machine studying (ML) coaching workflows.
The next diagram exhibits the answer structure.

On this put up, we current the steps to run distributed coaching workloads on an EKS cluster. The high-level steps are as follows:
- Arrange an EFA enabled 2-node 24xlarge cluster.
- Arrange an FSx for Lustre file system so you may have a shared knowledge repository for storing coaching dataset and mannequin checkpoints.
- Arrange an atmosphere for NVIDIA NeMo.
- Modify the NVIDIA NeMo Kubernetes manifests to arrange a dataset and practice a mannequin.
Conditions
You want to have the ability to launch a CPU-based Amazon Elastic Compute Cloud (Amazon EC2) occasion that you just’ll use to create the EKS cluster. When your occasion is up and operating, SSH into your EC2 occasion and set up the next CLIs:
These steps might change if you’re on a non-Linux platform. Seek the advice of the previous documentation for putting in the CLIs on different platforms accordingly. We additionally require that you’ve a capability reservation with p4de.24xlarge situations and have the capacityReservationID.
Launch an EKS cluster
ECR p4de.24xlarge situations have the NVIDIA A100 80GB situations, that are extremely in style for distributed coaching generative AI workloads. For extra data, discuss with Amazon EC2 Instance Types. On this part, we present create an EKS cluster with an On-Demand Capacity Reservation for p4de.24xlarge situations.
- We offer the cluster creation config in p4de-cluster-config.yaml. See the next code:
The next are key factors to notice when creating this cluster:
- Be certain the kubectl model and the required Area are right.
- Replace the
capacityReservationIDdiscipline and ensure to specify theavailabilityZonesthroughout themanagedNodeGroupspart, which ought to be the identical Availability Zone ID wherein your capability lives. - This configuration will create two managed node teams: one for the system nodes utilizing
c5.2xlargesituations and one other for operating distributed coaching onp4de.24xlargesituations. Managed node teams will use Amazon EKS optimized AMIs. If you wish to present a customized AMI, you may create a self-managed node group and specify a customized AMI. To search out the AMI ID, discuss with Retrieving Amazon EKS optimized Amazon Linux AMI IDs. For extra particulars in regards to the Amazon EKS optimized AMI, see the GitHub repo. - Be certain
efaEnabledis about totrue. You should use the identical config for making a cluster with different node teams. For a listing of EFA supported occasion sorts, see Supported instance types. - One other in style occasion for generative AI distributed coaching workloads is the
p5.48xlargeoccasion with the NVIDIA H100 80 GB GPU. So as to add a P5 node group to an current EKS cluster, discuss with AWS CLI scripts for EKS management.
- After the cluster is created, you may allow kubectl to speak along with your cluster by including a brand new context to the kubectl config file:
- You possibly can affirm communication along with your cluster by operating the next command:
Subsequent, you may set up the AWS EFA Kubernetes Device Plugin. EFA is a community interface for EC2 situations that enhances the efficiency of inter-node communications, which is crucial for distributed coaching workloads that contain GPUs. This plugin permits Kubernetes to acknowledge and make the most of the EFA machine, facilitating high-throughput, low-latency networking needed for environment friendly distributed coaching and deep studying functions.
- Set up the plugin with the next code:
The NVIDIA device plugin for Kubernetes allows GPU assist inside your EKS cluster by exposing the GPUs to the Kubernetes API server via the kubelet. It advertises the out there GPU sources, permitting Kubernetes to schedule and handle GPU-accelerated workloads.
- Set up the plugin with the next code:
- Run the next command to confirm all of the pods:

- You possibly can run
kubectl get nodesto confirm the nodes.
Alternatively, you should use the EKS node viewer software to view nodes, their prices, and their standing in your cluster. After it’s put in, enter eks-node-viewer to get the next view.

The node viewer shows the IP addresses of our two p4de.24xlarge compute nodes.
- We are able to select one in all these non-public IP DNS names to additional study and describe the node as follows:
The previous command describes numerous element of the node. To verify EFA is put in accurately, be sure to see particulars as proven within the following screenshot.

For p4 nodes, you will notice vpc.amazonaws.com/efa:4 and for p5.48xlarge nodes, you must see vpc.amazonaws.com/efa:32.
If EFA is enabled within the node group, be sure that a safety group is connected to the nodes that enables a rule to permit all outgoing site visitors originating from the identical safety group. That is required for EFA to work. For directions, see Get started with EFA and MPI. This safety group is meant for testing functions solely. On your manufacturing environments, we advocate that you just create an inbound SSH rule that enables site visitors solely from the IP tackle from which you might be connecting, such because the IP tackle of your pc, or a variety of IP addresses in your native community.
Create an FSx for Lustre file system
For distributed coaching functions, usually tons of of GPU situations are used, with every node containing a number of GPUs. It’s essential that every one nodes can entry a shared file system to coach on the identical dataset effectively. For this function, a high-performance file system with excessive throughput and low latency is crucial. We advocate utilizing the FSx for Lustre file system for large-scale distributed coaching, as a result of it meets these necessities and offers seamless knowledge entry for all nodes concerned within the coaching course of.
To have a FSx for Lustre file system mounted in your EKS cluster, full the next steps:
- Use the next scripts to create an AWS Identity and Access Management (IAM) function and fix the FSx coverage:
- Use the next script to create a safety group that enables EKS nodes to entry the file system:
- Create a 1.2 TB Persistent_2 FSx for Lustre file system from the FSx for Lustre console in the identical Availability Zone as your compute situations (
FSX_SUBNET_ID), VPC of Amazon EKS (VPC_ID), and the safety group you created (SECURITY_GROUP_ID). - After the file system is created, observe the file system ID, DNS title, and mount title from the file system particulars web page.

Earlier than mounting the file system, it’s essential set up the FSx CSI driver that enables EKS clusters to handle the lifecycle of FSx for Lustre file methods.
- Set up the FSx CSI driver as follows:
- Subsequent, to mount the file system, present scripts within the fsx-storage-class.yaml, fsx-pv.yaml and fsx-pvc.yaml information:
You possibly can test to be sure that the volumes are in Sure state.

Arrange the atmosphere for NVIDIA NeMo
For this put up, we use the NVIDIA device plugin for Kubernetes, but when it’s essential set up the GPU Operator, you are able to do in order follows:
To allow distributed coaching, we use the KubeFlow Training Operator, which is crucial for managing and scheduling ML coaching jobs in a Kubernetes atmosphere. This operator simplifies the method of operating distributed coaching jobs by automating the deployment and scaling of the mandatory elements. See the next code:
Moreover, we use the KubeFlow MPI Operator for preprocessing coaching knowledge in parallel. The MPI Operator facilitates operating Message Passing Interface (MPI) jobs, that are essential for parallelizing the preprocessing duties throughout a number of nodes, thereby rushing up the coaching course of. See the next code:
The NVIDIA NeMo Framework is accessible publicly within the picture nvcr.io/nvidia/nemo:24.01.framework. We offer an AWS optimized Dockerfile to be used with P4 and P5 situations. We advocate the next library variations for optimum efficiency:
You possibly can construct and push the picture to Amazon Elastic Container Registry (Amazon ECR) as follows:
The NVIDIA NeMo Framework requires customers to supply config information with job and mannequin data. You possibly can copy the launcher scripts from the container as follows:
In a Slurm cluster implementation, the launcher scripts, knowledge, and outcomes folder might reside within the file system that each the pinnacle node (node from the place jobs are submitted) and compute nodes entry. However on this Amazon EKS implementation, the node that you just used to create the EKS cluster doesn’t have entry to EKS file system. To get round this, you may put the launcher scripts within the head node and the outcomes and knowledge folder within the file system that the compute nodes have entry to.
Run NVIDIA NeMo on an EKS cluster
We’re now able to arrange NVIDIA NeMo Kubernetes manifests for knowledge preparation and mannequin coaching. For extra details about operating it on premises, see Running NeMo Framework on Kubernetes. There are some modifications to be performed for it to run on Amazon EKS, as proven within the following steps. We offer the launcher scripts within the GitHub repo.
- Modify the launcher_scripts/conf/cluster/k8s.yaml file as follows. The
subPathdiscipline is the trail the place FSx for Lustre is mounted, which is/fsx-sharedon this case. - Set up the required Python packages; that is required in order that NeMo Launcher can submit jobs to the Kubernetes cluster:
Subsequent, we copy the next folders from the container to the /fsx-shared/knowledge folder:
NeMo-Megatron-Launcher/launcher_scripts/knowledge/bpeNeMo-Megatron-Launcher/launcher_scripts/knowledge/nsfw
- To repeat information from EKS pods, you can begin a pod only for this function. Create a file
fsx-share-test.yamlas follows: - Run this pod and replica the information:
Just a few information should be up to date for knowledge preparation for it to work with the EKS cluster.
- Modify the launcher_scripts/conf/config.yaml file:
- For cluster, use
k8s. - For coaching, use
gpt3/126m. - For levels, this ought to be simply
data_preparationand no different levels. - For
launcher_scripts_path, use the trail to the NeMo Megatron launch scripts, which ought to finish with/launcher_scripts. - For
data_dir, use/fsx-shared/knowledge(the situation to retailer and browse the information). - For
base_results_dir, use/fsx-shared/outcomes(the situation to retailer the outcomes, checkpoints, and logs). - For container, use
${REPOSITORY}${IMAGE}${TAG}
- For cluster, use
- Modify the conf/data_preparation/gpt3/download_gpt3_pile.yaml file:
- Set
node_array_sizeto 2. - Set
file_numbersto “0-5”. With 5 information, it ought to be round 350 GB of knowledge
- Set
- Modify the nemo_launcher/core/k8s_templates/data_preparation/data-prep.yaml file:
- For those who get the error that
mpirun will not be discovered, add the total path to the executable/choose/amazon/openmpi/bin/mpirun. - Add
/fsx-sharedwithin the container quantity mount path. - Add the amount:
- For those who get the error that
- Launch the information preparation job:
python3 predominant.py
This script creates a Helm chart for the chosen stage (on this case, data_preparation) and runs the Helm chart routinely. Confer with Run NeMo Framework on Kubernetes for a proof of the information preparation course of. Be certain python3 is put in.
- You possibly can monitor your job standing and logs utilizing three instructions:
helm checklist, kubectl get pods, and kubectl logs --follow).

- When the job is completed, you may take away the Helm chart:
helm uninstall download-gpt3-pile
You possibly can see the downloaded the information within the /fsx-shared folder by operating in one of many pods as kubectl exec -it nlp-worker-0 bash.

Coaching
Now that our knowledge preparation is full, we’re prepared to coach our mannequin with the created dataset. Full the next steps:
- Modify a parameter within the
conf/config.yamlfile:- Set
levelstocoachingand no different levels.
- Set
- Modify parameters in
conf/coaching/gpt3/126m.yaml:- Set
num_nodesto 2. - Set
unitsto 1. - On line 18, change
use_distributed_sampler:Falsetoreplace_sampler_ddp:False.
- Set
Optionally, if you wish to use a mock dataset as an alternative of actual dataset for testing functions, you may modify the knowledge part as follows. You might be basically altering data_impl: mmap to data_impl: mock and assigning an empty checklist to data_prefix.
- Modify the parameters within the
nemo_launcher/core/k8s_templates/coaching/coaching.yamlfile: - Run
python3 predominant.pyto begin coaching and you must see the coaching pods by operatingkubectl get podsas follows:
Along with monitoring your job utilizing helm checklist, kubectl get pods, and kubectl logs –comply with, you can even SSH into your pod with kubectl exec and use nvidia-smi to test GPU standing.
- When the job is completed, you may delete the helm chart:
helm uninstall gpt3-126m
Mannequin checkpoints are saved at /fsx-shared/outcomes/checkpoints together with different coaching logs and TensorBoard occasions. By default, checkpoints are saved at each 2,000 steps. You possibly can modify the conf/coaching/gpt3/126m.yaml file to make adjustments within the coaching setup.
Troubleshooting deployment failures
If deployment fails attributable to incorrect setup or configuration, full the next debug steps:
- Discover the error message by operating
kubectl logs --follow PODNAME and kubectl describe pod PODNAME. - Cease any operating jobs by eradicating the Helm chart. This may be performed by operating
helm uninstall CHARTNAME.
Pods ought to be spun down after eradicating the Helm chart.
- You possibly can double-check by operating
kubectl get pods. - If pods are usually not spun down, you may manually cease them by operating
kubectl delete PODNAME.
Primarily based on the error message, you could discover errors from:
- Unready nodes.
- Lacking Operators or CRDs. On this case, make sure that your
kubectl get pods -Aoutput seems like that proven earlier. If errors exist, attempt reinstalling Operators and CRDs. - NeMo Framework scripts or Kubernetes manifests. That is extra seemingly a bug or mistaken setup on the NeMo facet. Errors can fluctuate.
Clear up
It’s necessary to spin down sources after mannequin coaching in an effort to keep away from prices related to operating idle situations. To scrub up our setup, we should delete the FSx for Lustre file system earlier than deleting the cluster as a result of it’s related to a subnet within the cluster’s VPC.
- To delete the file system integration with the EKS cluster, run the next command:
Not solely will this delete the persistent quantity, it should additionally delete the EFS file system and all the information on the file system will probably be misplaced.
- When Step 1 is full, delete the cluster through the use of the next script:
This can delete all the prevailing pods, take away the cluster, and delete the VPC you created to start with.
Conclusion
On this put up, we demonstrated practice generative AI fashions at scale utilizing the NeMo Framework inside an EKS cluster. We lined the challenges of coaching LLMs and the way NeMo’s complete instruments and optimizations tackle these challenges, making the method extra environment friendly and cost-effective. With NeMo, you may handle and scale distributed coaching workloads successfully. This put up works with P4de situations. One other in style occasion for generative AI distributed coaching workloads is the p5.48xlarge occasion with the NVIDIA H100 80 GB GPU. So as to add a P5 node group to an current EKS cluster, discuss with AWS CLI scripts for EKS management.
That will help you get began, we now have revealed a GitHub repository that gives step-by-step directions for creating an EKS cluster with P4de situations, mounting an FSx for Lustre file system, and operating distributed coaching workloads with NeMo. This information empowers you to harness the total potential of NeMo and Amazon EKS on your AI mannequin coaching wants.
In regards to the authors
 Ankur Srivastava is a Sr. Options Architect within the ML Frameworks Crew. He focuses on serving to clients with self-managed distributed coaching and inference at scale on AWS. His expertise consists of industrial predictive upkeep, digital twins, probabilistic design optimization and has accomplished his doctoral research from Mechanical Engineering at Rice College and post-doctoral analysis from Massachusetts Institute of Expertise.
 Akshit Arora is a senior knowledge scientist at NVIDIA, the place he works on deploying conversational AI fashions on GPUs at scale. He’s a graduate of College of Colorado at Boulder, the place he utilized deep studying to enhance data monitoring on a Okay-12 on-line tutoring platform. His work spans multilingual text-to-speech, time sequence classification, ed-tech, and sensible functions of deep studying.
 Eliuth Triana Isaza is a Developer Relations Supervisor at NVIDIA empowering Amazon’s AI MLOps, DevOps, Scientists and AWS technical specialists to grasp the NVIDIA computing stack for accelerating and optimizing Generative AI Basis fashions spanning from knowledge curation, GPU coaching, mannequin inference and manufacturing deployment on AWS GPU situations. As well as, Eliuth is a passionate mountain biker, skier, tennis and poker participant.
 Wenhan Tan is a Options Architect at Nvidia helping clients to undertake Nvidia AI options at large-scale. His work focuses on accelerating deep studying functions and addressing inference and coaching challenges.