Create {custom} pictures for geospatial evaluation with Amazon SageMaker Distribution in Amazon SageMaker Studio
Amazon SageMaker Studio offers a complete suite of absolutely managed built-in improvement environments (IDEs) for machine studying (ML), together with JupyterLab, Code Editor (primarily based on Code-OSS), and RStudio. It helps all levels of ML improvement—from information preparation to deployment, and permits you to launch a preconfigured JupyterLab IDE for environment friendly coding inside seconds. Moreover, its versatile interface and synthetic intelligence (AI) powered coding assistant simplifies and enhances the ML workflow configuration, debugging, and code testing.
Geospatial data resembling satellite tv for pc pictures, coordinate traces, or aerial maps which can be enriched with traits or attributes of different enterprise and environmental datasets is turning into more and more out there. This unlocks precious use instances in fields resembling environmental monitoring, city planning, agriculture, catastrophe response, transportation, and public well being.
To successfully make the most of the wealth of knowledge contained in such datasets for ML and analytics, entry to the correct instruments for geospatial information dealing with is essential. That is particularly related on condition that geospatial information usually is available in specialised file codecs resembling Cloud Optimized GeoTIFF (COG), Zarr recordsdata, GeoJSON, and GeoParquet that require devoted software program instruments and libraries to work with.
To handle these particular wants inside SageMaker Studio, this submit reveals you the right way to lengthen Amazon SageMaker Distribution with extra dependencies to create a {custom} container picture tailor-made for geospatial evaluation. Though the instance on this submit focuses on geospatial information science, the methodology offered might be utilized to any type of {custom} picture primarily based on SageMaker Distribution.
SageMaker Distribution pictures are Docker pictures that include preinstalled information science packages and are preconfigured with a JupyterLab IDE, which lets you use these pictures within the SageMaker Studio UI in addition to for non-interactive workflows like processing or coaching. This lets you use the identical runtime throughout SageMaker Studio notebooks and asynchronous jobs like processing or coaching, facilitating a seamless transition from native experimentation to batch execution whereas solely having to keep up a single Docker picture.
On this submit, we offer step-by-step steering on how one can construct and use {custom} container pictures in SageMaker Studio. Particularly, we reveal how one can customise SageMaker Distribution for geospatial workflows by extending it with open-source geospatial Python libraries. We clarify the right way to construct and deploy the picture on AWS utilizing steady integration and supply (CI/CD) instruments and the right way to make the deployed picture accessible in SageMaker Studio. All code used on this submit, together with the Dockerfile and infrastructure as code (IaC) templates for fast deployment, is offered as a GitHub repository.
Resolution overview
You’ll be able to constructing a {custom} container picture and use it in SageMaker Studio with the next steps:
- Create a Dockerfile that features the extra Python libraries and instruments.
- Construct a {custom} container picture from the Dockerfile.
- Push the {custom} container picture to a personal repository on Amazon Elastic Container Registry (Amazon ECR).
- Connect the picture to your Amazon SageMaker Studio area.
- Entry the picture out of your JupyterLab house.
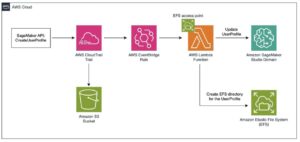
The next diagram illustrates the answer structure.
The answer makes use of AWS CodeBuild, a totally managed service that compiles supply code and produces deployable software program artifacts, to construct a brand new container picture from a Dockerfile. CodeBuild helps a broad number of git model management sources like AWS CodeCommit, GitHub, and GitLab. For this submit, we host our construct recordsdata on Amazon Simple Storage Service (Amazon S3) and use it because the supply supplier for the CodeBuild venture. You’ll be able to lengthen this resolution to work with different CI/CD tooling, together with GitLab, Jenkins, Harness, or different instruments.
CodeBuild retrieves the construct recordsdata from Amazon S3, runs a Docker construct, and pushes the ensuing container picture to a personal ECR repository. Amazon ECR is a managed container registry that facilitates the storage, administration, and deployment of container pictures.
The {custom} picture is then hooked up to a SageMaker Studio area and can be utilized by information scientists and information engineers as an IDE or as runtime for SageMaker processing or coaching jobs.
Conditions
This submit covers the default method for SageMaker Studio, which entails a managed community interface that enables web communication. We additionally embody steps to adapt this to be used inside a personal digital non-public cloud (VPC).
Earlier than you get began, confirm that you’ve the next conditions:
In the event you intend to comply with this submit and deploy the CodeBuild venture and the ECR repository utilizing IaC, you additionally want to put in the AWS Cloud Development Kit (AWS CDK) in your native machine. For directions, see Getting started with the AWS CDK. In the event you’re utilizing a cloud-based IDE like AWS Cloud9, the AWS CDK will often come preinstalled.
If you wish to securely deploy your {custom} container utilizing your non-public VPC, you additionally want the next:
- A VPC with a personal subnet
- VPC endpoints for the next providers:
To arrange a SageMaker Studio area with a personal VPC, see Connect Studio notebooks in a VPC to external resources.
Prolong SageMaker Distribution
By default, SageMaker Studio offers a number of curated pre-built Docker pictures as a part of SageMaker Distribution. These pictures embody widespread frameworks for ML, information science, and visualization, together with deep studying frameworks like PyTorch, TensorFlow and Keras; widespread Python packages like NumPy, scikit-learn, and pandas; and IDEs like JupyterLab and Code Editor. All put in libraries and packages are mutually suitable and are supplied with their newest suitable variations. Every distribution model is offered in two variants, CPU and GPU, and is hosted on the Amazon ECR Public Gallery. To have the ability to work with geospatial information in SageMaker Studio, you could extend SageMaker Distribution by including the required geospatial libraries like gdal, geospandas, leafmap, or rioxarray and make it accessible to customers by SageMaker Studio.
Let’s first assessment the right way to lengthen SageMaker Distribution for geospatial analyses and ML. To take action, we largely comply with the offered template for creating {custom} Docker recordsdata in SageMaker, with a number of refined however essential variations particular to the geospatial libraries we wish to set up. The total Dockerfile is as follows:
Let’s break down the important thing geospatial-specific modifications.
First, you put in the Geospatial Data Abstraction Library (GDAL) on Linux. GDAL is an open supply library that gives drivers for studying and writing raster and vector geospatial information codecs. It offers the spine for a lot of open supply and proprietary GIS purposes, together with the libraries used within the submit. That is carried out as follows (see see Install GDAL for Python for more details for extra particulars):
Now that you’ve created your {custom} geospatial Dockerfile, you possibly can construct it and push the picture to Amazon ECR.
Construct a {custom} geospatial picture
To construct the Docker picture, you want a construct atmosphere outfitted with Docker and the AWS Command Line Interface (AWS CLI). This atmosphere might be arrange in your native machine, in a cloud-based IDE like AWS Cloud9, or as a part of a steady integration service like CodeBuild.
Earlier than you construct the Docker picture, determine the ECR repository the place you’ll push the picture. Your picture should be tagged within the following format: <your-aws-account-id>.dkr.ecr.<your-aws-region>.amazonaws.com/<your-repository-name>:<tag>. With out this tag, pushing it to an ECR repository is just not doable. In the event you’re deploying the answer utilizing the AWS CDK, an ECR repository is robotically created, and a CodeBuild venture is configured to make use of this repository because the goal for pushing the picture. Whenever you provoke the CodeBuild construct, the picture is constructed, tagged, after which pushed to the beforehand created ECR repository.
The next steps are relevant provided that you select to carry out these actions manually.
To construct the picture manually, run the next command in the identical listing because the Dockerfile:
After constructing your picture, you need to log in to the ECR repository with this command earlier than pushing the picture:
Subsequent, push your Docker picture utilizing the next command:
Your picture has now been pushed to the ECR repository and you’ll proceed to connect it to SageMaker.
Connect the {custom} geospatial picture to SageMaker Studio
After your {custom} picture has been efficiently pushed to Amazon ECR, you could connect it to a SageMaker area to have the ability to use it inside SageMaker Studio.
- On the SageMaker console, select Domains beneath Admin configurations within the navigation pane.
In the event you don’t have a SageMaker area arrange but, you possibly can create one.
- From the listing of accessible domains, select the area to which you wish to connect the geospatial picture.
- On the Area particulars web page, select the Surroundings tab
- In Customized pictures for private Studio apps part, select Connect picture.

- Select New picture and enter the ECR picture URI from the construct pipeline output. This could have the next format
<your-aws-account-id>.dkr.ecr.<your-aws-region>.amazonaws.com/<your-repository-name>:<tag> - Select Subsequent.
- For Picture identify, enter a {custom} picture identify (for this submit, we use
custom-geospatial-sm-dist). - For Picture show identify, enter a {custom} show identify (for this submit, we use
Geospatial SageMaker Distribution (CPU)). - For Description, enter a picture description.

- Select JupyterLab picture as the applying kind and select Submit.

When returning to the Surroundings tab on the Area particulars web page, it is best to now see your picture listed beneath Customized pictures for private Studio apps.
Connect the {custom} geospatial picture utilizing the AWS CLI
You can too automate the method utilizing the AWS CLI.
First, register the picture in SageMaker and create a picture model:
Subsequent, create a file containing the next content material. You’ll be able to add a number of {custom} pictures by including extra entries to the CustomImages listing.
The following step assumes that you simply named the file from the earlier step default-user-settings.json. The next command attaches the SageMaker picture to the desired Studio area:
Use the {custom} geospatial Picture within the JupyterLab app
Within the earlier part, we demonstrated the right way to connect the picture to a SageMaker area. Whenever you create a brand new (or modify an current) JupyterLab house inside this area, the newly created {custom} picture will now be out there. You’ll be able to select it on the Picture dropdown menu, the place it now seems alongside the default AWS curated SageMaker Distribution picture variations beneath Customized.
To run an area utilizing the {custom} geospatial picture, select Geospatial SageMaker Distribution (CPU) as your picture, then select Run house.

After the house has been provisioned and is in Working state, select Open JupyterLab. This can deliver up the JupyterLab IDE in a brand new browser tab. Choose a pocket book with Python3 (ipykernel) to begin up a brand new Jupyter pocket book operating on prime of the {custom} geospatial picture.
Run interactive geospatial information analyses and large-scale processing jobs in SageMaker
After you construct the {custom} geospatial picture and fix it to your SageMaker area, you should use it in one among two predominant methods:
- You should utilize the picture as the bottom to run a JupyterLab pocket book kernel to carry out in-notebook interactive improvement and geospatial analytics.
- You should utilize the picture in a SageMaker processing job to run extremely parallelized geospatial processing pipelines. Reusing the interactive kernel picture for asynchronous batch processing might be advantageous as a result of solely a single picture should maintained and routines developed in an interactive method utilizing a pocket book might be anticipated to work seamlessly within the processing job. If startup latency attributable to longer picture load instances is a priority, you possibly can select to construct a devoted extra light-weight picture only for processing (see Build Your Own Processing Container for particulars).
For hands-on examples of each approaches, consult with the accompanying GitHub repository.
In-notebook interactive improvement utilizing a {custom} picture
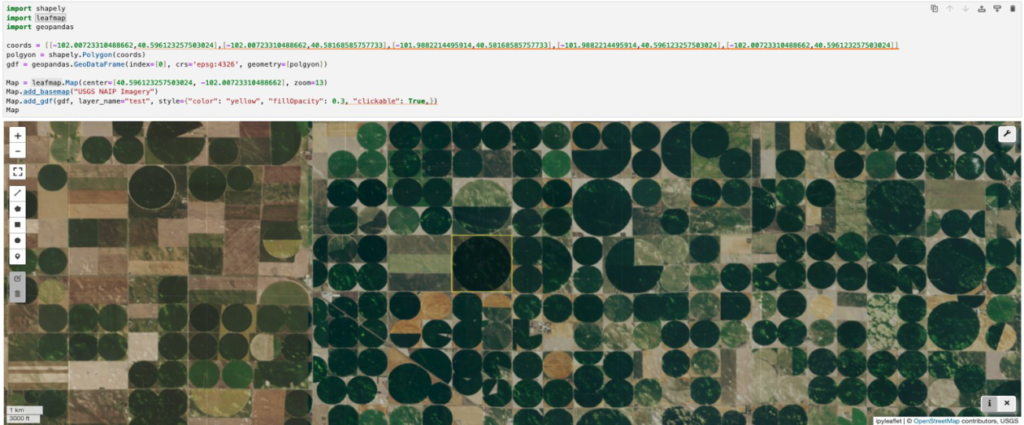
After you select the {custom} geospatial picture as the bottom picture in your JupyterLab house, SageMaker offers you with entry to many geospatial libraries that may now be imported with out the necessity for added installs. For instance, you possibly can run the next code to initialize a geometry object and plot it on a map inside the acquainted atmosphere of a pocket book:
import shapely
import leafmap
import geopandas

coords = [[-102.00723310488662,40.596123257503024],[-102.00723310488662,40.58168585757733],[-101.9882214495914,40.58168585757733],[-101.9882214495914,40.596123257503024],[-102.00723310488662,40.596123257503024]]
polgyon = shapely.Polygon(coords)
gdf = geopandas.GeoDataFrame(index=[0], crs="epsg:4326", geometry=[polgyon])
Map = leafmap.Map(heart=[40.596123257503024, -102.00723310488662], zoom=13)
Map.add_basemap("USGS NAIP Imagery")
Map.add_gdf(gdf, layer_name="take a look at", fashion={"colour": "yellow", "fillOpacity": 0.3, "clickable": True,})
Map
Extremely parallelized geospatial processing pipelines utilizing a SageMaker processing job and a {custom} picture
You’ll be able to specify the {custom} picture because the picture to run a SageMaker processing job. This allows you to use specialist geospatial processing frameworks to run large-scale distributed information processing pipelines with only a few strains of code. The next code snippet initializes after which runs a SageMaker ScriptProcessor object that makes use of the {custom} geospatial picture (specified utilizing the geospatial_image_uri variable) to run a geospatial processing routine (laid out in a processing script) on 20 ml.m5.2xlarge situations:
import sagemaker
from sagemaker import get_execution_role
from sagemaker.sklearn.processing import ScriptProcessor
from sagemaker.processing import ProcessingInput, ProcessingOutput

area = sagemaker.Session().boto_region_name
function = get_execution_role()

geospatial_image_uri = "<GEOSPATIAL-IMAGE-URI>" #<-- set to uri of the {custom} geospatial picture

processor_geospatial_data_cube = ScriptProcessor(
    command=['python3'],
    image_uri=geospatial_image_uri,
    function=function,
    instance_count=20,
    instance_type="ml.m5.2xlarge",
    base_job_name="aoi-data-cube"
)

processor_geospatial_data_cube.run(
    code="scripts/generate_aoi_data_cube.py", #<-- processing script
    inputs=[
        ProcessingInput(
            source=f"s3://{bucket_name}/{bucket_prefix_aoi_meta}/",
            destination='/opt/ml/processing/input/aoi_meta/', #<-- meta data (incl. geography) of the area of observation
            s3_data_distribution_type="FullyReplicated" #<-- sharding strategy for distribution across nodes
        ),
        ProcessingInput(
            source=f"s3://{bucket_name}/{bucket_prefix_sentinel2_meta}/",
            destination='/opt/ml/processing/input/sentinel2_meta/', #<-- Sentinel-2 scene metadata (1 file per scene)
            s3_data_distribution_type="ShardedByS3Key" #<-- sharding strategy for distribution across nodes
        ),
    ],
    outputs=[
        ProcessingOutput(
            source="/opt/ml/processing/output/",
            destination=f"s3://{bucket_name}/processing/geospatial-data-cube/{execution_id}/output/" #<-- output S3 path
        )
    ]
)
A typical processing routine involving raster file loading, clipping to an space of remark, resampling particular bands, and masking clouds amongst different steps throughout 134 110x110km Sentinel-2 scenes completes in beneath quarter-hour, as might be seen within the following Amazon CloudWatch dashboard.

Clear up
After you’re executed operating the pocket book, don’t neglect to stop the SageMaker Studio JupyterLab application to keep away from incurring pointless prices. In the event you deployed the extra infrastructure utilizing the AWS CDK, you possibly can delete the deployed stack by operating the next command in your native code checkout:
Conclusion
This submit has outfitted you with the information and instruments to construct and use {custom} container pictures tailor-made for geospatial evaluation in SageMaker Studio. By extending SageMaker Distribution with specialised geospatial libraries, you possibly can customise your atmosphere for specialised use instances. This empowers you to unlock the huge potential of geospatial information for purposes resembling environmental monitoring, city planning, and precision agriculture—all inside the acquainted and user-friendly atmosphere of SageMaker Studio.
Though this submit targeted on geospatial workflows, the methodology offered is broadly relevant. You’ll be able to make the most of the identical ideas to tailor container pictures for any area requiring particular libraries or instruments past the scope of SageMaker Distribution. This empowers you to create a really custom-made improvement expertise inside SageMaker Studio, catering to your distinctive venture wants.
The offered assets, together with pattern code and IaC templates, provide a stable basis for constructing your individual {custom} pictures. Experiment and discover how this method can streamline your ML workflows involving geospatial information or every other specialised area. To get began, go to the accompanying GitHub repository.
Concerning the Authors
 Janosch Woschitz is a Senior Options Architect at AWS, specializing in AI/ML. With over 15 years of expertise, he helps clients globally in leveraging AI and ML for progressive options and constructing ML platforms on AWS. His experience spans machine studying, information engineering, and scalable distributed programs, augmented by a powerful background in software program engineering and trade experience in domains resembling autonomous driving.
 Dr. Karsten Schroer is a Senior Machine Studying (ML) Prototyping Architect at AWS, targeted on serving to clients leverage synthetic intelligence (AI), ML, and generative AI applied sciences. With deep ML experience, he collaborates with firms throughout industries to design and implement data- and AI-driven options that generate enterprise worth. Karsten holds a PhD in utilized ML.
 Anirudh Viswanathan is a Senior Product Supervisor, Technical, at AWS with the SageMaker workforce, the place he focuses on Machine Studying. He holds a Grasp’s in Robotics from Carnegie Mellon College and an MBA from the Wharton Faculty of Enterprise. Anirudh is a named inventor on greater than 50 AI/ML patents. He enjoys long-distance operating, exploring artwork galleries, and attending Broadway reveals.