Scalable clever doc processing utilizing Amazon Bedrock
In as we speak’s data-driven enterprise panorama, the flexibility to effectively extract and course of data from a variety of paperwork is essential for knowledgeable decision-making and sustaining a aggressive edge. Nonetheless, conventional doc processing workflows typically contain advanced and time-consuming handbook duties, hindering productiveness and scalability.
On this submit, we focus on an strategy that makes use of the Anthropic Claude 3 Haiku mannequin on Amazon Bedrock to boost doc processing capabilities. Amazon Bedrock is a totally managed service that makes basis fashions (FMs) from main synthetic intelligence (AI) startups and Amazon out there by means of an API, so you’ll be able to select from a variety of FMs to search out the mannequin that’s finest suited to your use case. With the Amazon Bedrock serverless expertise, you will get began rapidly, privately customise FMs with your personal information, and combine and deploy them into your purposes utilizing the AWS instruments with out having to handle any infrastructure.
On the coronary heart of this answer lies the Anthropic Claude 3 Haiku mannequin, the quickest and most reasonably priced mannequin in its intelligence class. With state-of-the-art imaginative and prescient capabilities and powerful efficiency on trade benchmarks, Anthropic Claude 3 Haiku is a flexible answer for a variety of enterprise purposes. By utilizing the superior pure language processing (NLP) capabilities of Anthropic Claude 3 Haiku, our clever doc processing (IDP) answer can extract useful information straight from pictures, eliminating the necessity for advanced postprocessing.
Scalable and environment friendly information extraction
Our answer overcomes the normal limitations of doc processing by addressing the next key challenges:
- Easy prompt-based extraction – This answer permits you to outline the precise information it’s good to extract from the paperwork by means of intuitive prompts. The Anthropic Claude 3 Haiku mannequin then processes the paperwork and returns the specified data, streamlining your complete workflow.
- Dealing with bigger file sizes and multipage paperwork – To offer scalability and adaptability, this answer integrates further AWS providers to deal with file sizes past the 5 MB restrict of Anthropic Claude 3 Haiku. The answer can course of each PDFs and picture recordsdata, together with multipage paperwork, offering complete processing for unparalleled effectivity.
With the superior NLP capabilities of the Anthropic Claude 3 Haiku mannequin, our answer can straight extract the precise information you want with out requiring advanced postprocessing or parsing the output. This strategy simplifies the workflow and permits extra focused and environment friendly doc processing than conventional OCR-based options.
Confidence scores and human overview
Sustaining information accuracy and high quality is paramount in any doc processing answer. This answer incorporates customizable guidelines, permitting you to outline the standards for invoking a human overview. This supplies a seamless collaboration between the automated extraction and human experience, delivering high-quality outcomes that meet your particular necessities.
On this submit, we present how you need to use Amazon Bedrock and Amazon Augmented AI (Amazon A2I) to construct a workflow that allows multipage PDF doc processing with a human reviewer loop.
Resolution overview
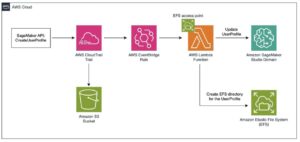
The next structure exhibits how one can have a serverless structure to course of multipage PDF paperwork or pictures with a human overview. To implement this structure, we reap the benefits of AWS Step Functions to construct the general workflow. Because the workflow begins, it extracts particular person pages from the multipage PDF doc. It then makes use of the Map state to course of a number of pages concurrently utilizing the Amazon Bedrock API. After the information is extracted from the doc, it validates in opposition to the enterprise guidelines and sends the doc to Amazon A2I for a human to overview if any enterprise guidelines fail. Reviewers use the Amazon A2I UI (a customizable web site) to confirm the extraction consequence. When the human overview is full, the callback task token is used to renew the state machine and retailer the output in an Amazon DynamoDB desk.

You may deploy this answer following the steps on this submit.
Conditions
For this walkthrough, you want the next:
Create an AWS Cloud9 IDE
We use an AWS Cloud9 built-in growth surroundings (IDE) to deploy the answer. It supplies a handy technique to entry a full growth and construct surroundings. Full the next steps:
- Check in to the AWS Management Console by means of your AWS account.
- Choose the AWS Area during which you wish to deploy the answer.
- On the AWS Cloud9 console, select Create surroundings.
- Identify your surroundings mycloud9.
- Select “t3.small” occasion on the Amazon Linux2 platform.
- Select Create.

AWS Cloud9 robotically creates and units up a brand new Amazon Elastic Compute Cloud (Amazon EC2) occasion in your account.
- When the surroundings is prepared, choose it and select Open.

The AWS Cloud9 occasion opens in a brand new terminal tab, as proven within the following screenshot.

Clone the supply code to deploy the answer
Now that your AWS Cloud9 IDE is about up, you’ll be able to proceed with the next steps to deploy the answer.
Verify the Node.js model
AWS Cloud9 preinstalls Node.js. You may affirm the put in model by working the next command:
It is best to see output like the next:
In the event you’re on v20.x or greater, you’ll be able to skip to the steps in “Set up the AWS CDK” part. In the event you’re on a distinct model of Node.js, full the next steps:
- In an AWS Cloud9 terminal, run the next command to verify you may have the newest model of Node.js Version Manager (nvm) :
- Set up Node.js 20:
- Verify the present Node.js model by working the next command:
Set up the AWS CDK
Verify whether or not you have already got the AWS Cloud Development Kit (AWS CDK) put in. To do that, with the terminal session nonetheless open within the IDE, run the next command:
If the AWS CDK is put in, the output accommodates the AWS CDK model and construct numbers. On this case, you’ll be able to skip to the steps in “Obtain the supply code” part. In any other case, full the next steps:
- Set up the AWS CDK by working the npm command together with the set up motion, the identify of the AWS CDK bundle to put in, and the -g choice to put in the bundle globally within the surroundings:
- To verify that the AWS CDK is put in and appropriately referenced, run the cdk command with the –model choice:
If profitable, the AWS CDK model and construct numbers are displayed.
Obtain the supply code kind the GitHub repo
Full the next steps to obtain the supply code:
- In an AWS Cloud9 terminal, clone the GitHub repo:
- Run the next instructions to create the Sharp npm bundle and replica the bundle to the supply code:
- Change to the repository listing:
- Run the next command:
The primary time you deploy an AWS CDK app into an surroundings for a selected AWS account and Area mixture, you need to set up a bootstrap stack. This stack contains numerous sources that the AWS CDK wants to finish its operations. For instance, this stack contains an Amazon Simple Storage Service (Amazon S3) bucket that the AWS CDK makes use of to retailer templates and belongings throughout its deployment processes.
- To put in the bootstrap stack, run the next command:
- From the mission’s root listing, run the next command to deploy the stack:
If profitable, the output shows that the stack deployed with out errors.
The final step is to replace the cross-origin resource sharing (CORS) for the S3 bucket.
- On the Amazon S3 console, select Buckets within the navigation pane.
- Select the identify of the bucket that was created within the AWS CDK deployment step. It ought to have a reputation format like multipagepdfa2i-multipagepdf-xxxxxxxxx.
- Select Permissions.
- Within the Cross-origin useful resource sharing (CORS) part, select Edit.
- Within the CORS configuration editor textual content field, enter the next CORS configuration:
- Select Save modifications.
Create a personal work group
A work group is a bunch of individuals you choose to overview your paperwork. You may create a piece group from a workforce, which is made up of Amazon Mechanical Turk staff, vendor-managed staff, or your personal personal staff that you simply invite to work in your duties. Whichever workforce kind you select, Amazon A2I takes care of sending duties to staff. For this answer, you create a piece group utilizing a personal workforce and add your self to the group to preview the Amazon A2I workflow.
To create and handle your personal workforce, you need to use the Amazon SageMaker console. You may create a personal workforce by coming into employee emails or importing a preexisting workforce from an Amazon Cognito person pool.
To create your personal work group, full the next steps:
- On the SageMaker console, select Labeling workforces below Floor Fact within the navigation pane.
- On the Personal tab, select Create personal group.

- Select Invite new staff by e mail.
- Within the E-mail addresses field, enter the e-mail addresses to your work group (for this submit, enter your e mail tackle).
You may enter a listing of as much as 50 e mail addresses, separated by commas.
- Enter a corporation identify and speak to e mail.
- Select Create personal group.

After you create the personal group, you get an e mail invitation. The next screenshot exhibits an instance e mail.

After you select the hyperlink and alter your password, you’ll be registered as a verified employee for this group. The next screenshot exhibits the up to date data on the Personal tab.

Your one-person group is now prepared, and you may create a human overview workflow.
Create a human overview workflow
You outline the enterprise situations below which the Amazon Bedrock extracted content material ought to go to a human for overview. These enterprise situations are set in Parameter Store, a functionality of AWS Systems Manager. For instance, you’ll be able to search for particular keys within the doc. When the extraction is full, within the AWS Lambda operate, verify for these keys and their values. If the secret’s not current or the worth is clean, the shape will go for human overview.
Full the next steps to create a employee process template to your doc overview process:
- On the SageMaker console, select Employee process templates below Augmented AI within the navigation pane.
- Select Create template.

- Within the template properties part, enter a novel template identify for Template identify and choose Customized for Template kind.
- Copy the contents from the Custom template file you downloaded from GitHub repo and change the content material within the Template editor part.
- Select Create and the template might be created efficiently.
Subsequent, you create directions to assist staff full your doc overview process.
- Select Human overview workflows below Augmented AI within the navigation pane.
- Select Create human overview workflow.

- Within the Workflow settings part, for Identify, enter a novel workflow identify.
- For S3 bucket, enter the S3 bucket that was created within the AWS CDK deployment step. It ought to have a reputation format like
multipagepdfa2i-multipagepdf-xxxxxxxxx.
This bucket is the place Amazon A2I will retailer the human overview outcomes.
- For IAM position, select Create a brand new position for Amazon A2I to create a task robotically for you.
- For S3 buckets you specify, choose Particular S3 buckets.
- Enter the S3 bucket you specified earlier in Step 9; for instance,
multipagepdfa2i-multipagepdf-xxxxxxxxxx. - Select Create.

You see a affirmation when position creation is full, and your position is now pre-populated on the IAM position dropdown menu.

- For Job kind, choose Customized.

- Within the employee process template part, select the template that you simply beforehand created.
- For Job Description, enter “Evaluate the extracted content material from the doc and make modifications as wanted”.
- For Employee sorts, choose Personal.
- For Personal groups, select the work group you created earlier.
- Select Create.

You’re redirected to the Human overview workflows web page, the place you will note a affirmation message.

In a couple of seconds, the standing of the workflow might be modified to lively. File your new human overview workflow ARN, which you employ to configure your human loop in a later step.
Replace the answer with the human overview workflow
You’re now prepared so as to add your human overview workflow Amazon Useful resource Identify (ARN):
- Throughout the code you downloaded from GitHub repo, open the file
- Replace line 23 with the ARN that you simply copied earlier:
- Save the modifications you made.
- Deploy by coming into the next command:
Take a look at the answer with out enterprise guidelines validation
To check the answer with out utilizing a human overview, create a folder referred to as uploads within the S3 bucket multipagepdfa2i-multipagepdf-xxxxxxxxx and add the sample PDF document supplied. For instance, uploads/Very important-records-birth-application.pdf.
The content material might be extracted, and you will note the information within the DynamoDB desk
multipagepdfa2i-ddbtableVitalBirthDataXXXXX
Take a look at the answer with enterprise guidelines validation
Full the next steps to check the answer with a human overview:
- On the Systems Manager console , select Parameter Retailer within the navigation pane.
- Choose the Parameter
/business_rules/validationrequiedand replace the worth to sure. - add the sample PDF document supplied to the
uploadsfolder that you simply created earlier within the S3 bucketmultipagepdfa2i-multipagepdf-xxxxxxxxx - On the SageMaker console, select Labeling workforces below Floor Fact within the navigation pane.
- On the Personal tab, select the hyperlink below Labeling portal sign-in URL.

- Check in with the account you configured with Amazon Cognito.
- Choose the job you wish to full and select Begin working.

Within the reviewer UI, you will note directions and the doc to work on. You need to use the toolbox to zoom out and in, match picture, and reposition the doc.

This UI is particularly designed for document-processing duties. On the fitting aspect of the previous screenshot, the extracted information is robotically prefilled with the Amazon Bedrock response. As a employee, you’ll be able to rapidly discuss with this sidebar to ensure the extracted data is recognized appropriately.
Whenever you full the human overview, you will note the information within the DynamoDB desk
multipagepdfa2i-ddbtableVitalBirthDataXXXXX

Conclusion
On this submit, we confirmed you the way to use the Anthropic Claude 3 Haiku mannequin on Amazon Bedrock and Amazon A2I to robotically extract information from multipage PDF paperwork and pictures. We additionally demonstrated the way to conduct a human overview of the pages for given enterprise standards. By eliminating the necessity for advanced postprocessing, dealing with bigger file sizes, and integrating a versatile human overview course of, this answer might help your corporation unlock the true worth of your paperwork, drive knowledgeable decision-making, and achieve a aggressive edge available in the market.
General, this submit supplies a roadmap for constructing an scalable doc processing workflow utilizing Anthropic Claude fashions on Amazon Bedrock.
As subsequent steps, try What is Amazon Bedrock to start out utilizing the service. Comply with the Amazon Bedrock on the AWS Machine Learning Blog to maintain updated with new capabilities and use circumstances for Amazon Bedrock.
In regards to the Authors
 Venkata Kampana is a Senior Options Architect within the AWS Well being and Human Providers group and relies in Sacramento, CA. In that position, he helps public sector clients obtain their mission targets with well-architected options on AWS.
 Jim Daniel is the Public Well being lead at Amazon Net Providers. Beforehand, he held positions with the US Division of Well being and Human Providers for practically a decade, together with Director of Public Well being Innovation and Public Well being Coordinator. Earlier than his authorities service, Jim served because the Chief Data Officer for the Massachusetts Division of Public Well being.