Streamline customized mannequin creation and deployment for Amazon Bedrock with Provisioned Throughput utilizing Terraform
As prospects search to include their corpus of data into their generative synthetic intelligence (AI) functions, or to construct domain-specific fashions, their knowledge science groups usually need to conduct A/B testing and have repeatable experiments. On this publish, we talk about an answer that makes use of infrastructure as code (IaC) to outline the method of retrieving and formatting knowledge for mannequin customization and initiating the mannequin customization. This allows you to model and iterate as wanted.
With Amazon Bedrock, you may privately and securely customise basis fashions (FMs) with your individual knowledge to construct functions which can be particular to your area, group, and use case. With custom models, you may create distinctive consumer experiences that mirror your organization’s fashion, voice, and providers.
Amazon Bedrock helps two strategies of mannequin customization:
- Fine-tuning lets you enhance mannequin accuracy by offering your individual task-specific labeled coaching dataset and additional specialize your FMs.
- Continued pre-training lets you prepare fashions utilizing your individual unlabeled knowledge in a safe and managed surroundings and helps customer-managed keys. Continued pre-training helps fashions grow to be extra domain-specific by accumulating extra strong information and flexibility—past their authentic coaching.
On this publish, we offer steerage on the right way to create an Amazon Bedrock customized mannequin utilizing HashiCorp Terraform that lets you automate the method, together with getting ready datasets used for personalisation.
Terraform is an IaC software that lets you handle AWS assets, software program as a service (SaaS) assets, datasets, and extra, utilizing declarative configuration. Terraform gives the advantages of automation, versioning, and repeatability.
Resolution overview
We use Terraform to obtain a public dataset from the Hugging Face Hub, convert it to JSONL format, and add it to an Amazon Simple Storage Service (Amazon S3) bucket with a versioned prefix. We then create an Amazon Bedrock customized mannequin utilizing fine-tuning, and create a second mannequin utilizing continued pre-training. Lastly, we configure Provisioned Throughput for our new fashions so we will check and deploy the customized fashions for wider utilization.
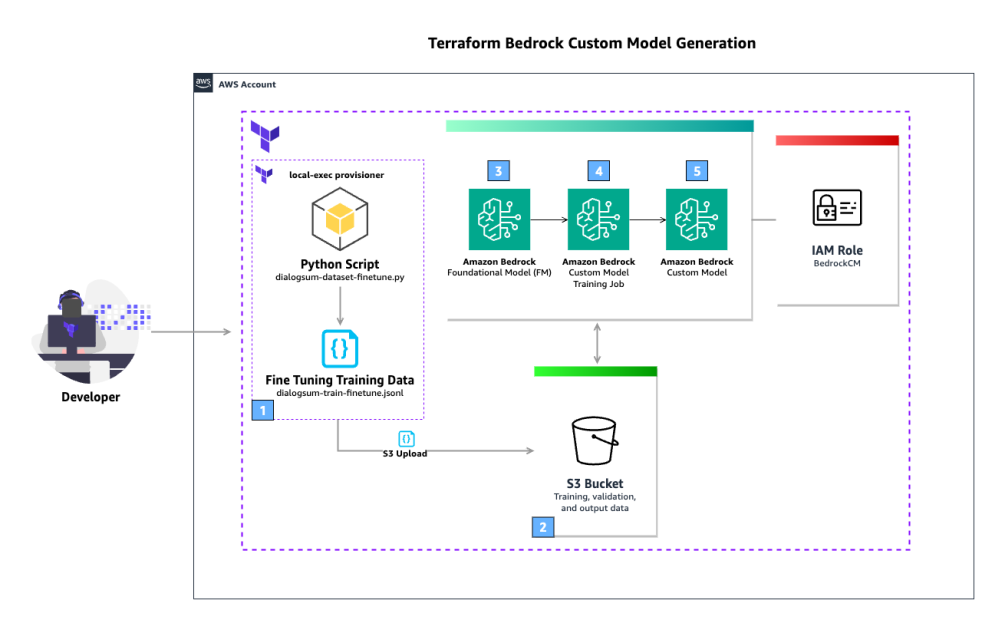
The next diagram illustrates the answer structure.

The workflow consists of the next steps:
- The consumer runs the
terraform applyThe Terraformlocal-execprovisioner is used to run a Python script that downloads the general public dataset DialogSum from the Hugging Face Hub. That is then used to create a fine-tuning coaching JSONL file. - An S3 bucket shops coaching, validation, and output knowledge. The generated JSONL file is uploaded to the S3 bucket.
- The FM outlined within the Terraform configuration is used because the supply for the customized mannequin coaching job.
- The customized mannequin coaching job makes use of the fine-tuning coaching knowledge saved within the S3 bucket to counterpoint the FM. Amazon Bedrock is ready to entry the info within the S3 bucket (together with output knowledge) as a result of AWS Identity and Access Management (IAM) position outlined within the Terraform configuration, which grants entry to the S3 bucket.
- When the customized mannequin coaching job is full, the brand new customized mannequin is on the market to be used.
The high-level steps to implement this answer are as follows:
- Create and initialize a Terraform venture.
- Create knowledge sources for context lookup.
- Create an S3 bucket to retailer coaching, validation, and output knowledge.
- Create an IAM service position that permits Amazon Bedrock to run a mannequin customization job, entry your coaching and validation knowledge, and write your output knowledge to your S3 bucket.
- Configure your native Python digital surroundings.
- Obtain the DialogSum public dataset and convert it to JSONL.
- Add the transformed dataset to Amazon S3.
- Create an Amazon Bedrock customized mannequin utilizing fine-tuning.
- Configure customized mannequin Provisioned Throughput to your fashions.
Conditions
This answer requires the next stipulations:
Create and initialize a Terraform venture
Full the next steps to create a brand new Terraform venture and initialize it. You may work in an area folder of your selecting.
- In your most well-liked terminal, create a brand new folder named
bedrockcmand alter to that folder:- If on Home windows, use the next code:
- If on Mac or Linux, use the next code:
Now you may work in a textual content editor and enter in code.
- In your most well-liked textual content editor, add a brand new file with the next Terraform code:
- Save the file within the root of the
bedrockcmfolder and title itprincipal.tf. - In your terminal, run the next command to initialize the Terraform working listing:
The output will comprise a profitable message like the next:
“Terraform has been efficiently initialized”
- In your terminal, validate the syntax to your Terraform recordsdata:
Create knowledge sources for context lookup
The following step is so as to add configurations that outline data sources that lookup details about the context Terraform is presently working in. These knowledge sources are used when defining the IAM position and insurance policies and when creating the S3 bucket. Extra data may be discovered within the Terraform documentation for aws_caller_identity, aws_partition, and aws_region.
- In your textual content editor, add the next Terraform code to your
principal.tffile:
- Save the file.
Create an S3 bucket
On this step, you employ Terraform to create an S3 bucket to make use of throughout mannequin customization and related outputs. S3 bucket names are globally distinctive, so you employ the Terraform knowledge supply aws_caller_identity, which lets you lookup the present AWS account ID, and use string interpolation to incorporate the account ID within the bucket title. Full the next steps:
- Add the next Terraform code to your
principal.tffile:
- Save the file.
Create an IAM service position for Amazon Bedrock
Now you create the service position that Amazon Bedrock will assume to function the mannequin customization jobs.
You first create a coverage doc, assume_role_policy, which defines the belief relationship for the IAM position. The coverage permits the bedrock.amazonaws.com service to imagine this position. You utilize global condition context keys for cross-service confused deputy prevention. There are additionally two circumstances you specify: the supply account should match the present account, and the supply ARN have to be an Amazon Bedrock mannequin customization job working from the present partition, AWS Area, and present account.
Full the next steps:
- Add the next Terraform code to your
principal.tffile:
The second coverage doc, bedrock_custom_policy, defines permissions for accessing the S3 bucket you created for mannequin coaching, validation, and output. The coverage permits the actions GetObject, PutObject, and ListBucket on the assets specified, that are the ARN of the model_training S3 bucket and the entire buckets contents. You’ll then create an aws_iam_policy useful resource, which creates the coverage in AWS.
- Add the next Terraform code to your
principal.tffile:
Lastly, the aws_iam_role useful resource, bedrock_custom_role, creates an IAM position with a reputation prefix of BedrockCM- and an outline. The position makes use of assume_role_policy as its belief coverage and bedrock_custom_policy as a managed coverage to permit the actions specified.
- Add the next Terraform code to your
principal.tffile:
- Save the file.
Configure your native Python digital surroundings
Python helps creating lightweight virtual environments, every with their very own unbiased set of Python packages put in. You create and activate a digital surroundings, after which set up the datasets bundle.
- In your terminal, within the root of the
bedrockcmfolder, run the next command to create a virtual environment:
- Activate the digital surroundings:
- If on Home windows, use the next command:
- If on Mac or Linux, use the next command:
Now you put in the datasets bundle by way of pip.
- In your terminal, run the next command to put in the datasets bundle:
Obtain the general public dataset
You now use Terraform’s local-exec provisioner to invoke an area Python script that can obtain the general public dataset DialogSum from the Hugging Face Hub. The dataset is already divided into coaching, validation, and testing splits. This instance makes use of simply the coaching cut up.
You prepare the data for training by eradicating the id and subject columns, renaming the dialogue and abstract columns, and truncating the dataset to 10,000 information. You then save the dataset in JSONL format. You could possibly additionally use your individual inner personal datasets; we use a public dataset for instance functions.
You first create the native Python script named dialogsum-dataset-finetune.py, which is used to obtain the dataset and reserve it to disk.
- In your textual content editor, add a brand new file with the next Python code:
- Save the file within the root of the
bedrockcmfolder and title itdialogsum-dataset-finetune.py.
Subsequent, you edit the principal.tf file you will have been working in and add the terraform_data useful resource kind, makes use of an area provisioner to invoke your Python script.
- In your textual content editor, edit the
principal.tffile and add the next Terraform code:
Add the transformed dataset to Amazon S3
Terraform gives the aws_s3_object useful resource kind, which lets you create and handle objects in S3 buckets. On this step, you reference the S3 bucket you created earlier and the terraform_data useful resource’s output attribute. This output attribute is the way you instruct the Terraform resource graph that these assets have to be created with a dependency order.
- In your textual content editor, edit the
principal.tffile and add the next Terraform code:
Create an Amazon Bedrock customized mannequin utilizing fine-tuning
Amazon Bedrock has a number of FMs that help customization with fine-tuning. To see an inventory of the fashions out there, use the next AWS Command Line Interface (AWS CLI) command:
- In your terminal, run the next command to listing the FMs that help customization by fine-tuning:
You utilize the Cohere Command-Gentle FM for this mannequin customization. You add a Terraform knowledge supply to question the inspiration mannequin ARN utilizing the mannequin title. You then create the Terraform useful resource definition for aws_bedrock_custom_model, which creates a model customization job, and instantly returns.
The time it takes for mannequin customization is non-deterministic, and is predicated on the enter parameters, mannequin used, and different elements.
- In your textual content editor, edit the
principal.tffile and add the next Terraform code:
- Save the file.
Now you employ Terraform to create the info sources and assets outlined in your principal.tf file, which can begin a mannequin customization job.
- In your terminal, run the next command to validate the syntax to your Terraform recordsdata:
- Run the next command to apply the configuration you created. Earlier than creating the assets, Terraform will describe all of the assets that shall be created so you may confirm your configuration:
Terraform will generate a plan and ask you to approve the actions, which can look much like the next code:
- Enter
sureto approve the adjustments.
Terraform will now apply your configuration. This course of runs for a couple of minutes. At the moment, your customized mannequin is just not but prepared to be used; it is going to be in a Coaching state. Look ahead to coaching to complete earlier than persevering with. You may evaluate the standing on the Amazon Bedrock console on the Customized fashions web page.

When the method is full, you obtain a message like the next:
You too can view the standing on the Amazon Bedrock console.

You may have now created an Amazon Bedrock customized mannequin utilizing fine-tuning.
Configure customized mannequin Provisioned Throughput
Amazon Bedrock lets you run inference on customized fashions by buying Provisioned Throughput. This ensures a constant degree of throughput in change for a time period dedication. You specify the variety of mannequin models wanted to satisfy your utility’s efficiency wants. For evaluating customized fashions initially, you should buy Provisioned Throughput hourly (on-demand) with no long-term dedication. With no dedication, a quota of 1 mannequin unit is on the market per Provisioned Throughput.
You create a brand new useful resource for Provisioned Throughput, affiliate one among your customized fashions, and supply a reputation. You omit the commitment_duration attribute to make use of on-demand.
- In your textual content editor, edit the
principal.tffile and add the next Terraform code:
- Save the file.
Now you employ Terraform to create the assets outlined in your principal.tf file.
- In your terminal, run the next command to re-initialize the Terraform working listing:
The output will comprise a profitable message like the next:
- Validate the syntax to your Terraform recordsdata:
- Run the next command to apply the configuration you created:
Greatest practices and issues
Observe the next greatest practices when utilizing this answer:
- Knowledge and mannequin versioning – You may model your datasets and fashions by utilizing model identifiers in your S3 bucket prefixes. This lets you evaluate mannequin efficacy and outputs. You could possibly even function a brand new mannequin in a shadow deployment in order that your group can consider the output relative to your fashions being utilized in manufacturing.
- Knowledge privateness and community safety – With Amazon Bedrock, you’re accountable for your knowledge, and all of your inputs and customizations stay personal to your AWS account. Your knowledge, akin to prompts, completions, customized fashions, and knowledge used for fine-tuning or continued pre-training, is just not used for service enchancment and is rarely shared with third-party mannequin suppliers. Your knowledge stays within the Area the place the API name is processed. All knowledge is encrypted in transit and at relaxation. You should use AWS PrivateLink to create a personal connection between your VPC and Amazon Bedrock.
- Billing – Amazon Bedrock costs for mannequin customization, storage, and inference. Mannequin customization is charged per tokens processed. That is the variety of tokens within the coaching dataset multiplied by the variety of coaching epochs. An epoch is one full cross via the coaching knowledge throughout customization. Mannequin storage is charged monthly, per mannequin. Inference is charged hourly per mannequin unit utilizing Provisioned Throughput. For detailed pricing data, see Amazon Bedrock Pricing.
- Customized fashions and Provisioned Throughput – Amazon Bedrock lets you run inference on customized fashions by buying Provisioned Throughput. This ensures a constant degree of throughput in change for a time period dedication. You specify the variety of mannequin models wanted to satisfy your utility’s efficiency wants. For evaluating customized fashions initially, you should buy Provisioned Throughput hourly with no long-term dedication. With no dedication, a quota of 1 mannequin unit is on the market per Provisioned Throughput. You may create as much as two Provisioned Throughputs per account.
- Availability – High-quality-tuning help on Meta Llama 2, Cohere Command Gentle, and Amazon Titan Textual content FMs is on the market immediately in Areas US East (N. Virginia) and US West (Oregon). Continued pre-training is on the market immediately in public preview in Areas US East (N. Virginia) and US West (Oregon). To study extra, go to the Amazon Bedrock Developer Experience and take a look at Custom models.
Clear up
Once you not want the assets created as a part of this publish, clear up these assets to avoid wasting related prices. You may clear up the AWS assets created on this publish utilizing Terraform with the terraform destroy command.
First, you might want to modify the configuration of the S3 bucket within the principal.tf file to allow pressure destroy so the contents of the bucket shall be deleted, so the bucket itself may be deleted. This may take away the entire pattern knowledge contained within the S3 bucket in addition to the bucket itself. Make sure that there isn’t a knowledge you need to retain within the bucket earlier than continuing.
- Modify the declaration of your S3 bucket to set the
force_destroyattribute of the S3 bucket:
- Run the terraform apply command to replace the S3 bucket with this new configuration:
- Run the terraform destroy command to delete all assets created as a part of this publish:
Conclusion
On this publish, we demonstrated the right way to create Amazon Bedrock customized fashions utilizing Terraform. We launched GitOps to handle mannequin configuration and knowledge related together with your customized fashions.
We advocate testing the code and examples in your improvement surroundings, and making acceptable adjustments as required to make use of them in manufacturing. Think about your mannequin consumption necessities when defining your Provisioned Throughput.
We welcome your suggestions! In case you have questions or options, go away them within the feedback part.
In regards to the Authors
 Josh Famestad is a Options Architect at AWS serving to public sector prospects speed up development, add agility, and cut back threat with cloud-based options.
 Kevon Mayers is a Options Architect at AWS. Kevon is a Core Contributor for Terraform and has led a number of Terraform initiatives inside AWS. Previous to becoming a member of AWS, he was working as a DevOps engineer and developer, and earlier than that was working with the GRAMMYs/The Recording Academy as a studio supervisor, music producer, and audio engineer.
 Tyler Lynch is a Principal Resolution Architect at AWS. Tyler leads Terraform supplier engineering at AWS and is a Core Contributor for Terraform.