Construction and Relationships: Graph Neural Networks and a Pytorch Implementation | by Najib Sharifi | Mar, 2024
Let’s implement a regression instance the place the intention is to coach a community to foretell the worth of a node given the worth of all different nodes i.e. every node has a single function (which is a scalar worth). The intention of this instance is to leverage the inherent relational data encoded within the graph to precisely predict numerical values for every node. The important thing factor to notice is that we enter the numerical worth for all nodes besides the goal node (we masks the goal node worth with 0) then predict the goal node’s worth. For every information level, we repeat the method for all nodes. Maybe this may come throughout as a weird activity however lets see if we are able to predict the anticipated worth of any node given the values of the opposite nodes. The information used is the corresponding simulation information to a collection of sensors from trade and the graph construction I’ve chosen within the instance beneath is predicated on the precise course of construction. I’ve offered feedback within the code to make it simple to observe. You’ll find a duplicate of the dataset here (Observe: that is my very own information, generated from simulations).
This code and coaching process is way from being optimised nevertheless it’s intention is as an instance the implementation of GNNs and get an instinct for a way they work. A problem with the at the moment method I’ve performed that ought to undoubtedly not be performed this manner past studying functions is the masking of node function worth and predicting it from the neighbours function. Presently you’d need to loop over every node (not very environment friendly), a a lot better solution to do is the cease the mannequin from embody it’s personal options within the aggregation step and therefore you wouldn’t must do one node at a time however I assumed it’s simpler to construct instinct for the mannequin with the present technique:)
Preprocessing Knowledge
Importing the required libraries and Sensor information from CSV file. Normalise all information within the vary of 0 to 1.
import pandas as pd
import torch
from torch_geometric.information import Knowledge, Batch
from sklearn.preprocessing import StandardScaler, MinMaxScaler
from sklearn.model_selection import train_test_split
import numpy as np
from torch_geometric.information import DataLoader# load and scale the dataset
df = pd.read_csv('SensorDataSynthetic.csv').dropna()
scaler = MinMaxScaler()
df_scaled = pd.DataFrame(scaler.fit_transform(df), columns=df.columns)
Defining the connectivity (edge index) between nodes within the graph utilizing a PyTorch tensor — i.e. this supplies the system’s graphical topology.
nodes_order = [
'Sensor1', 'Sensor2', 'Sensor3', 'Sensor4',
'Sensor5', 'Sensor6', 'Sensor7', 'Sensor8'
]# outline the graph connectivity for the info
edges = torch.tensor([
[0, 1, 2, 2, 3, 3, 6, 2],  # supply nodes
[1, 2, 3, 4, 5, 6, 2, 7]   # goal nodes
], dtype=torch.lengthy)
The Knowledge imported from csv has a tabular construction however to make use of this in GNNs, it should be reworked to a graphical construction. Every row of information (one commentary) is represented as one graph. Iterate via Every Row to Create Graphical illustration of the info
A masks is created for every node/sensor to point the presence (1) or absence (0) of information, permitting for flexibility in dealing with lacking information. In most programs, there could also be gadgets with no information obtainable therefore the necessity for flexibility in dealing with lacking information. Cut up the info into coaching and testing units
graphs = []# iterate via every row of information to create a graph for every commentary
# some nodes is not going to have any information, not the case right here however created a masks to permit us to cope with any nodes that would not have information obtainable
for _, row in df_scaled.iterrows():
node_features = []
node_data_mask = []
for node in nodes_order:
if node in df_scaled.columns:
node_features.append([row[node]])
node_data_mask.append(1) # masks worth of to point current of information
else:
# lacking nodes function if essential
node_features.append(2)
node_data_mask.append(0) # information not current
node_features_tensor = torch.tensor(node_features, dtype=torch.float)
node_data_mask_tensor = torch.tensor(node_data_mask, dtype=torch.float)
# Create a Knowledge object for this row/graph
graph_data = Knowledge(x=node_features_tensor, edge_index=edges.t().contiguous(), masks = node_data_mask_tensor)
graphs.append(graph_data)
#### splitting the info into practice, take a look at commentary
# Cut up indices
observation_indices = df_scaled.index.tolist()
train_indices, test_indices = train_test_split(observation_indices, test_size=0.05, random_state=42)
# Create coaching and testing graphs
train_graphs = [graphs[i] for i in train_indices]
test_graphs = [graphs[i] for i in test_indices]
Graph Visualisation
The graph construction created above utilizing the sting indices might be visualised utilizing networkx.
import networkx as nx
import matplotlib.pyplot as pltG = nx.Graph()
for src, dst in edges.t().numpy():
G.add_edge(nodes_order[src], nodes_order[dst])
plt.determine(figsize=(10, 8))
pos = nx.spring_layout(G)
nx.draw(G, pos, with_labels=True, node_color='lightblue', edge_color='grey', node_size=2000, font_weight='daring')
plt.title('Graph Visualization')
plt.present()
Mannequin Definition
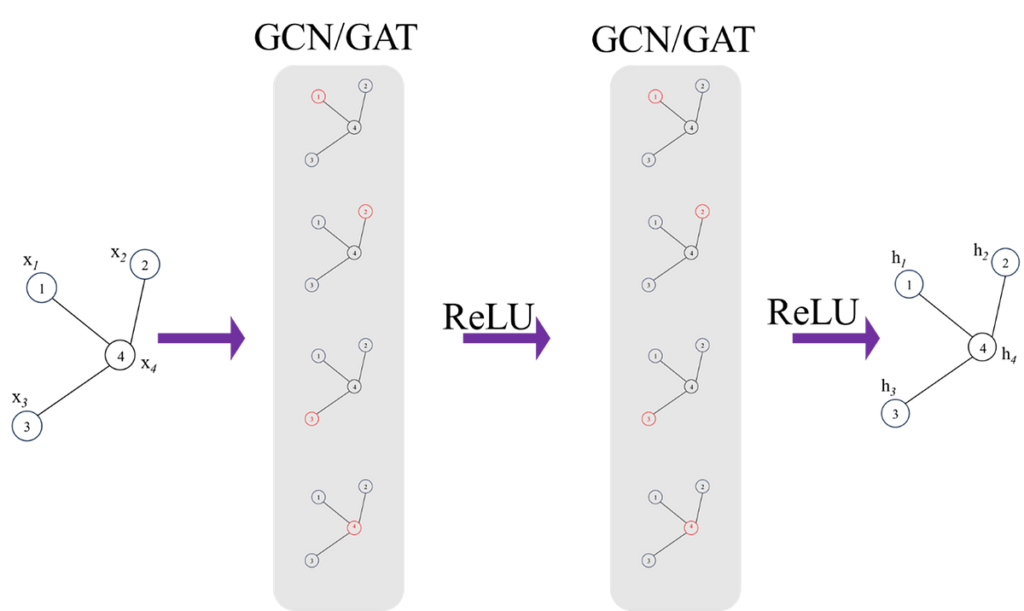
Let’s outline the mannequin. The mannequin incorporates 2 GAT convolutional layers. The primary layer transforms node options to an 8 dimensional house, and the second GAT layer additional reduces this to an 8-dimensional illustration.
GNNs are extremely prone to overfitting, regularation (dropout) is utilized after every GAT layer with a person outlined chance to stop over becoming. The dropout layer primarily randomly zeros among the components of the enter tensor throughout coaching.
The GAT convolution layer output outcomes are handed via a totally related (linear) layer to map the 8-dimensional output to the ultimate node function which on this case is a scalar worth per node.
Masking the worth of the goal Node; as talked about earlier, the intention of this of activity is to regress the worth of the goal node based mostly on the worth of it’s neighbours. That is the explanation behind masking/changing the goal node’s worth with zero.
from torch_geometric.nn import GATConv
import torch.nn.useful as F
import torch.nn as nnclass GNNModel(nn.Module):
def __init__(self, num_node_features):
tremendous(GNNModel, self).__init__()
self.conv1 = GATConv(num_node_features, 16)
self.conv2 = GATConv(16, 8)
self.fc = nn.Linear(8, 1) # Outputting a single worth per node
def ahead(self, information, target_node_idx=None):
x, edge_index = information.x, information.edge_index
edge_index = edge_index.T
x = x.clone()
# Masks the goal node's function with a worth of zero!
# Intention is to foretell this worth from the options of the neighbours
if target_node_idx is just not None:
x[target_node_idx] = torch.zeros_like(x[target_node_idx])
x = F.relu(self.conv1(x, edge_index))
x = F.dropout(x, p=0.05, coaching=self.coaching)
x = F.relu(self.conv2(x, edge_index))
x = F.relu(self.conv3(x, edge_index))
x = F.dropout(x, p=0.05, coaching=self.coaching)
x = self.fc(x)
return x
Coaching the mannequin
Initialising the mannequin and defining the optimiser, loss operate and the hyper parameters together with studying price, weight decay (for regularisation), batch_size and variety of epochs.
mannequin = GNNModel(num_node_features=1)
batch_size = 8
optimizer = torch.optim.Adam(mannequin.parameters(), lr=0.0002, weight_decay=1e-6)
criterion = torch.nn.MSELoss()
num_epochs = 200
train_loader = DataLoader(train_graphs, batch_size=1, shuffle=True)
mannequin.practice()
The coaching course of is pretty customary, every graph (one information level) of information is handed via the ahead move of the mannequin (iterating over every node and predicting the goal node. The loss from the prediction is gathered over the outlined batch measurement earlier than updating the GNN via backpropagation.
for epoch in vary(num_epochs):
accumulated_loss = 0
optimizer.zero_grad()
loss = 0
for batch_idx, information in enumerate(train_loader):
masks = information.masks
for i in vary(1,information.num_nodes):
if masks[i] == 1:  # Solely practice on nodes with information
output = mannequin(information, i)  # get predictions with the goal node masked
# test the feed ahead a part of the mannequin
goal = information.x[i]
prediction = output[i].view(1)
loss += criterion(prediction, goal)
#Replace parameters on the finish of every set of batches
if (batch_idx+1) % batch_size == 0 or (batch_idx +1 ) == len(train_loader):
loss.backward()
optimizer.step()
optimizer.zero_grad()
accumulated_loss += loss.merchandise()
loss = 0average_loss = accumulated_loss / len(train_loader)
print(f'Epoch {epoch+1}, Common Loss: {average_loss}')
Testing the educated mannequin
Utilizing the take a look at dataset, move every graph via the ahead move of the educated mannequin and predict every node’s worth based mostly on it’s neighbours worth.
test_loader = DataLoader(test_graphs, batch_size=1, shuffle=True)
mannequin.eval()precise = []
pred = []
for information in test_loader:
masks = information.masks
for i in vary(1,information.num_nodes):
output = mannequin(information, i)
prediction = output[i].view(1)
goal = information.x[i]
precise.append(goal)
pred.append(prediction)
Visualising the take a look at outcomes
Utilizing iplot we are able to visualise the anticipated values of nodes in opposition to the bottom reality values.
import plotly.graph_objects as go
from plotly.offline import iplotactual_values_float = [value.item() for value in actual]
pred_values_float = [value.item() for value in pred]
scatter_trace = go.Scatter(
x=actual_values_float,
y=pred_values_float,
mode='markers',
marker=dict(
measurement=10,
opacity=0.5,
shade='rgba(255,255,255,0)',
line=dict(
width=2,
shade='rgba(152, 0, 0, .8)',
)
),
title='Precise vs Predicted'
)
line_trace = go.Scatter(
x=[min(actual_values_float), max(actual_values_float)],
y=[min(actual_values_float), max(actual_values_float)],
mode='traces',
marker=dict(shade='blue'),
title='Excellent Prediction'
)
information = [scatter_trace, line_trace]
format = dict(
title='Precise vs Predicted Values',
xaxis=dict(title='Precise Values'),
yaxis=dict(title='Predicted Values'),
autosize=False,
width=800,
top=600
)
fig = dict(information=information, format=format)
iplot(fig)

Regardless of an absence of effective tuning the mannequin structure or hyperparameters, it has performed an honest job truly, we may tune the mannequin additional to get improved accuracy.
This brings us to the top of this text. GNNs are comparatively newer than different branches of machine studying, it will likely be very thrilling to see the developments of this subject but additionally it’s utility to totally different issues. Lastly, thanks for taking the time to learn this text, I hope you discovered it helpful in your understanding of GNNs or their mathematical background.
Except in any other case famous, all pictures are by the writer