Construct an end-to-end MLOps pipeline utilizing Amazon SageMaker Pipelines, GitHub, and GitHub Actions
Machine studying (ML) fashions don’t function in isolation. To ship worth, they need to combine into present manufacturing programs and infrastructure, which necessitates contemplating all the ML lifecycle throughout design and improvement. ML operations, often known as MLOps, deal with streamlining, automating, and monitoring ML fashions all through their lifecycle. Constructing a sturdy MLOps pipeline calls for cross-functional collaboration. Information scientists, ML engineers, IT employees, and DevOps groups should work collectively to operationalize fashions from analysis to deployment and upkeep. With the suitable processes and instruments, MLOps permits organizations to reliably and effectively undertake ML throughout their groups.
Though the necessities of steady integration and steady supply (CI/CD) pipelines may be distinctive and mirror every group’s wants, scaling MLOps practices throughout groups may be simplified through the use of managed orchestrations and instruments that may speed up the event course of and take away the undifferentiated heavy lifting.
Amazon SageMaker MLOps is a set of options that features Amazon SageMaker Projects (CI/CD), Amazon SageMaker Pipelines and Amazon SageMaker Model Registry.
SageMaker Pipelines permits for simple creation and administration of ML workflows, whereas additionally providing storage and reuse capabilities for workflow steps. The SageMaker Mannequin Registry centralizes mannequin monitoring, simplifying mannequin deployment. SageMaker Tasks introduces CI/CD practices to ML, together with surroundings parity, model management, testing, and automation. This enables for a fast institution of CI/CD in your ML surroundings, facilitating efficient scalability all through your enterprise.
The built-in project templates offered by Amazon SageMaker embody integration with a few of third-party instruments, akin to Jenkins for orchestration and GitHub for supply management, and several other make the most of AWS native CI/CD instruments akin to AWS CodeCommit, AWS CodePipeline, and AWS CodeBuild. In lots of situations, nonetheless, prospects wish to combine SageMaker Pipelines with different present CI/CD instruments and due to this fact, create their customized venture templates.
On this submit, we present you a step-by-step implementation to realize the next:
- Create a customized SageMaker MLOps venture template that integrates with GitHub and GitHub Actions
- Make your customized venture templates out there in Amazon SageMaker Studio on your information science workforce with one-click provisioning
Resolution overview
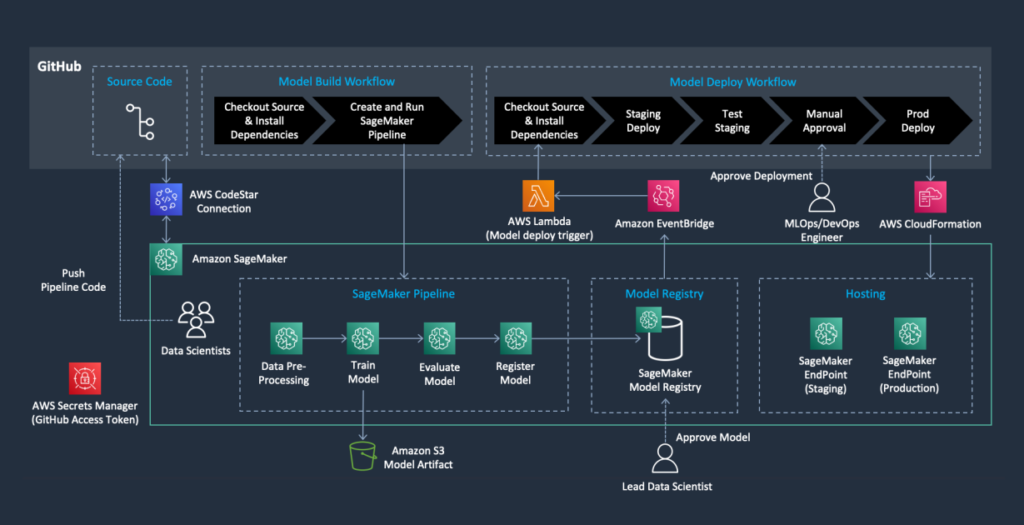
On this submit, we assemble the next structure. We create an automatic mannequin construct pipeline that features steps for information preparation, mannequin coaching, mannequin analysis, and registration of the educated mannequin within the SageMaker Mannequin Registry. The ensuing educated ML mannequin is then deployed from the SageMaker Mannequin Registry to staging and manufacturing environments upon handbook approval.

Let’s delve into the weather of this structure to grasp the whole configuration.
GitHub and GitHub Actions
GitHub is a web-based platform that gives model management and supply code administration utilizing Git. It permits groups to collaborate on software program improvement tasks, monitor modifications, and handle code repositories. GitHub serves as a centralized location to retailer, model, and handle your ML code base. This ensures that your ML code base and pipelines are versioned, documented, and accessible by workforce members.
GitHub Actions is a strong automation device inside the GitHub ecosystem. It lets you create customized workflows that automate your software program improvement lifecycle processes, akin to constructing, testing, and deploying code. You’ll be able to create event-driven workflows triggered by particular occasions, like when code is pushed to a repository or a pull request is created. When implementing MLOps, you need to use GitHub Actions to automate varied levels of the ML pipeline, akin to:
- Information validation and preprocessing
- Mannequin coaching and analysis
- Mannequin deployment and monitoring
- CI/CD for ML fashions
With GitHub Actions, you’ll be able to streamline your ML workflows and be sure that your fashions are constantly constructed, examined, and deployed, resulting in extra environment friendly and dependable ML deployments.
Within the following sections, we begin by organising the stipulations regarding a few of the parts that we use as a part of this structure:
- AWS CloudFormation – AWS CloudFormation initiates the mannequin deployment and establishes the SageMaker endpoints after the mannequin deployment pipeline is activated by the approval of the educated mannequin.
- AWS CodeStar connection – We use AWS CodeStar to determine a hyperlink with the GitHub repository and put it to use as code repo integration with AWS sources, like SageMaker Studio.
- Amazon EventBridge – Amazon EventBridge retains monitor of all modifications to the mannequin registry. It additionally maintains a rule that prompts the Lambda perform to deploy the mannequin pipeline when the standing of the mannequin bundle model modifications from
PendingManualApprovaltoAuthorisedinside the mannequin registry. - AWS Lambda – We use an AWS Lambda perform to provoke the mannequin deployment workflow in GitHub Actions after a brand new mannequin is registered within the mannequin registry.
- Amazon SageMaker – We configure the next SageMaker parts:
- Pipeline – This part consists of a directed acyclic graph (DAG) that helps us construct the automated ML workflow for the levels of knowledge preparation, mannequin coaching, and mannequin analysis. The mannequin registry maintains data of mannequin variations, their related artifacts, lineage, and metadata. A mannequin bundle group is established that homes all associated mannequin variations. The mannequin registry can be chargeable for managing the approval standing of the mannequin model for subsequent deployment.
- Endpoint – This part units up two HTTPS real-time endpoints for inference. The internet hosting configuration may be adjusted, as an illustration, for batch remodel or asynchronous inference. The staging endpoint is generated when the mannequin deployment pipeline is activated by the approval of the educated mannequin from the SageMaker Mannequin Registry. This endpoint is utilized to validate the deployed mannequin by making certain it gives predictions that fulfill our accuracy requirements. When the mannequin is ready for manufacturing deployment, a manufacturing endpoint is deployed by a handbook approval stage within the GitHub Actions workflow.
- Code repository – This creates a Git repository as a useful resource in your SageMaker account. Utilizing the prevailing information from the GitHub code repository that you just enter in the course of the creation of your SageMaker venture, an affiliation with the identical repository is established in SageMaker whenever you provoke the venture. This primarily varieties a hyperlink with a GitHub repository in SageMaker, enabling interactive actions (pull/push) together with your repository.
- Mannequin registry – This displays the varied variations of the mannequin and the corresponding artifacts, which incorporates lineage and metadata. A group often known as a mannequin bundle group is created, housing associated variations of the mannequin. Furthermore, the mannequin registry oversees the approval standing of the mannequin model, making certain its readiness for subsequent deployment.
- AWS Secrets and techniques Supervisor – To securely protect your GitHub private entry token, it’s essential to determine a secret in AWS Secrets Manager and home your entry token inside it.
- AWS Service Catalog – We use the AWS Service Catalog for the implementation of SageMaker tasks, which embody parts like a SageMaker code repository, Lambda perform, EventBridge rule, artifact S3 bucket, and so on., all applied by way of CloudFormation. This enables your group to make use of venture templates repeatedly, allocate tasks to every person, and streamline operations.
- Amazon S3 – We use an Amazon Simple Storage Service (Amazon S3) bucket to maintain the mannequin artifacts produced by the pipeline.
Conditions
You need to have the next stipulations:
You need to additionally full extra setup steps earlier than implementing the answer.
Arrange an AWS CodeStar connection
In the event you don’t have already got an AWS CodeStar connection to your GitHub account, seek advice from Create a connection to GitHub for directions to create one. Your AWS CodeStar connection ARN will appear to be this:
On this instance, aEXAMPLE-8aad-4d5d-8878-dfcab0bc441f is the distinctive ID for this connection. We use this ID after we create our SageMaker venture later on this instance.
Arrange secret entry keys on your GitHub token
To securely retailer your GitHub private entry token, you might want to create a secret in Secrets and techniques Supervisor. In the event you don’t have a private entry token for GitHub, seek advice from Managing your personal access tokens for directions to create one.
You’ll be able to create both a basic or fine-grained entry token. Nevertheless, ensure that the token has entry to the repository’s contents and actions (workflows, runs, and artifacts).
Full the next steps to retailer your token in Secrets and techniques Supervisor:
- On the Secrets and techniques Supervisor console, select Retailer a brand new secret.
- Choose Different sort of secret for Select secret sort.
- Present a reputation on your secret within the Key subject and add your private entry token to the corresponding Worth subject.
- Select Subsequent, enter a reputation on your secret, and select Subsequent once more.
- Select Retailer to save lots of your secret.
By storing your GitHub private entry token in Secrets and techniques Supervisor, you’ll be able to securely entry it inside your MLOps pipeline whereas making certain its confidentiality.
Create an IAM person for GitHub Actions
To permit GitHub Actions to deploy SageMaker endpoints in your AWS surroundings, you might want to create an AWS Identity and Access Management (IAM) person and grant it the mandatory permissions. For directions, seek advice from Creating an IAM user in your AWS account. Use the iam/GithubActionsMLOpsExecutionPolicy.json file (offered within the code sample) to supply ample permissions for this person to deploy your endpoints.
After you create the IAM person, generate an access key. You’ll use this key, which consists of each an entry key ID and a secret entry key, within the subsequent step when configuring your GitHub secrets and techniques.
Arrange your GitHub account
The next are the steps to organize your GitHub account to run this instance.
Clone the GitHub repository
You’ll be able to reuse an present GitHub repo for this instance. Nevertheless, it’s simpler if you happen to create a brand new repository. This repository goes to include all of the supply code for each SageMaker pipeline builds and deployments.
Copy the contents of the seed code listing into the basis of your GitHub repository. As an example, the .github listing needs to be beneath the basis of your GitHub repository.
Create a GitHub secret containing your IAM person entry key
On this step, we retailer the entry key particulars of the newly created person in our GitHub secret.
- On the GitHub web site, navigate to your repository and select Settings.
- Within the safety part, choose Secrets and techniques and Variables and select Actions.
- Select New Repository Secret.
- For Title, enter
AWS_ACCESS_KEY_ID - For Secret, enter the entry key ID related to the IAM person you created earlier.
- Select Add Secret.
- Repeat the identical process for
AWS_SECRET_ACCESS_KEY
Configure your GitHub environments
To create a handbook approval step in our deployment pipelines, we use a GitHub environment. Full the next steps:
- Navigate to the Settings, Environments menu of your GitHub repository and create a brand new surroundings referred to as manufacturing.
- For Setting safety guidelines, choose Required reviewers.
- Add the specified GitHub person names as reviewers. For this instance, you’ll be able to select your individual person identify.
Be aware that the surroundings function shouldn’t be out there in some forms of GitHub plans. For extra data, seek advice from Using environments for deployment.
Deploy the Lambda perform
Within the following steps, we compress lambda_function.py right into a .zip file, which is then uploaded to an S3 bucket.
The related code pattern for this may be discovered within the following GitHub repo. Particularly, the lambda_function.py is positioned within the lambda_functions/lambda_github_workflow_trigger listing.
It’s really useful to create a fork of the code pattern and clone that as an alternative. This offers you the liberty to change the code and experiment with totally different facets of the pattern.
- After you acquire a duplicate of the code, navigate to the suitable listing and use the
zipcommand to compresslambda_function.py. Each Home windows and MacOS customers can use their native file administration system, File Explorer or Finder, respectively, to generate a .zip file.
- Add the
lambda-github-workflow-trigger.zipto an S3 bucket.
This bucket will later be accessed by Service Catalog. You’ll be able to select any bucket that you’ve got entry to, so long as Service Catalog is ready to retrieve information from it in subsequent steps.
From this step onwards, we require the AWS CLI v2 to be put in and configured. Another can be to make the most of AWS CloudShell, which comes with all essential instruments pre-installed, eliminating the necessity for any extra configurations.
- To add the file to the S3 bucket, use the next command:
Now we assemble a Lambda layer for the dependencies associated to the lambda_function we simply uploaded.
- Arrange a Python digital surroundings and get the dependencies put in:
- Generate the .zip file with the next instructions:
- Publish the layer to AWS:
With this layer printed, all of your Lambda capabilities can now reference it to fulfill their dependencies. For a extra detailed understanding of Lambda layers, seek advice from Working with Lambda layers.
Create a customized venture template in SageMaker
After completion of all of the above steps, we have now all of the CI/CD pipeline sources and parts. Subsequent we reveal how we will make these sources out there as a customized venture inside the SageMaker Studio accessible by way of one click on deployment.
As mentioned earlier, when the SageMaker-provided templates don’t meet your wants (for instance, you need to have extra complicated orchestration in CodePipeline with a number of levels, customized approval steps or to combine with a 3rd occasion device akin to GitHub and GitHub actions demonstrated on this submit), you’ll be able to create your individual templates. We suggest beginning with the SageMaker-provided templates to grasp tips on how to set up your code and sources and construct on prime of it. For extra particulars, seek advice from Create Custom Project Templates.
Be aware that you could additionally automate this step and as an alternative use the CloudFormation to deploy the Service Catalogue portfolio and product by way of code. On this submit nonetheless, for a higher studying expertise, we present you the console deployment.
At this stage, we use the offered CloudFormation template to create a Service Catalog portfolio that helps us create customized tasks in SageMaker.
You’ll be able to create a brand new area or reuse your SageMaker area for the next steps. In the event you don’t have a website, seek advice from Onboard to Amazon SageMaker Domain using Quick setup for setup directions.
After you allow administrator entry to the SageMaker templates, full the next steps:
- On the Service Catalog console, beneath Administration within the navigation pane, select Portfolios.
- Select Create a brand new portfolio.
- Title the portfolio “SageMaker Group Templates”.
- Obtain the template.yml file to your laptop.
This Cloud Formation template provisions all of the CI/CD sources we’d like as configuration and infrastructure as code. You’ll be able to research the template in additional element to see what sources are deployed as a part of it. This template has been custom-made to combine with GitHub and GitHub Actions.
- Within the
template.ymlfile, change theS3Bucketworth to your bucket the place you’ve gotten uploaded the Lambda .zip file:
- Select the brand new portfolio.
- Select Add a brand new product.
- For Product identify¸ enter a reputation on your template. We use the identify
build-deploy-github. - For Description, enter an outline.
- For Proprietor, enter your identify.
- Beneath Model particulars, for Methodology, select Use a template file.
- Select Add a template.
- Add the template you downloaded.
- For Model title, select 1.0.
- Select Evaluate.
- Evaluate your settings and select Create product.
- Select Refresh to record the brand new product.
- Select the product you simply created.
- On the Tags tab, add the next tag to the product:
- Key =
sagemaker:studio-visibility - Worth =
true
- Key =
Again within the portfolio particulars, it’s best to see one thing just like the next screenshot (with totally different IDs).

- On the Constraints tab, select Create constraint.
- For Product, select
build-deploy-github(the product you simply created). - For Constraint sort, select Launch.
- Beneath Launch constraint, for Methodology, select Choose IAM position.
- Select
AmazonSageMakerServiceCatalogProductsLaunchRole. - Select Create.
- On the Teams, roles, and customers tab, select Add teams, roles, customers.
- On the Roles tab, choose the position you used when configuring your SageMaker Studio area. That is the place the SageMaker area position may be discovered.

- Select Add entry.
Deploy the venture from SageMaker Studio
Within the earlier sections, you ready the customized MLOps venture surroundings. Now, let’s create a venture utilizing this template:
- On the SageMaker console, navigate to the area that you just need to create this venture.
- On the Launch menu, select Studio.
You’ll be redirected to the SageMaker Studio surroundings.
- In SageMaker Studio, within the navigation pane beneath Deployments, select Tasks.
- Select Create venture.
- On the prime of the record of templates, select Group templates.
You probably have gone via all of the earlier steps efficiently, it’s best to have the ability to see a brand new customized venture template named Construct-Deploy-GitHub.
- Choose that template and select Choose Mission Template.
- Enter an non-compulsory description.
- For GitHub Repository Proprietor Title, enter the proprietor of your GitHub repository. For instance, in case your repository is at
https://github.com/pooyavahidi/my-repo, the proprietor can bepooyavahidi. - For GitHub Repository Title, enter the identify of the repository into which you copied the seed code. It will be simply the identify of the repo. For instance, in
https://github.com/pooyavahidi/my-repo, the repo ismy-repo. - For Codestar connection distinctive ID, enter the distinctive ID of the AWS CodeStar connection that you just created.
- For Title of the key within the Secrets and techniques Supervisor which shops GitHub token, enter the identify of the key in Secrets and techniques Supervisor the place you created and saved the GitHub token.
- For GitHub workflow file for deployment, enter the identify of the GitHub workflow file (at
.github/workflows/deploy.yml) the place you’ve gotten the deployment directions. For this instance, you’ll be able to preserve it as default, which isdeploy.yml. - Select Create venture.

- After creating your venture, ensure you replace the
AWS_REGIONandSAGEMAKER_PROJECT_NAMEsurroundings variables in your GitHub workflow recordsdata accordingly. Workflow recordsdata are in your GitHub repo (copied from the seed code), contained in the.github/workflowslisting. Be sure you replace eachconstruct.ymlanddeploy.ymlrecordsdata.
Now your surroundings is able to go! You’ll be able to run the pipelines immediately, make modifications, and push these modifications to your GitHub repository to set off the automated construct pipeline and see how all of the steps of construct and deploy are automated.
Clear up
To wash up the sources, full the next steps:
- Delete the CloudFormation stacks used for the SageMaker venture and SageMaker endpoints.
- Delete the SageMaker area.
- Delete the Service Catalog sources.
- Delete the AWS CodeStar connection hyperlink with the GitHub repository.
- Delete the IAM person that you just created for GitHub Actions.
- Delete the key in Secrets and techniques Supervisor that shops the GitHub private entry particulars.
Abstract
On this submit, we walked via the method of utilizing a customized SageMaker MLOps venture template to routinely assemble and set up a CI/CD pipeline. This pipeline successfully integrates your present CI/CD mechanisms with SageMaker capabilities for information manipulation, mannequin coaching, mannequin approval, and mannequin deployment. In our state of affairs, we centered on integrating GitHub Actions with SageMaker tasks and pipelines. For a complete understanding of the implementation particulars, go to the GitHub repository. Be happy to experiment with this and don’t hesitate to go away any queries you might need within the feedback part.
In regards to the Authors
 Dr. Romina Sharifpour is a Senior Machine Studying and Synthetic Intelligence Options Architect at Amazon Internet Companies (AWS). She has spent over 10 years main the design and implementation of modern end-to-end options enabled by developments in ML and AI. Romina’s areas of curiosity are pure language processing, giant language fashions, and MLOps.
 Pooya Vahidi is a Senior Options Architect at AWS, enthusiastic about laptop science, synthetic intelligence, and cloud computing. As an AI skilled, he’s an energetic member of the AWS AI/ML Space-of-Depth workforce. With a background spanning over twenty years of experience in main the structure and engineering of large-scale options, he helps prospects on their transformative journeys via cloud and AI/ML applied sciences.